Cum să creezi o pagină de destinație pentru plăți Stripe în WordPress
Ultima actualizare la

Doriți să învățați cum să creați o pagină personalizată de checkout / plată pentru site-ul dvs. WordPress?
Crearea unei pagini de destinație fără distrageri, unde clienții sau donatorii dvs. pot finaliza plățile, este o modalitate excelentă de a crește ratele de conversie. În plus, paginile de destinație personalizate cu imagini și logo-ul dvs. pot contribui la creșterea notorietății mărcii. Din fericire, cu instrumentul potrivit, puteți adăuga cu ușurință pagini de destinație dedicate care găzduiesc plăți Stripe pe site-ul dvs.
În acest articol, vă vom arăta cea mai bună modalitate de a crea o pagină de destinație personalizată pentru plățile Stripe în WordPress.
Crearea unei pagini de destinație pentru plăți Stripe
O pagină de plată dedicată asigură conversii ridicate, deoarece elimină fricțiunea inutilă de pe pagină, cum ar fi anteturi, subsoluri și multe altele, indiferent de tema WordPress pe care o utilizați.
Cea mai ușoară modalitate de a crea pagini de destinație dedicate pentru checkout pe site-ul dvs. este să utilizați un plugin pentru plăți Stripe pentru WordPress care acceptă pagini de destinație personalizate.
Cu WP Simple Pay, pluginul numărul 1 pentru plăți Stripe, puteți crea pagini de destinație de marcă pentru formularele dvs. de plată, fără a scrie cod. Unul dintre cele mai bune aspecte ale pluginului este că vă permite să personalizați mesajele de confirmare a plății pentru formularele individuale de plată, pentru a îmbunătăți comunicarea cu clienții dvs. și pentru a ajuta la eficientizarea oricăror pași post-cumpărare care sunt necesari.
Cu WP Simple Pay, puteți, de asemenea:
- Acceptați multiple metode de plată: Oferiți metode de plată preferate pentru a vă extinde acoperirea și a vă lărgi baza de clienți. Metodele de plată includ Cash App Pay, Apple Pay / Google Pay / Microsoft Pay, ACH Direct Debit, carduri de credit și debit, Alipay și multe altele.
- Creați e-mailuri per formular: Trimiteți automat clienților sau donatorilor dvs. e-mailuri personalizate de confirmare a plății pentru formulare individuale.
- Creați formulare de plată în câteva minute: Utilizați șabloane de formulare de plată predefinite și un constructor avansat de formulare de plată drag-and-drop pentru a începe să colectați plăți pe site-ul dvs. în câteva minute.
- Eliminați taxa de procesare Stripe de 3%: Transfereți taxa suplimentară de procesare Stripe clienților dvs. pentru a colecta suma integrală a plății.
- Și multe altele…
Eliminați taxa suplimentară de 3%!
Majoritatea pluginurilor Stripe percep o taxă suplimentară de 3% pentru FIECARE tranzacție
…nu și WP Simple Pay Pro!
Iată câteva beneficii ale utilizării unei pagini de plată pe site-ul dvs.
- Creșteți conversiile: Cu o pagină de plată dedicată, puteți elimina toate elementele inutile care împiedică vizitatorii dvs. să efectueze o plată.
- Independentă de tema dvs.: Niciunul dintre elementele temei dvs., inclusiv antetul, subsolul și meniul de navigare, nu va fi utilizat pe pagina dvs. personalizată de plată. Acest lucru vă oferă oportunități infinite de a optimiza pagina pentru conversii ridicate, fără a angaja un dezvoltator.
- Personalizabil: Cu WP Simple Pay, puteți adăuga cu ușurință logo-ul dvs., un antet personalizat și multe altele, fără a atinge o singură linie de cod.
Cum să creezi o pagină de destinație pentru plăți Stripe
Pasul 1: Instalați WP Simple Pay pentru a crea o pagină de plată
Pentru a crea o pagină de destinație pentru plăți pe site-ul dvs., primul lucru pe care va trebui să îl faceți este să instalați și să activați WP Simple Pay. Pentru a instala pluginul, navigați la pagina de prețuri și selectați un plan care se potrivește nevoilor dvs. Apoi descărcați pluginul din contul dvs. WP Simple Pay sau din e-mailul de confirmare a plății. Apoi, instalați-l în WordPress.
Pentru mai multe detalii, consultați acest ghid pas cu pas despre cum să instalați WP Simple Pay.
După ce ați terminat activarea pluginului, veți fi direcționat către expertul de configurare. Expertul de configurare vă permite să configurați un cont Stripe dacă nu aveți deja unul și să îl conectați la site-ul dvs. fără a fi nevoie să introduceți manual cheile API.

Dacă nu ați văzut expertul de configurare, pur și simplu accesați fila WP Simple Pay » Setări » Avansat și faceți clic pe butonul Lansare Expert de configurare.
2: Conectați WordPress la Stripe
Pentru a conecta site-ul dvs. WordPress la Stripe, faceți clic pe Conectare cu Stripe.

În continuare, introduceți adresa de e-mail pe care o utilizați pentru contul dvs. Stripe și conectați-o la site-ul dvs. Dacă nu aveți un cont Stripe, îl puteți crea cu ușurință introducând adresa de e-mail și completând înregistrarea.
După finalizarea acestui proces, vi se va afișa o pagină de succes pe care scrie „Configurare finalizată”. Apoi, faceți clic pe Creare formular de plată.

Pasul 3: Creați un formular de plată Stripe
Acum că ați instalat și activat WP Simple Pay pe site-ul dvs. WordPress, este timpul să creați o pagină de plată.
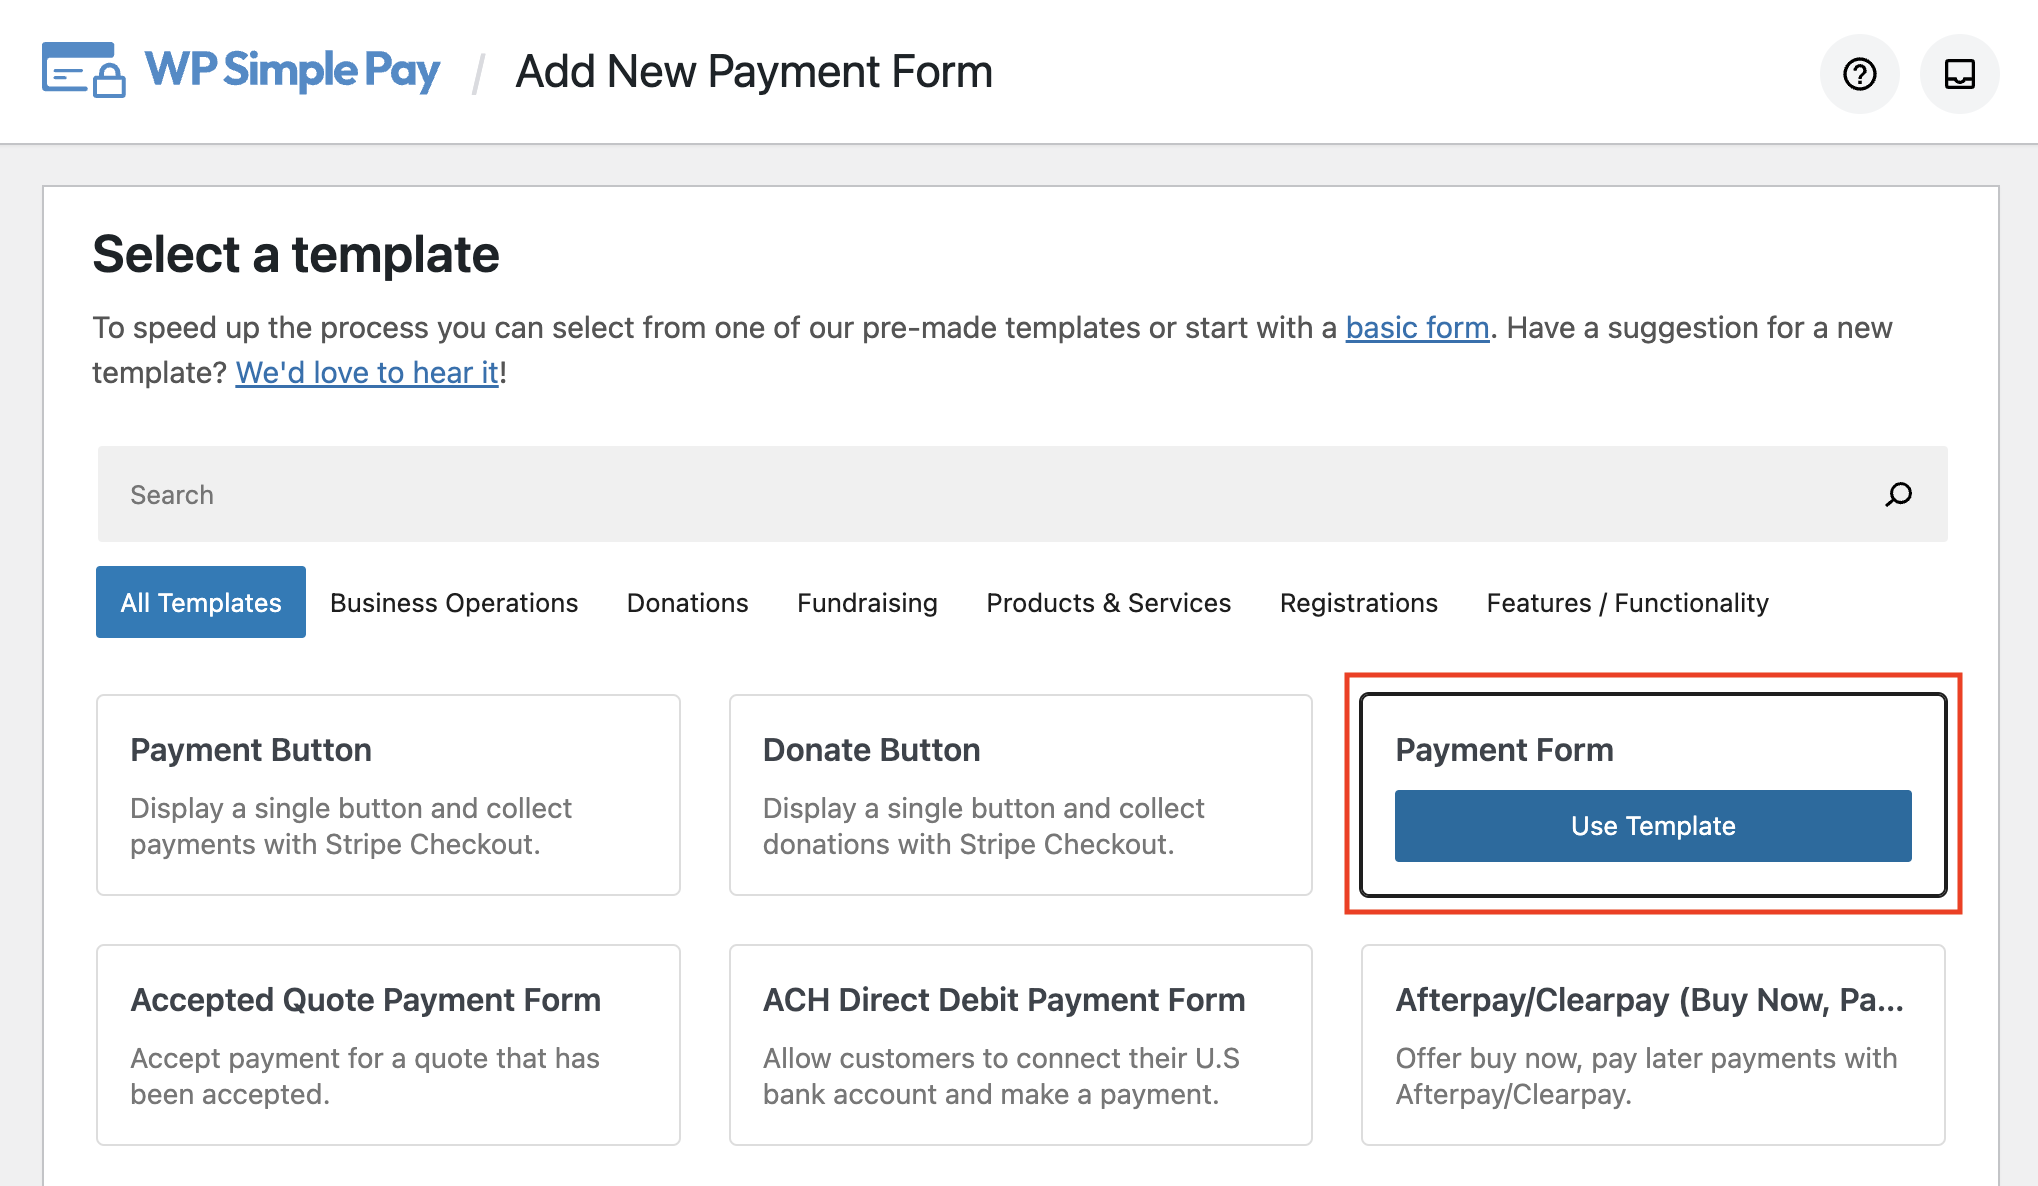
Ar trebui să fiți direcționat către o listă completă de șabloane de formulare de plată pre-construite. Dacă nu sunteți încă pe această pagină, navigați pur și simplu la WP Simple Pay » Adăugare Nou.
Deși puteți alege orice șablon de formular în funcție de nevoile dvs., în scopul acestui tutorial, vom selecta șablonul de bază Formular de plată.
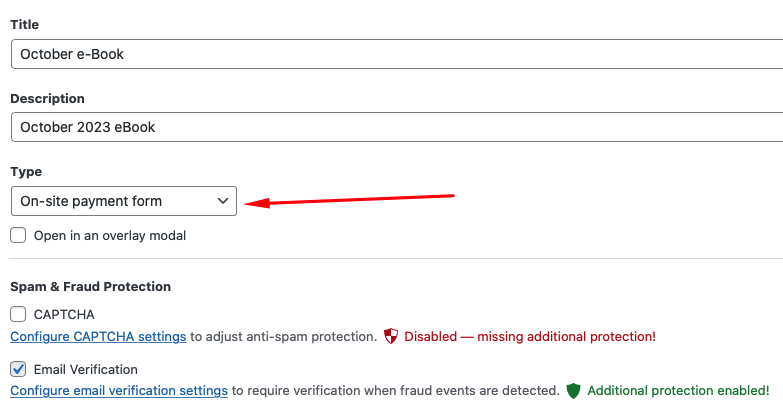
Apoi, vi se va solicita să introduceți titlul și descrierea formularului dvs. de plată. Asigurați-vă că selectați și Formular de plată pe site pentru a vă asigura că clienții dvs. finalizează achizițiile direct pe site-ul dvs.
Notă: Dacă alegeți Formular de checkout Stripe în afara site-ului pentru Tip, vizitatorii dvs. vor fi redirecționați către o pagină de checkout găzduită de Stripe.
Pentru pagina de succes a plății, dacă nu doriți să utilizați pagina implicită configurată în setările pluginului, alegeți Pagină specifică. Alternativ, dacă doriți să redirecționați utilizatorii către un site extern, alegeți URL de redirecționare.
Pentru a configura setările de plată, să alegem opțiunea Plată din stânga. Aici, puteți adăuga noi opțiuni de preț și puteți personaliza cele existente. Pe lângă alegerea unei sume, puteți schimba și moneda și chiar puteți alege între plăți unice sau abonamente.
Rețineți că odată ce formularul este publicat, nu veți mai putea să îl personalizați. Deci, deocamdată, NU schimbați modul de plată în Modul Live până când nu previzualizați și testați formularul.
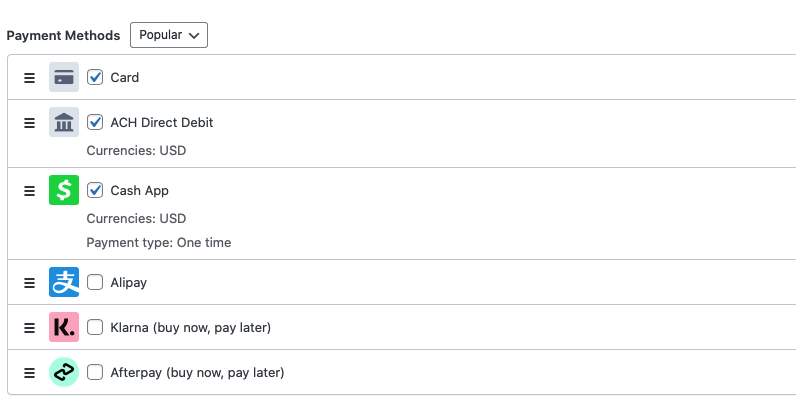
Nu ezitați să activați oricâte metode de plată doriți în secțiunea Metode de plată. Este cel mai bine să oferiți mai multe metode de plată pentru a vă asigura că nu excludeți potențiali clienți.
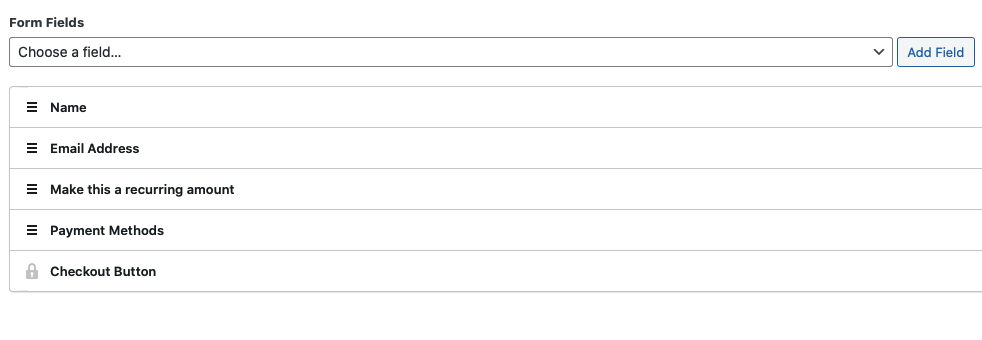
Apoi, faceți clic pe opțiunea Câmpuri formular din partea stângă. Aici, puteți adăuga, elimina sau edita orice câmpuri de formular existente.
Pasul 4: Creați o pagină de plată/checkout Stripe
Pentru a crea pagina de plată Stripe, selectați Pagină de plată din partea stângă.
Apoi, selectați caseta de selectare Activați o pagină de plată dedicată.
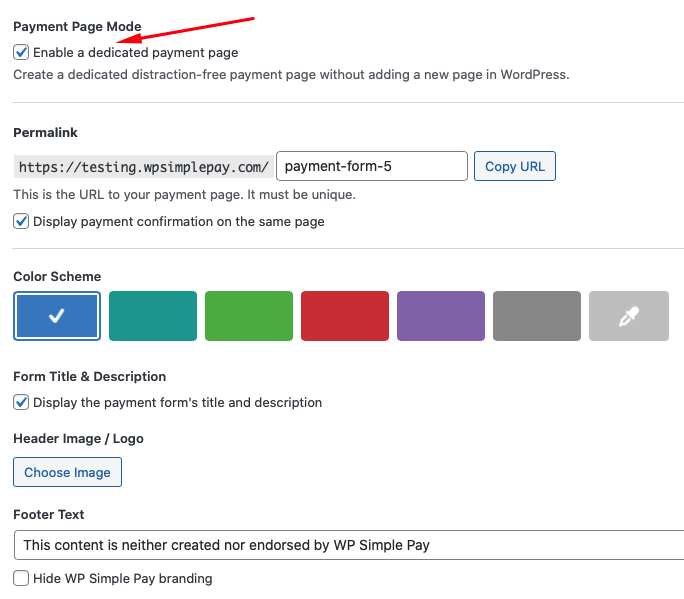
Imediat ce faceți clic pe caseta de selectare, vi se va solicita să specificați URL-ul paginii dvs. de plată, o schemă de culori pentru fundal și o imagine de antet sau un logo. De asemenea, puteți alege să afișați sau să ascundeți titlul și descrierea formularului dvs. de plată pe pagină.
Asigurați-vă că debifați caseta de lângă Afișați confirmarea plății pe aceeași pagină. Pentru acest tutorial, vom crea un mesaj personalizat de confirmare a plății, legat de acest formular specific.
Continuați și faceți clic pe opțiunea Pagină de confirmare din partea stângă. Aici, puteți introduce un mesaj personalizat de confirmare a plății pe care clienții dvs. îl vor vedea după o plată reușită.

După ce ați introdus mesajul personalizat de confirmare a plății în câmpul de text furnizat, asigurați-vă că faceți clic pe Publicați după ce ați previzualizat formularul.
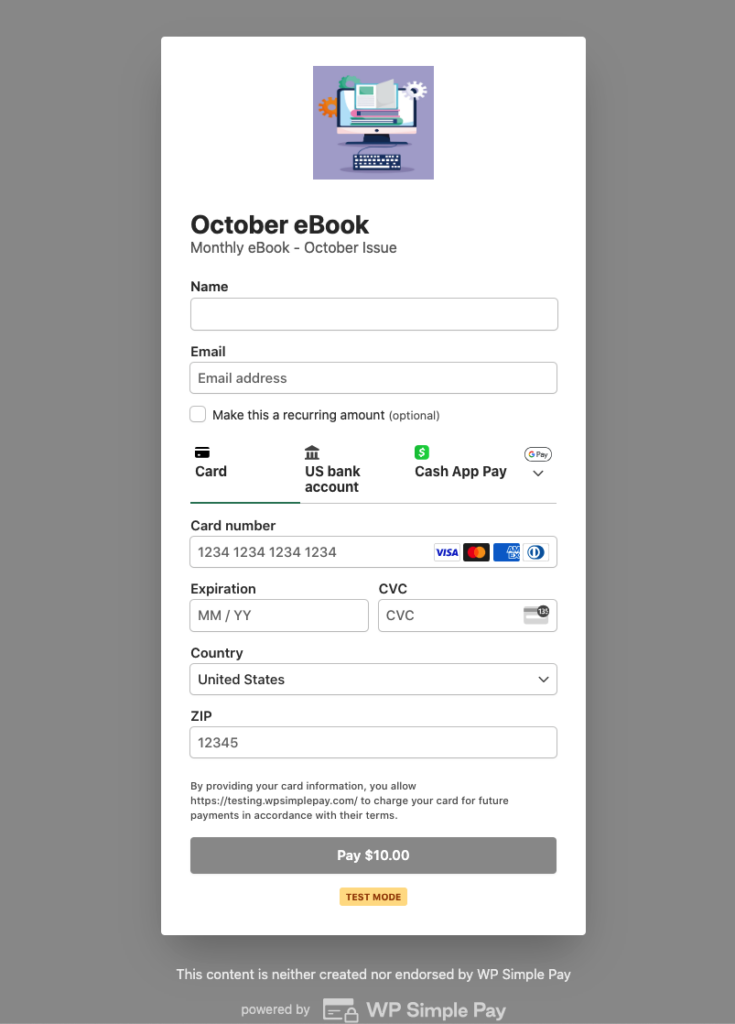
După ce ați publicat formularul, puteți verifica pagina de destinație live accesând URL-ul pe care l-ați creat în editorul Pagina de plată.
Mai jos este pagina de destinație dedicată pe care tocmai am creat-o.
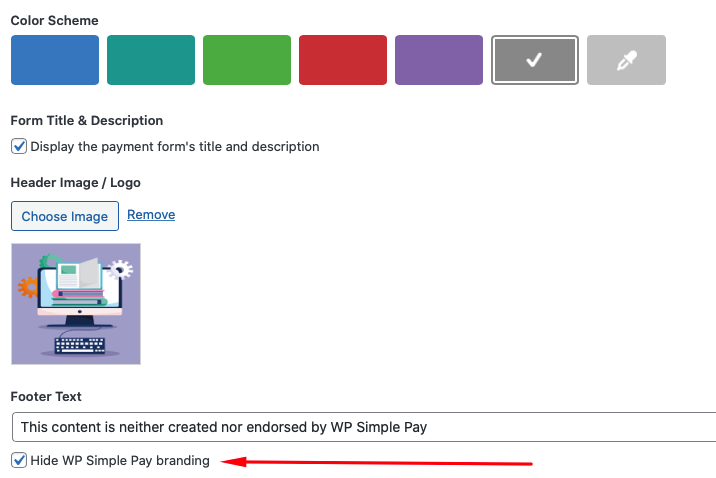
Dacă decideți că doriți să eliminați marca WP Simple Pay de pe pagina de destinație, aveți întotdeauna opțiunea de a bifa caseta de lângă Ascunde marca WP Simple Pay în editorul Pagina de plată.
Atât!
Sperăm că ați învățat cum să creați o pagină personalizată de plată/checkout Stripe în WordPress.
Dacă v-a plăcut acest articol, s-ar putea să doriți să consultați și ghidurile noastre următoare:
- Cum să acceptați Google Pay / Apple Pay / Microsoft Pay în WordPress
- Cum să acceptați plăți „cumpără acum, plătește mai târziu” în WordPress
- Cum să acceptați plăți recurente cu WordPress
Ce mai așteptați? Începeți astăzi cu WP Simple Pay!
Pentru a citi mai multe articole ca acesta, urmăriți-ne pe X.
Dezvăluire: Conținutul nostru este susținut de cititori. Acest lucru înseamnă că dacă faceți clic pe unele dintre linkurile noastre, este posibil să câștigăm un comision. Recomandăm doar produse despre care credem că vor adăuga valoare cititorilor noștri.


Lasă un răspuns