
How to Create an Event Registration Form with Multiple Price & Quantity Options
Last updated on

 Spencer Finnell
Do you want to create an event registration form that offers multiple price and quantity options in one transaction for your WordPress site?
Hosting an event is a complex process with several moving parts. Whether you’re hosting an in-person event at a venue or an online event like a webinar, it’s easy to miss key details that can negatively impact your guests’ experience as well as your revenue.
In addition, creating a convenient and flexible checkout experience for registrants that allows them to purchase multiple registrations and any additional items in one transaction is key to achieving a successful turnout rate.
In this article, we’ll show you how to easily create event registration forms with multiple price and quantity options to help you boost attendance, keep track of signups, accept payments, and collect guest data.
How to Make Event Registration Forms
Creating an event registration form is a key way to automate much of the registration process. It lets your guests register, pay for their admission, and submit any relevant information.
When done right, event registration forms eliminate the need to manually sign up guests or collect a single payment.
When it comes to making an event registration form for your site, the best way to use a Stripe payments plugin for WordPress that lets you accept payments for events and collect and store your guest’s information.
WP Simple Pay is the #1 Stripe payments plugin for WordPress. It lets you create registration forms for several different types of events. One of the best parts about the plugin is that you can also create personalized confirmation email messages regarding the event. You can also use it to offer different registration pricing options and additional items and set up restrictions that prevent overbooking.
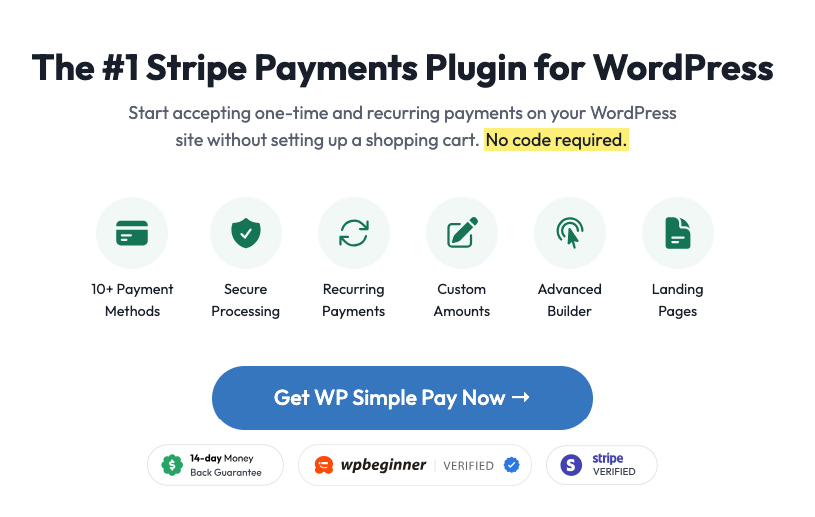
A few additional features include:
- [NEW] Itemized Payment Receipts: Easily create an itemized payment confirmation receipt with a breakdown of the items purchased.
- 10+ Payment Methods: Boost event registrations by offering the most popular payment methods, including credit and debit cards, ACH Direct Debit, digital wallets, Buy Now, Pay Later, and more.
- Per-Form Confirmation Emails: Send registrants personalized email confirmations that provide them with information regarding the event.
- Purchase Restrictions: Control when your registration form starts and stops accepting new registrants to prevent overbooking.
- Pre-Built Templates: Create event registration forms quickly using one of the pre-built form templates.
- And more…
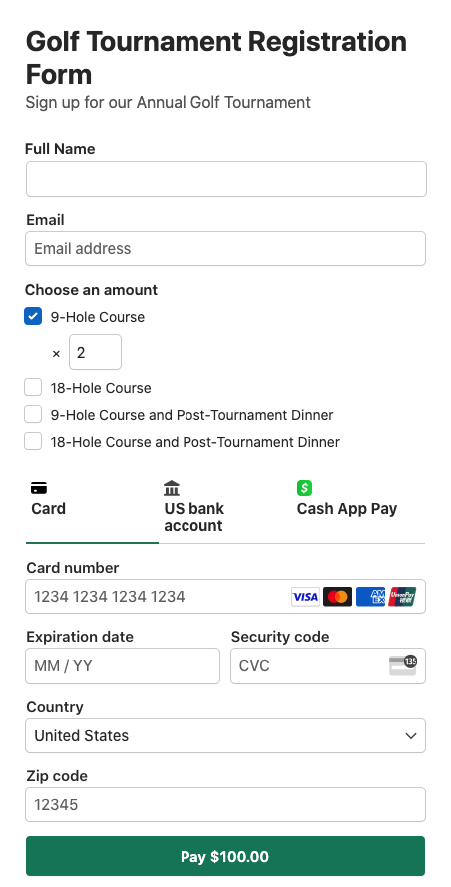
For the purpose of this tutorial, we’ll be creating the following form:
Step 1: Install and Activate WP Simple Pay
If you haven’t already installed and activated WP Simple Pay on your WordPress site, you’ll need to do so to create an event registration form with multiple pricing and quantity options.
All you need to do is visit the plugin’s pricing page and choose the best plan for your needs. Then, simply locate the .Zip file from your email confirmation and upload it on your site.
For more information, see our step-by-step guide on how to install WP Simple Pay.
After activating the plugin, you can go ahead and connect your Stripe account with WP Simple Pay.
The setup wizard makes it easy to set up a Stripe account and connect it to your site. In the setup wizard, click Let’s Get Started.

If you didn’t see the setup wizard, simply head over to WP Simple Pay » Settings » Advanced tab and click the Launch Setup Wizard button.
2: Connect WordPress to Stripe
To connect your WordPress site to Stripe, click on Connect with Stripe.

Next up, enter the email address you use for your Stripe account and connect it to your site. If you don’t have a Stripe account, you can easily create one by entering your email address and completing the registration.
Upon completing this process, you’ll be shown a success page that says, “Setup Complete.” Next, click on Create a Payment Form.

Step 3: Create an Event Registration Form
Now that you’ve connected your site to Stripe, let’s create an event registration payment form that offers multiple price and quantity options.
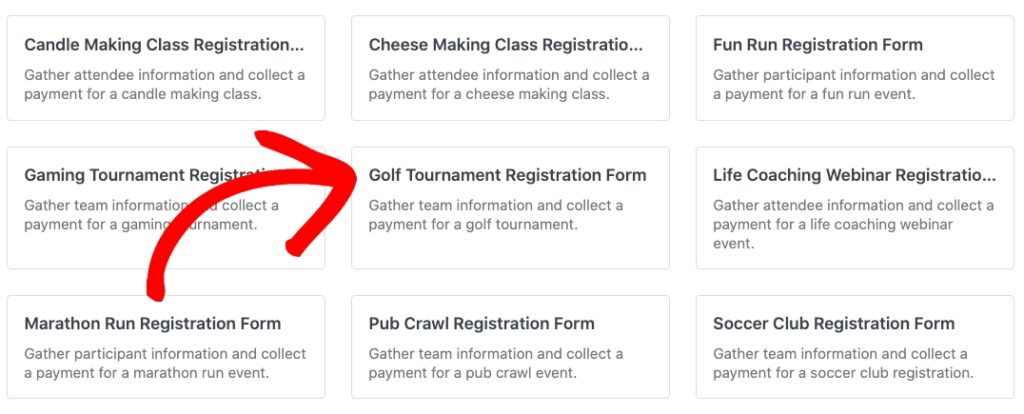
As soon as you click the Create a Payment Form button in the setup wizard, you’ll be able to choose from a variety of pre-built templates.
Click on the Registrations tab to see all of the available pre-built registration templates. For this tutorial, go ahead and choose Golf Tournament Registration Form.
Once you’ve selected the template, you can enter the title and description of your form in the General tab. Then, choose On-site payment form for the Type. This will ensure that your form is hosted directly on your site.

Next, in the Payment tab, make sure One time Amount is chosen if you have a specific price you expect guests to pay.
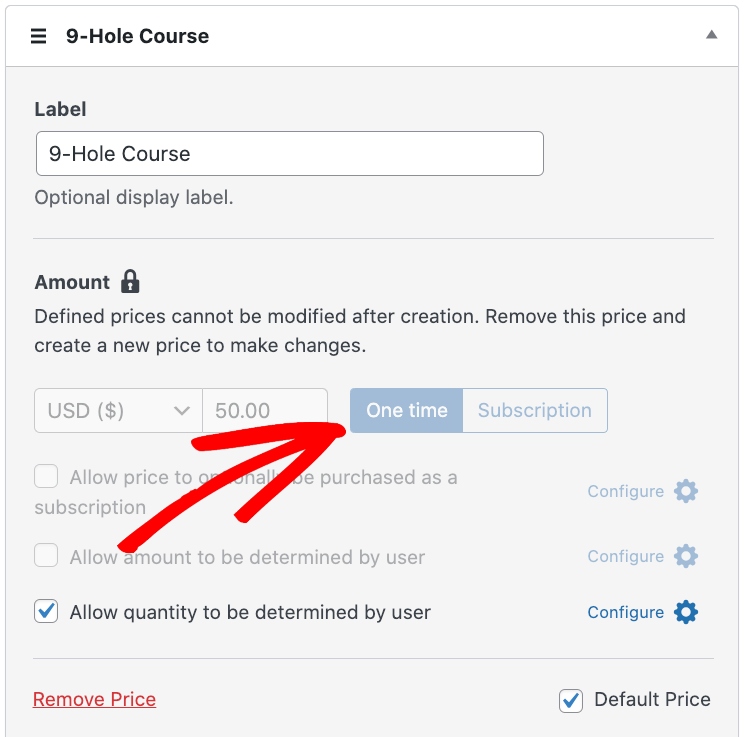
If you want to let guests choose how much they’ll pay, select the checkbox that says Allow amount to be determined by user.
Finally, to set up different price amounts and multiple quantity options, check the box that says Allow quantity to be determined by user for each price amount.
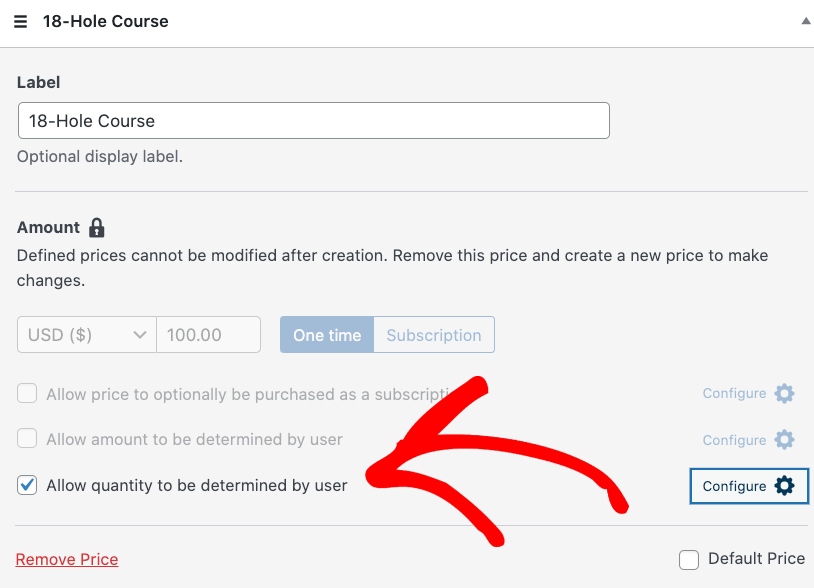
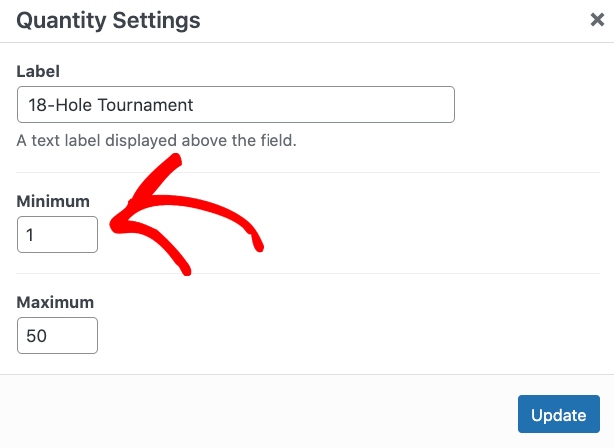
Next, to set up purchase limits, simply click on the Configure button and enter the custom limits.
Step 4: Add Custom Fields
Unlike other types of payment forms, event registration ones can be quite long. You may have several questions to ask your guests.
To get started, simply add the fields you absolutely need to process a payment: Full Name, Email, Payment Methods, and a Checkout Button.

To learn more, see our detailed guide on how to collect customer data during checkout.
Next, go ahead and add any fields related to your event. For example, if you plan to give out t-shirts to guests, you’ll want to add a Radio Select field that asks for their size. When you add a new field to the form, simply click on it to expand and configure its options.
What other fields should you add?
- Phone number
- Physical address (if you have to mail them anything, such as hard passes)
- Emergency contact (in case people travel alone to your event)
- Social media usernames (so you can engage with them before and after the event)
Your event registration form is also a great place to gather some extra data about your guests. You can use this information to create an event that better suits their wants and needs. For example, here are some questions you might ask.
- Why are you attending our event?
- Where did you hear about this event?
- What kinds of food and drinks do you like?
- What do you hope to learn or accomplish?
- What kind of entertainment do you enjoy?
Let’s say an overwhelming number of guests submit that they hope to make connections with like-minded people. You might use this information to change your event’s format so there’s more face-to-face communication between guests.
Once you’ve added all the fields you need, click and drag them around until they appear in the order you want them to appear on the form. then, click Publish to save your form.
Step 5: Embed the Form on a Page
After publishing the form, the next step is to embed it on a page so prospective guests can access it.
Make sure you test the form first before it goes live.
To embed the form, go to the post or page where you want to publish it. Then click on the + icon to add the WP Simple Pay block. Then, choose the form you just created and click Publish or Update.

Now that your event registration form is available on your page, it’s time to move on to other tasks, like promoting your event and driving traffic to your event registration page.
We hope this article has helped you learn how to easily create an event registration form with multiple price and quantity options for your WordPress site.
If you liked this article, you might also want to check out our guide on how to limit purchase quantities in WordPress.
What are you waiting for? Get started with WP Simple Pay today!
To read more articles like this, follow us on X.
Disclosure: Our content is reader-supported. This means if you click on some of our links, then we may earn a commission. We only recommend products that we believe will add value to our readers.

