
How to Accept Payments During a Set Date Range in WordPress
Last updated on

Are you looking to accept payments during a specific date range in WordPress?
Having control over the start/end date and time of when your site accepts online payments is a great solution for time-sensitive events such as registrations. Accepting payments during a specific date range also ensures that you don’t oversell products with limited availability.
In this article, we’ll show you how to easily accept payments during a set date range in WordPress so you can prevent overbooking events or overselling products that are no longer available.
Why Set Up a Payment Collection Schedule?
Configuring when your site starts and stops accepting payments in advance is a great solution for events as well as limited edition products and services.
For example, online registration for an event such as a webinar may only need to be available for purchase a few weeks leading up to the live event. Scheduling payment collection for the event to meet your exact needs can help prevent overselling available spots.
Accepting Payments During a Specific Date Range
WP Simple Pay is the best Stripe payments plugin for WordPress that allows you to accept payments on your site for all types of products, services, and events.
One of the best parts about WP Simple Pay is that it lets you customize your payment forms to accept payments during a set date range.
Additional features of WP Simple Pay include:
- Inventory Limits: Control the number of transactions a payment form can accept to manage fundraising goals and products with limited availability.
- Accepts 10+ payment methods: Increase conversions by offering customers more ways to pay, including ACH direct debit, credit/debit cards, and Apple Pay / Google Pay.
- Advanced Custom Form Fields: Ask your customers a number of customized questions using dropdown menus, checkboxes, and text fields.
- Pre-made Form Templates: Create payment forms in minutes using a pre-made form that best suits your needs, including forms for event registrations.
- And more…
Remove the additional 3% fee!
Most Stripe plugins charge an additional 3% fee for EVERY transaction
…not WP Simple Pay Pro!
Step 1: Install and Activate WP Simple Pay
To start accepting payments during a specific date range, the first thing you’ll need to do is install and activate WP Simple Pay.
The easiest way to do this is going to the pricing page, choosing a plan based on your needs, and creating a WP Simple Pay account.
Next, download the plugin from your account or your email purchase receipt. Then, simply navigate to Plugins » Add New » Upload Plugin in your WordPress admin dashboard. Click Choose File and find the WP Simple Pay .zip file on your computer. Click Install Now. Once the upload is complete, click on the Activate Plugin button.
For instructions, check out our detailed guide on how to install WP Simple Pay.
After you’ve activated the plugin in WordPress, you’ll need to connect your Stripe account to your site by following the steps in the setup wizard.
Don’t worry if you’re not familiar with Stripe or don’t have an account yet. With Stripe Connect, you can easily integrate your Stripe account with your site. The setup wizard will even walk you through how to create a new Stripe account if you don’t already have one.
Step 2: Connect WordPress to Stripe
To connect your WordPress site to Stripe, click Connect with Stripe.

Next up, enter the email address you use for your Stripe account and connect it with your site. If you don’t have a Stripe account, you can easily create one by entering your email address and completing registration.

Upon completing this process, you’ll be shown a success page that says Setup Complete. Next, to create a payment form, click on the Create a Payment Form button.

Step 3: Create a Payment Form
So far, you’ve downloaded, installed, and activated WP Simple Pay in WordPress, connected your Stripe account, and clicked on Create a Payment Form.
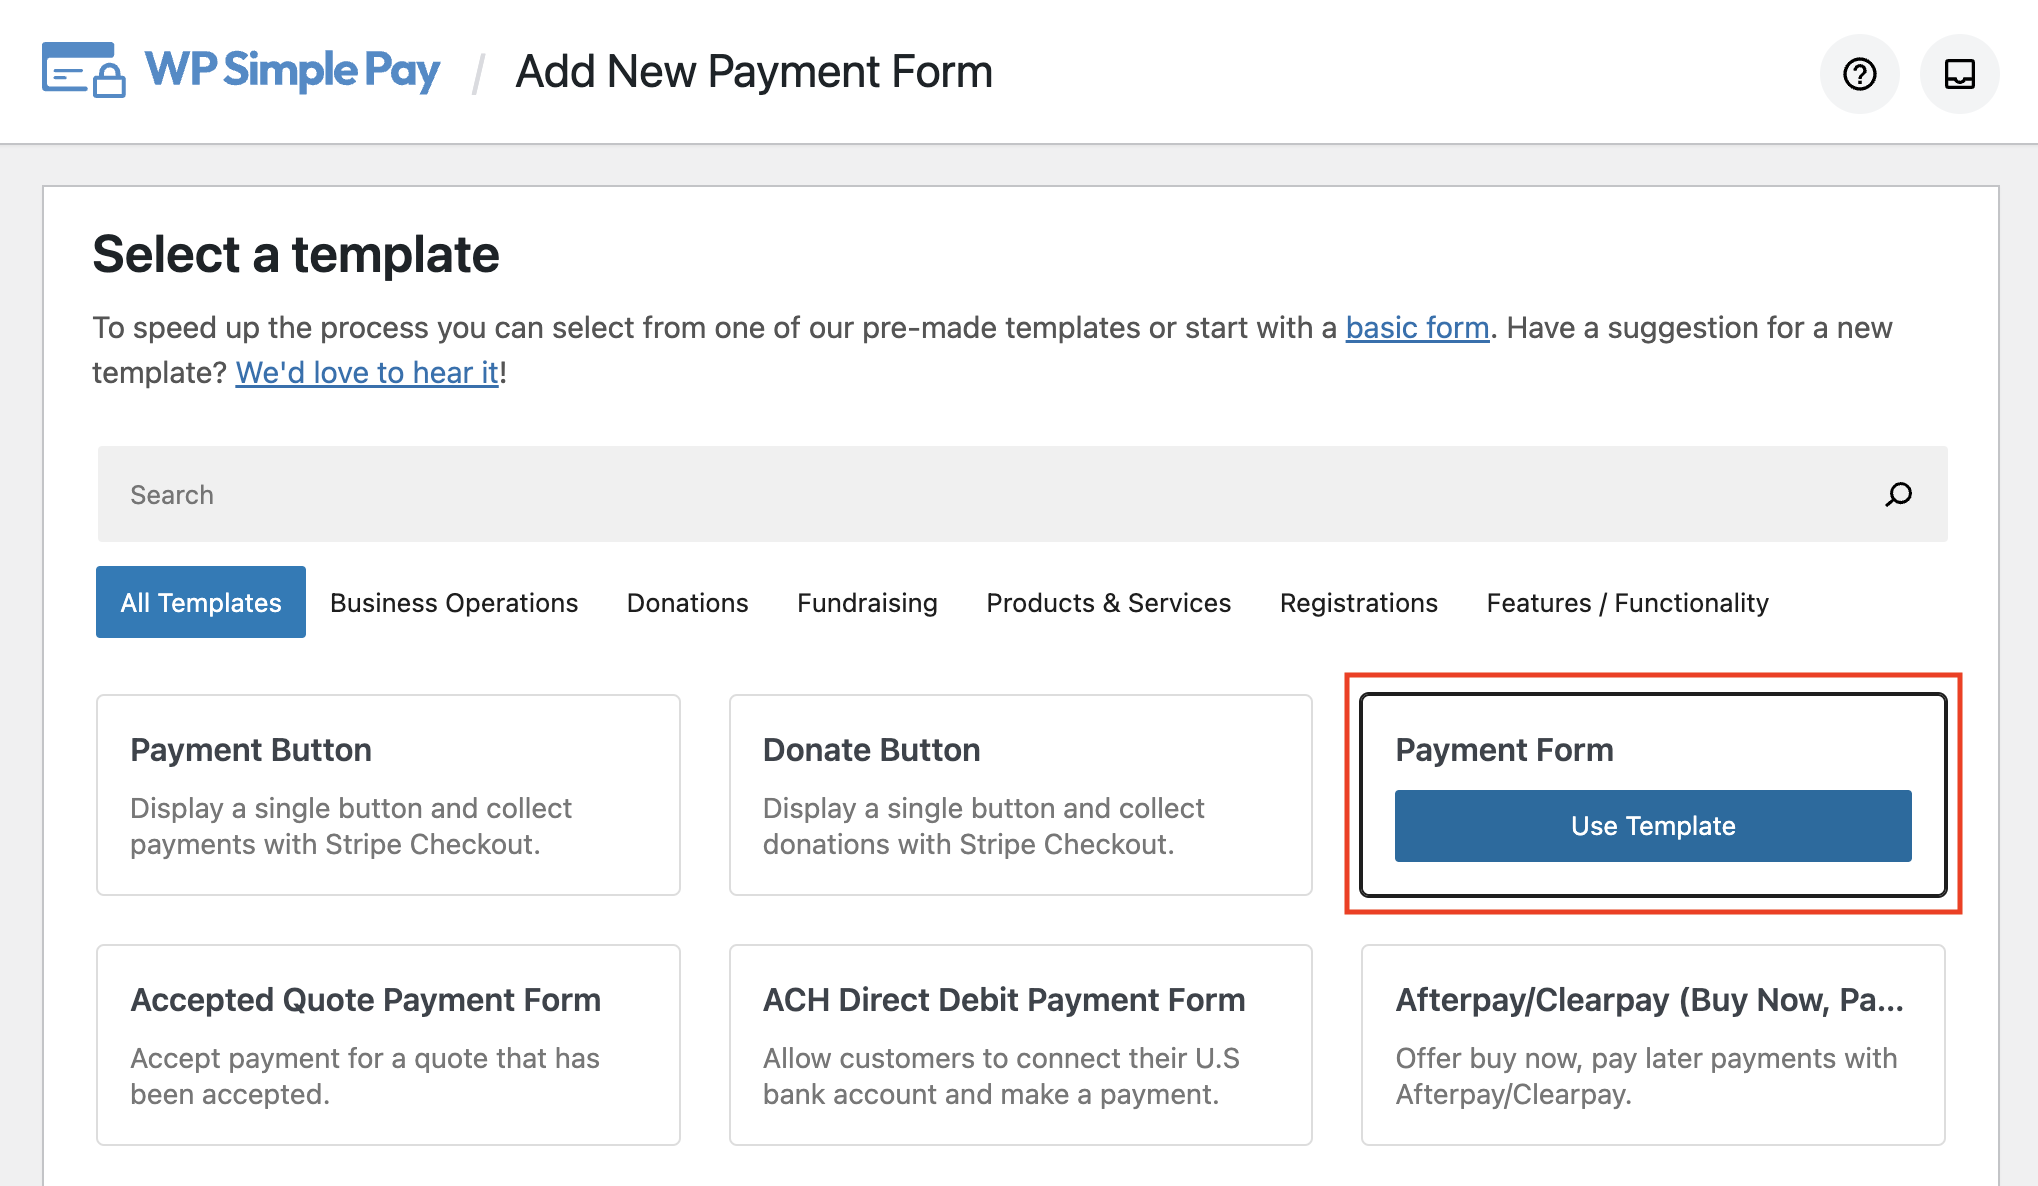
You should have landed on the pre-made payment form template library page. WP Simple Pay offers tons of pre-made payment form templates for you to choose from. For the purpose of this tutorial, let’s go ahead and choose the basic Payment Form template.
Step 4: Configure the Payment Form Settings
To start accepting payments during a specific date range, you’ll need to configure your payment form settings.
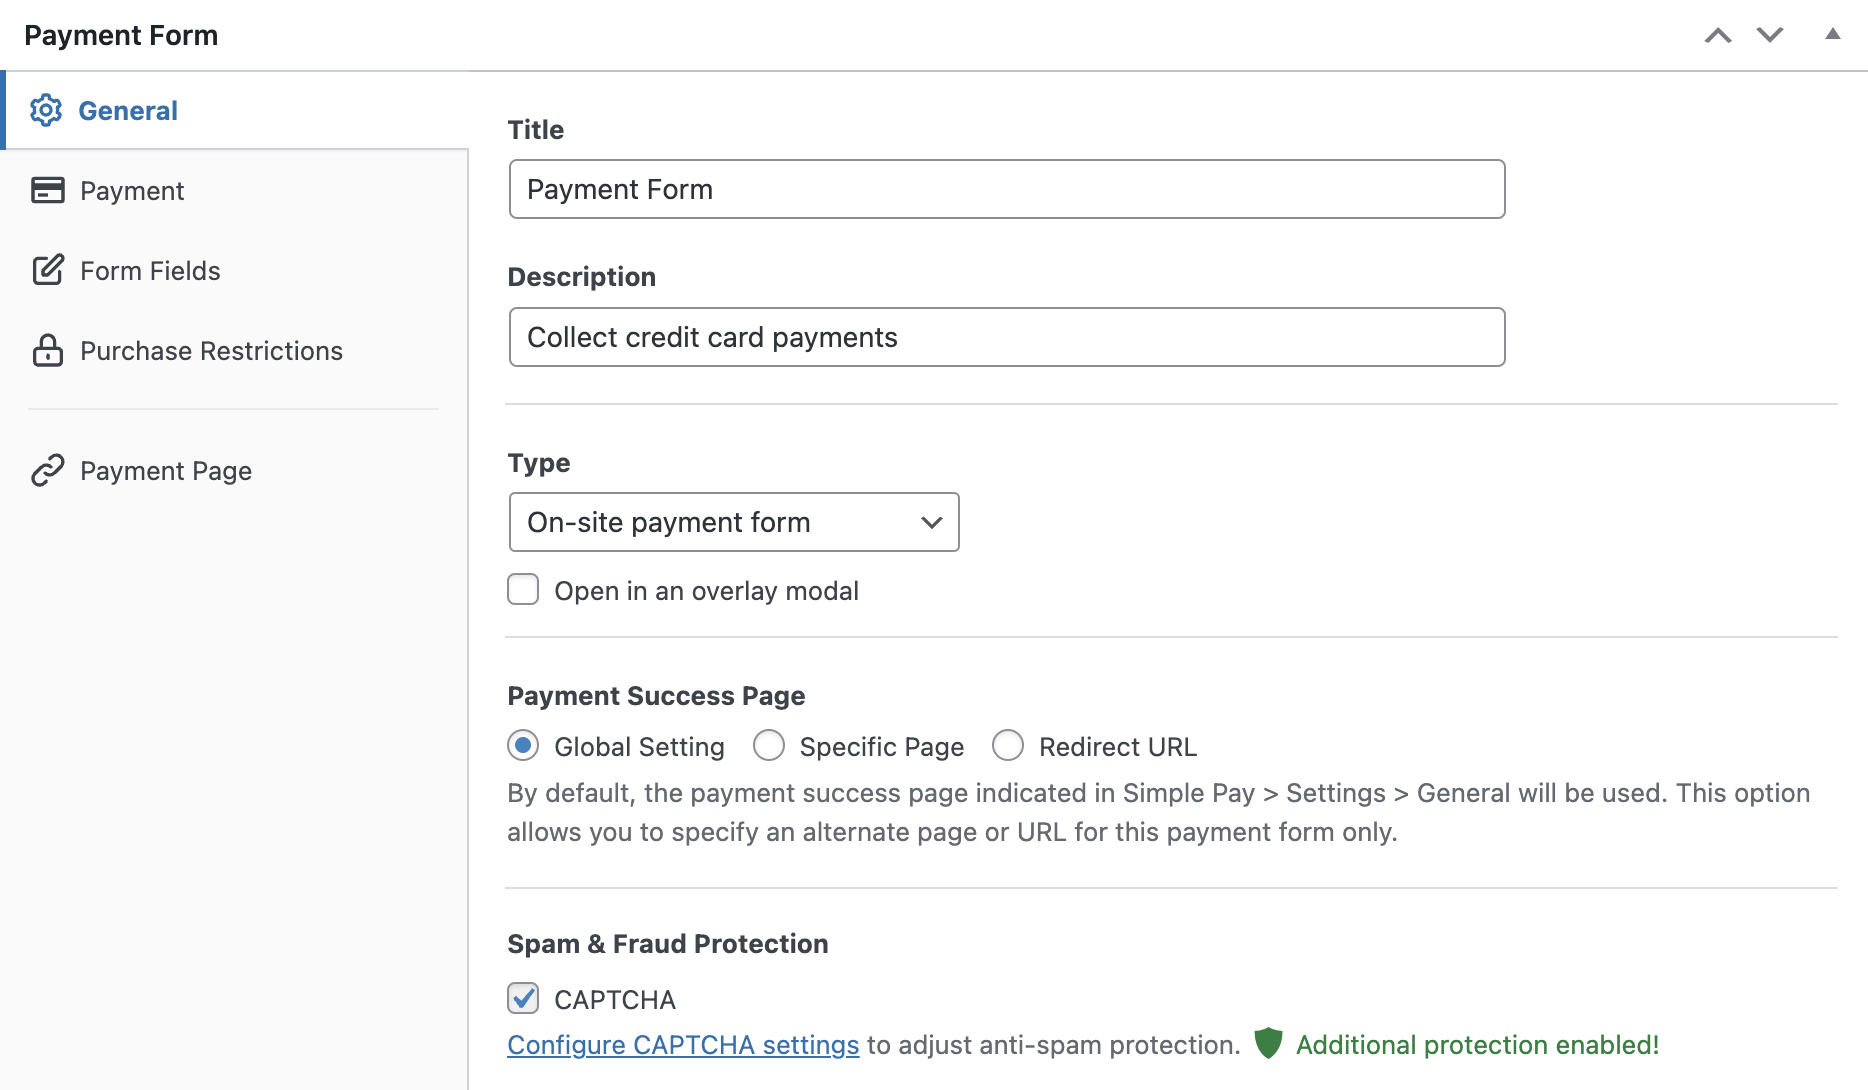
First, go to the General tab. This is where you can edit the title, description, and the form type.
When it comes to the form type, you have the option to choose between an On-site payment form and an Off-site Stripe Checkout, which will redirect your customers to a Stripe-hosted checkout page.
If you’d like, you can also have your form open in a popup window by choosing Open in an overlay modal.
One thing to keep in mind is that to set up payment collection scheduling and begin accepting payments during a specific date range, you’ll need to choose the On-site payment form type.
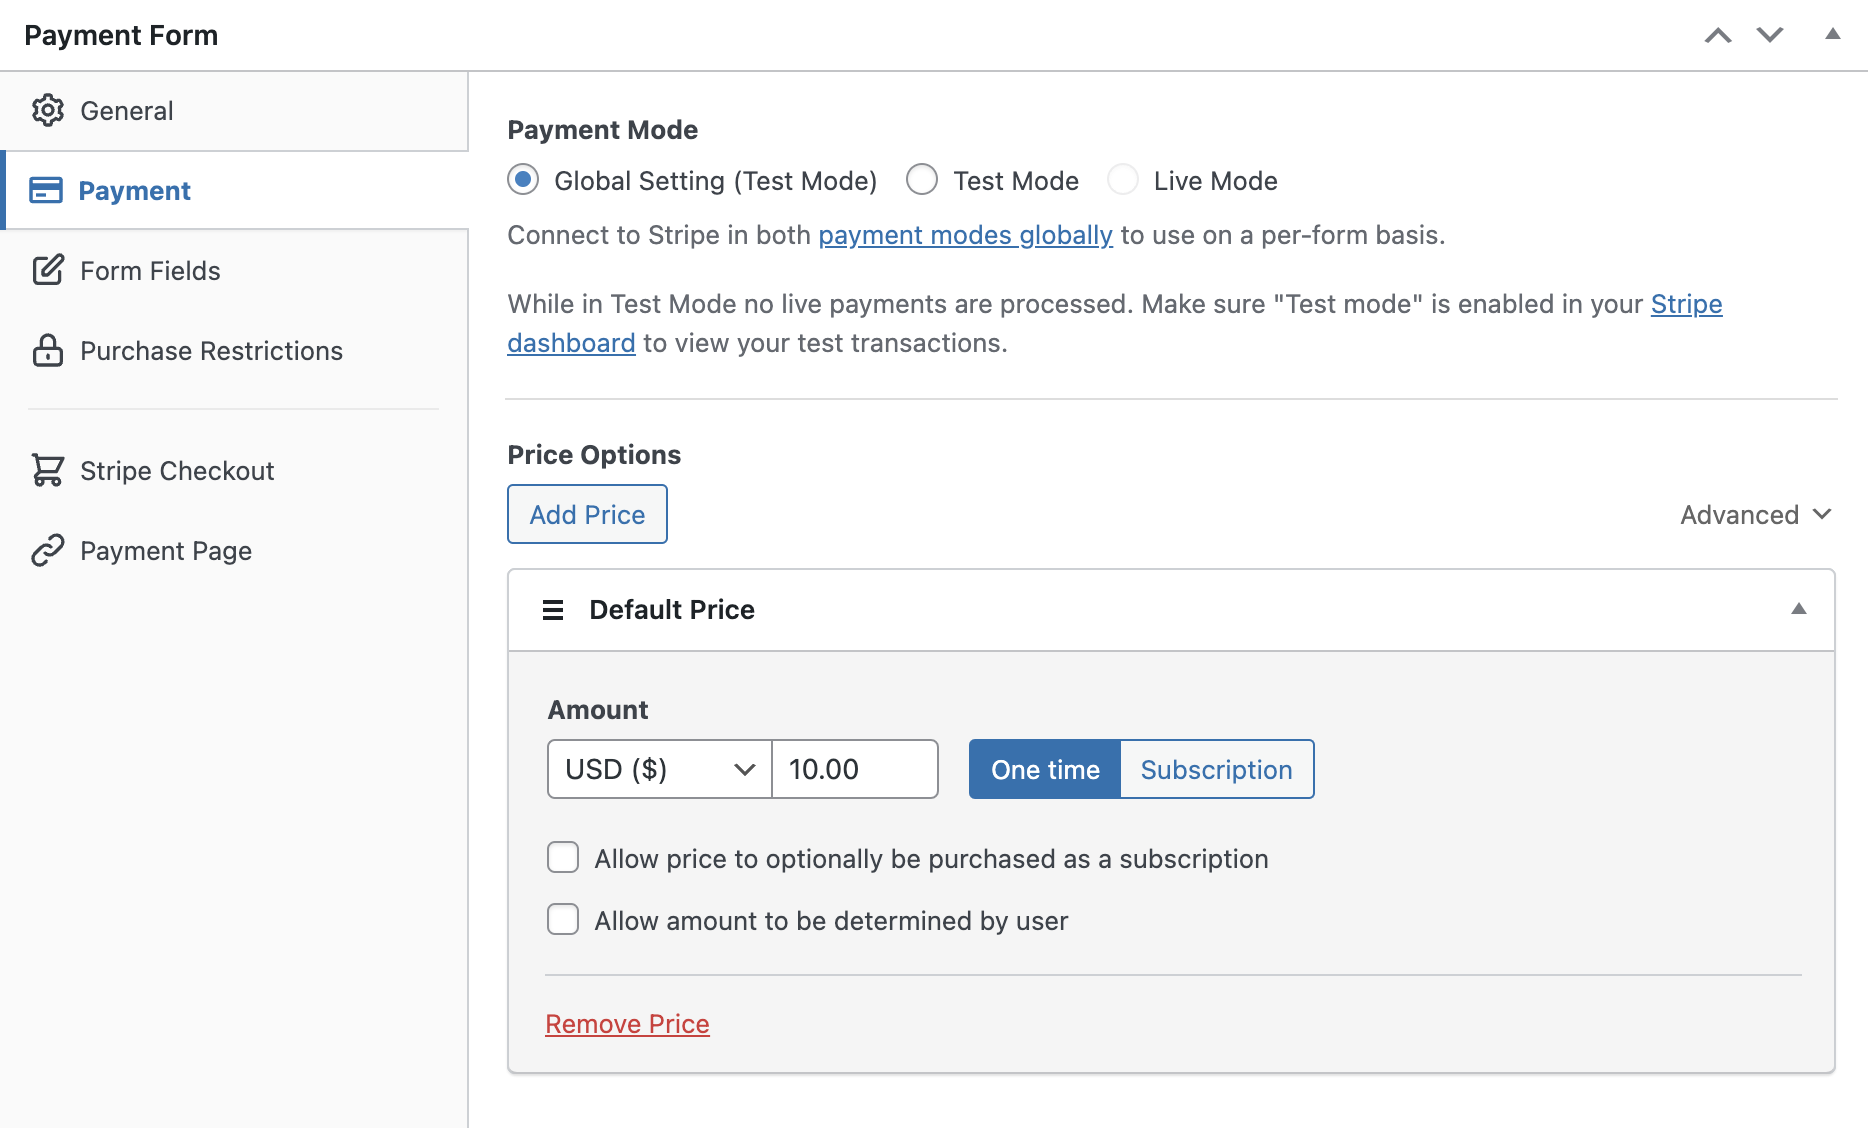
Next, click on Payment. This is where you can set the price, currency, and payment methods you want to offer your customers. You can also set up a one-time or subscription payment option.
Next, click on Form Fields. Here is where you can edit, add, or remove form fields. You can even rearrange the order of the fields by clicking and dragging on the menu button icon to create a completely customized payment form the way you want.
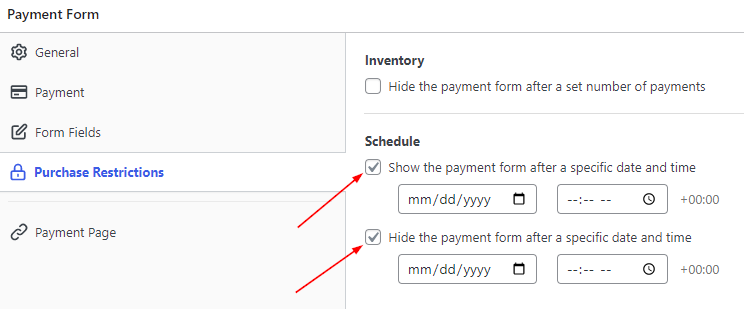
Finally, to easily configure payment collection scheduling, click on Purchase Restrictions.
Next, check the boxes and enter the specific dates and times you want the form to accept payments.
Step 5: Embed the Payment Form on a Page
Now that your payment form is scheduled to accept payments only during the date range you specified, you’re ready to add it to your site.
Before you make your form live, be sure to test it. You can toggle your entire site or individual payment forms between test and live modes. For detailed instructions, follow our tutorial on how to enable Stripe test mode in WordPress.
To embed the payment form, simply go to the page or post where you want your form to go. Next, click on the + icon to add the WP Simple Pay block. Then choose the form you just created and click Publish.

There you have it! We hope this article has helped you learn how to accept payments on your WordPress site during a specific date range.
If you liked this article, you might also want to check out how to sell limited edition products in WordPress.
What are you waiting for? Get started with WP Simple Pay today!
To read more articles like this, follow us on X.
Disclosure: Our content is reader-supported. This means if you click on some of our links, then we may earn a commission. We only recommend products that we believe will add value to our readers.


Leave a Reply