
How to Add Custom Fields to Stripe Checkout in WordPress
Last updated on

Are you wanting to add custom fields to your Stripe Checkout payment forms in WordPress?
Collecting custom data is a great way to understand your customers better. As a result, you can improve customer experience, prevent churn, and grow your business. In addition, custom form fields allow your customers to provide necessary information about their order along with their payment information.
In this article, we’ll show you how to easily add custom fields to your Stripe checkout payment forms in WordPress.
What is Stripe Checkout?
Stripe Checkout is a pre-built, hosted payment page that allows users to complete online purchases securely.
With the introduction of Payment Links, users can generate a non-expiring URL that allows Stripe Checkout payments to be completed.
Additionally, Payment Links lets you add up to two custom fields to your payment forms so you can collect additional information from your customers in Stripe Checkout.
By adding custom fields to your payment forms, including Text, Dropdown, and Number, you can collect critical information from your customers in addition to the standard shipping address, phone number, and billing.
Collected information is displayed in the Checkout Summary section of the Stripe dashboard.
Adding Custom Fields to Stripe Checkout
The easiest way to add custom fields to your Stripe Checkout payment forms directly in WordPress is to use a Stripe payments plugin that supports Stripe Payment Links.
WP Simple Pay is the #1 Stripe payments plugin for WordPress that lets you easily collect payments on your site without setting up a shopping cart or having to learn code.
One of the best parts about WP Simple Pay is that it works with Stripe Payment Links and lets you easily add custom fields to your Stripe Checkout payment forms right from the WordPress admin dashboard.
With all that being said, WP Simple Pay Lite, the free version of the plugin, now offers custom field management for the first time ever. This means you can add up to two custom fields to your Stripe Checkout forms without upgrading to a premium version. If you want to add more than two custom fields to your payment forms, you’ll want to purchase a WP Simple Pay Pro plan.
Additional features of WP Simple Pay include:
- Payment Form Templates: Create the exact payment form you need in minutes.
- Multiple Payment Methods: Accept 10+ payment methods including traditional debit and credit cards, ACH direct debit, Google Pay / Apple Pay, Cash App, and more.
- Subscriptions: Collect recurring payments and automatically charge the customer on a specified basis.
- Fee Recovery: Receive the full payment amount by passing the Stripe processing fee onto your customers.
- On-site Payment Forms: Boost conversions by allowing users to complete purchases without having to leave your site.
- And more…
Remove the additional 3% fee!
Most Stripe plugins charge an additional 3% fee for EVERY transaction
…not WP Simple Pay Pro!
Step 1: Download and Activate WP Simple Pay in WordPress
To add custom fields to Stripe Checkout payment forms in WordPress, the first thing you’ll need to do is download and activate WP Simple Pay in WordPress.
All you need to do is go to the pricing page and choose the plan the best suits your needs.
After purchasing WP Simple Pay, you’ll need to download the plugin from your purchase receipt email or from your WP Simple Pay account.

If you didn’t see the setup wizard, simply head over to WP Simple Pay » Settings » Advanced tab and click the Launch Setup Wizard button.
2: Connect WordPress to Stripe
To connect your WordPress site to Stripe, click on Connect with Stripe.

Next up, enter the email address you use for your Stripe account and connect it to your site. If you don’t have a Stripe account, you can easily create one by entering your email address and completing the registration.
Upon completing this process, you’ll be shown a success page that says, “Setup Complete.” Next, click on Create a Payment Form.

Step 3: Create a Stripe Checkout Payment Form
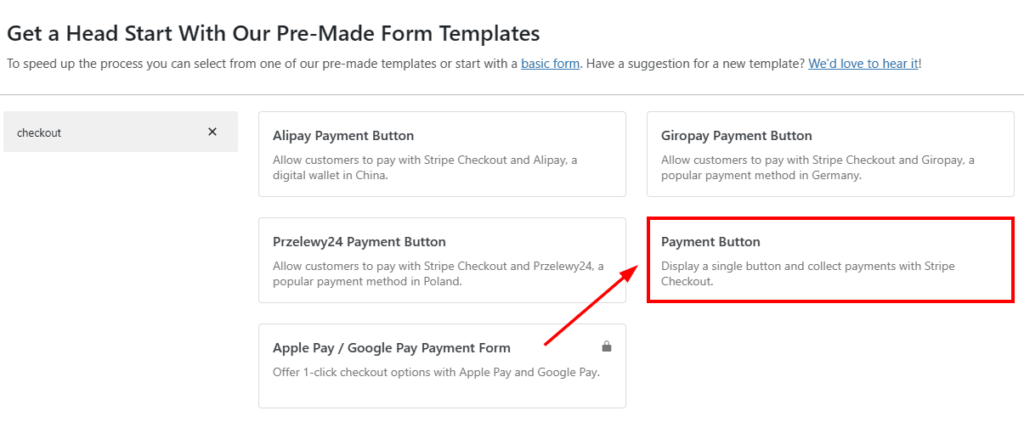
You should have landed on the payment form template library page, where you can choose from several different types of forms.
For the purpose of this tutorial, go ahead and choose the Payment Button template.
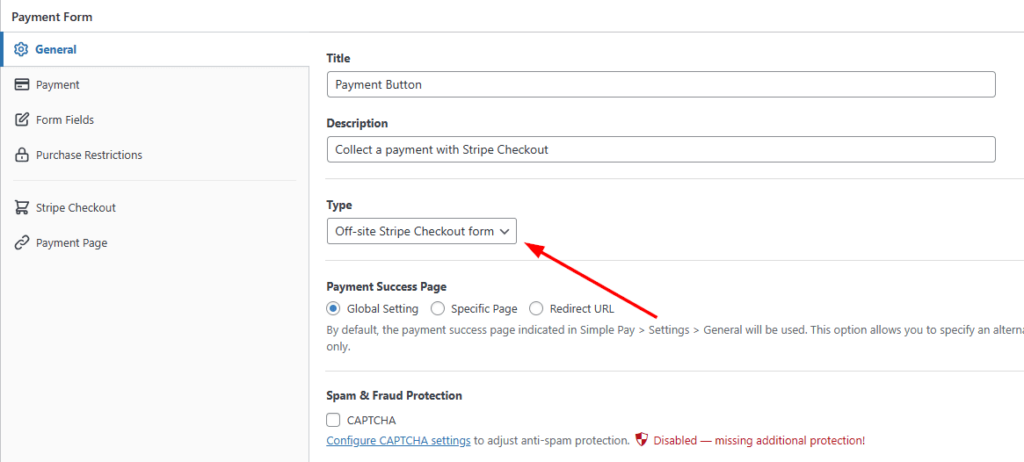
Next, in the General tab, add your form’s title and description. Be sure that Off-site Stripe Checkout form is selected for your form Type.
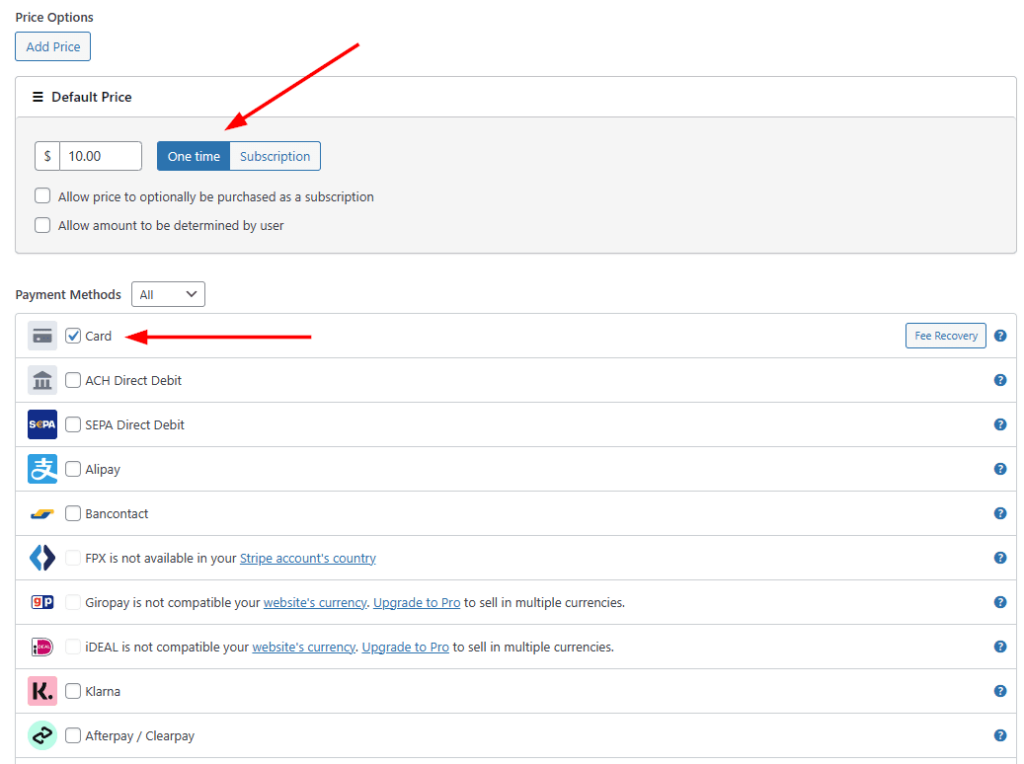
In the Payment tab, add the price to the payment form and select the payment methods you want to offer users.
You’ll notice that the Lite version of WP Simple Pay allows you to accept traditional credit and debit cards. Go ahead and choose One-time payment, and Card from the list of available options.
Step 4: Add Custom Fields to Stripe Checkout Form
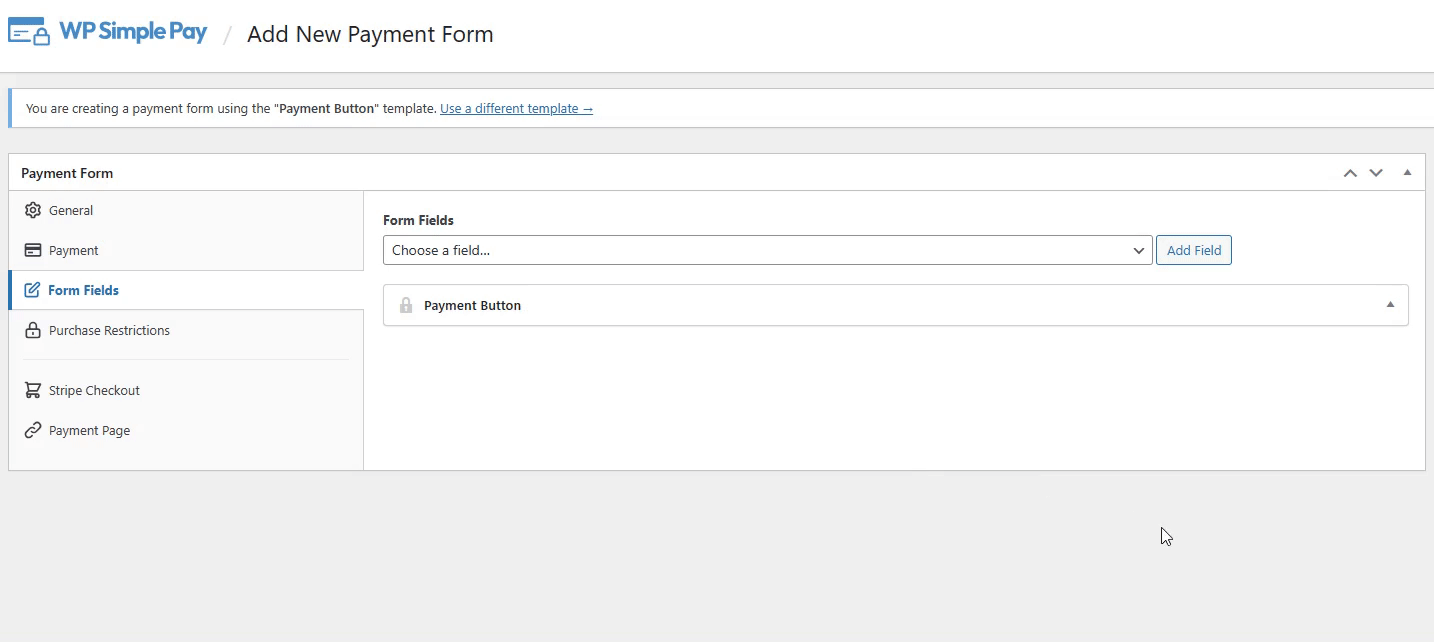
Now that you’ve created your Stripe Checkout payment form, it’s time to add custom fields.
Simply go to the Form Fields tab and click on the dropdown menu to see a list of options.
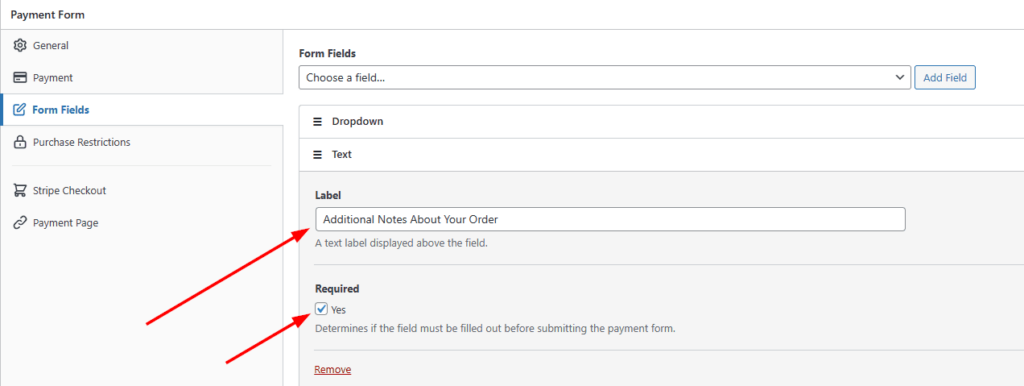
Using WP Simple Pay Lite, you can choose up to two custom fields. For the sake of this tutorial, go ahead and choose Text and Dropdown.
For the dropdown menu custom field, you can easily add the specific information you want to collect. All you need to do is click on the arrow icon next to the field and add your label and options to the fields.
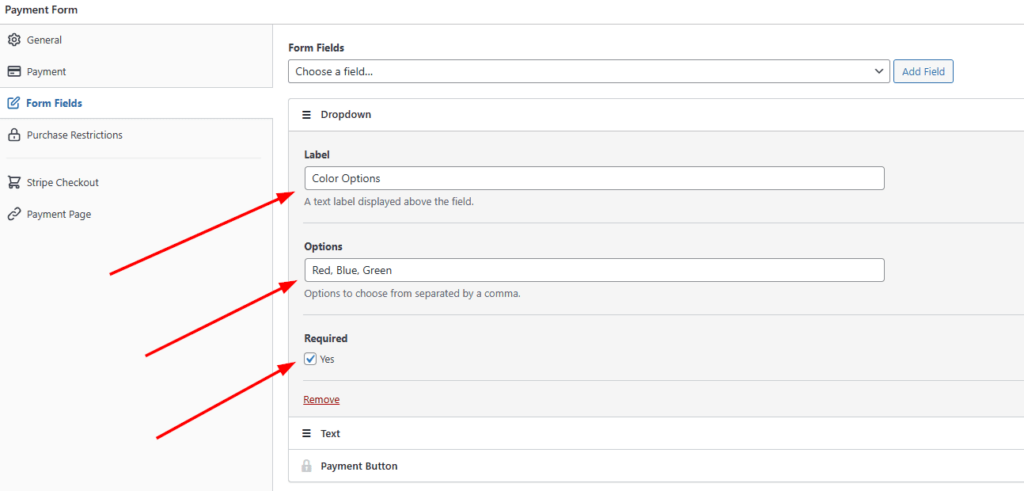
Be sure to check the Required box to ensure your users complete the form fields.
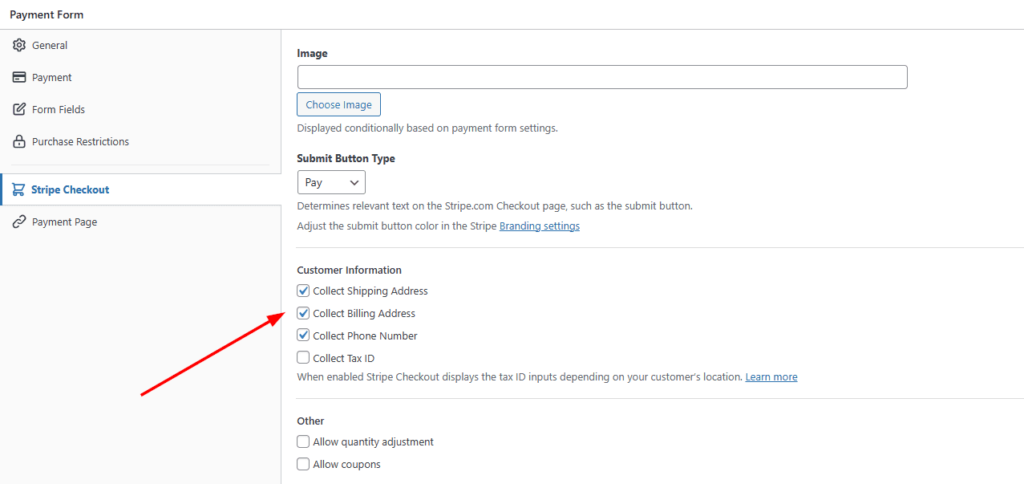
Go ahead and click on Stripe Checkout once you’ve finished adding your custom fields. This is where you can add an image such as a logo, select your button text, and choose the customer information you want to collect in addition to your custom fields.
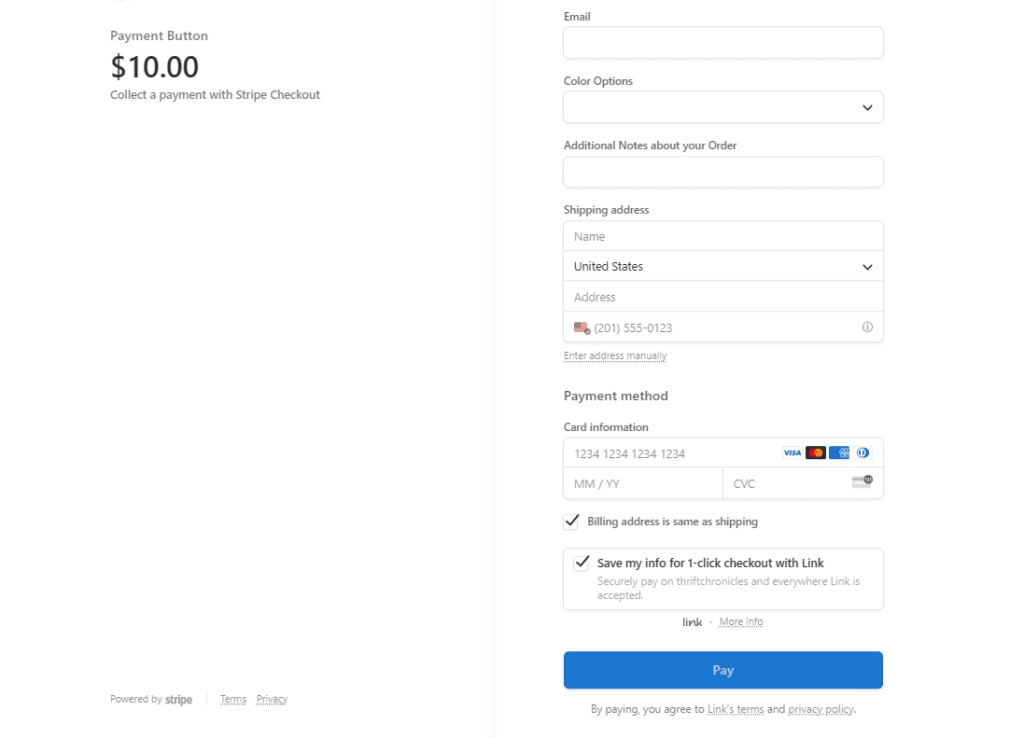
Once you’re finished making your changes to Stripe Checkout, be sure to save your changes. You can preview your form by clicking on preview.
If your Stripe Checkout payment form looks good, go ahead and publish your form.
Your published form should look something like the one below:
Step 5: Embed Your Stripe Checkout Payment Button
Now that you’ve created your Stripe Checkout payment form and added custom fields, all you need to do is embed your Stripe Checkout button on your site.
To do this, just go to the page or post you want your button to go and click on the + icon to add the WP Simple Pay block. Then simply choose the form you just created and click on Publish or Update.

That’s it! You’ve created a Stripe Checkout payment form with custom fields directly in WordPress.
You’re now well on your way to collecting additional information so you can provide a better experience for your customers.
If you liked this article, you might also want to check out our guide on how to customize Stripe payment confirmations in WordPress.
What are you waiting for? Get started with WP Simple Pay today!
To read more articles like this, follow us on X.
Disclosure: Our content is reader-supported. This means if you click on some of our links, then we may earn a commission. We only recommend products that we believe will add value to our readers.


Leave a Reply