
How to Autocomplete Shipping & Billing Addresses in WordPress
Last updated on

Are you wanting to autocomplete shipping and billing addresses in WordPress?
Offering users a way to make a payment on your site without having to enter their shipping and billing addresses manually increases the chances of them completing their transaction. In addition, it’s a great way to prevent errors during the checkout process.
Stripe, the most advanced payment gateway in the world, features the Universal Payment Element so you can create smart payment forms that autocomplete your customer’s shipping and billing address based on their country and their chosen payment method.
All you need to do to start offering your customers autocomplete for their shipping and billing addresses during checkout is use a Stripe payments plugin for WordPress that supports the Universal Payment Element.
In this article, we’ll show you how to easily enable shipping and billing autocomplete in WordPress.
Enabling Autocompleted Shipping & Billing Addresses
The easiest way to offer autocomplete for shipping and billing addresses to your customers during checkout is to use WP Simple Pay, the #1 Stripe payments plugin for WordPress.
WP Simple Pay supports the Universal Payment Element feature so you can begin creating smart payment forms that automatically autocomplete your customer’s shipping and billing addresses once they’ve entered their country and selected their payment method.
Additional features of WP Simple Pay include:
- Advanced Custom Fields: Collect any additional information you like from your customers using text fields, dropdowns, checkboxes.
- 10+ Payment Methods: Accept traditional card payments, in addition to Apple Pay / Google Pay / Microsoft Pay, ACH direct debit, Alipay, Giropay, and more.
- Drag and Drop Payment Form Builder: Create user-friendly, attractive payment forms in just minutes without writing a single line of code.
- International Phone Number Validation: Collect a valid phone number to automate SMS notifications regarding order updates and customer support.
- Fee Recovery: Pass the extra Stripe processing fee onto your customers so you receive the full amount.
Remove the additional 3% fee!
Most Stripe plugins charge an additional 3% fee for EVERY transaction
…not WP Simple Pay Pro!
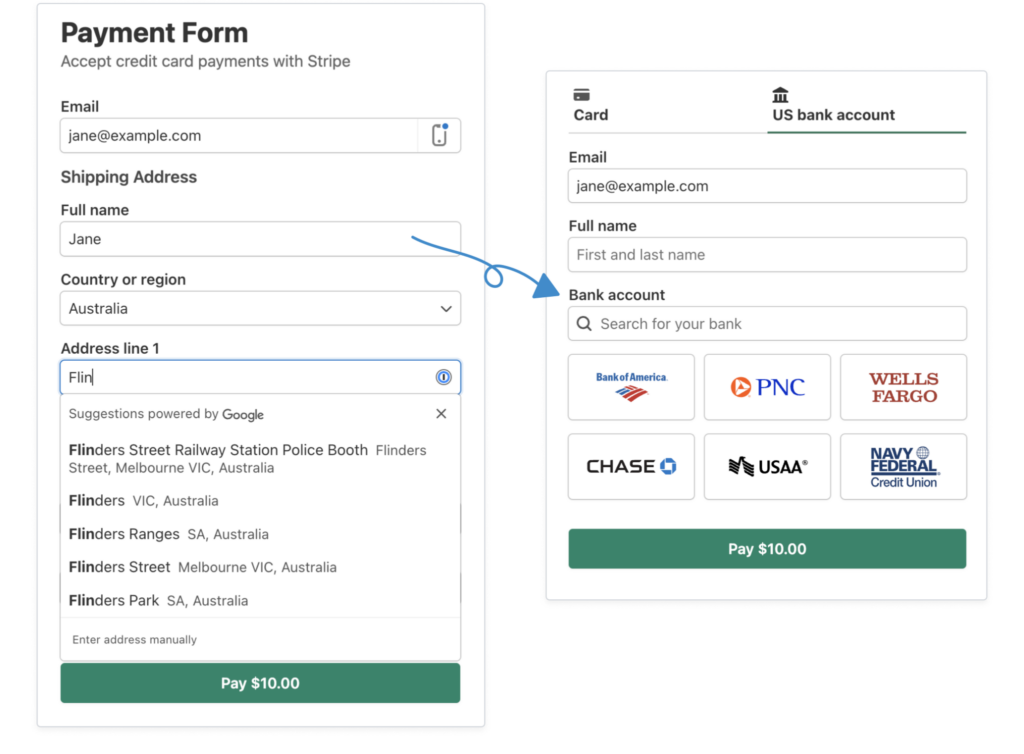
Without further ado, let’s get started creating a payment form that autocompletes the billing and shipping address. When we’re finished, the form will look and function like this:
Step 1: Install WP Simple Pay to Autocomplete Addresses
To enable autocomplete for shipping and billing addresses in WordPress, the first thing you’ll need to do is install and activate WP Simple Pay on your site.
First, head over to the pricing page and choose a plan. Once you’ve completed your purchase, download the plugin from your purchase email receipt or from your WP Simple Pay account.
To install the plugin in WordPress, just go to your dashboard, navigate to Add New » Plugins and then Upload Plugin.
After that, click Choose File and find the WP Simple Pay .zip file on your computer. Click Install Now. When the upload is complete, press the Activate Plugin button.
For detailed instructions, see our step-by-step guide on how to install WP Simple Pay.

If you didn’t see the setup wizard, simply head over to WP Simple Pay » Settings » Advanced tab and click the Launch Setup Wizard button.
2: Connect WordPress to Stripe
To connect your WordPress site to Stripe, click on Connect with Stripe.

Next up, enter the email address you use for your Stripe account and connect it to your site. If you don’t have a Stripe account, you can easily create one by entering your email address and completing the registration.
Upon completing this process, you’ll be shown a success page that says, “Setup Complete.” Next, click on Create a Payment Form.

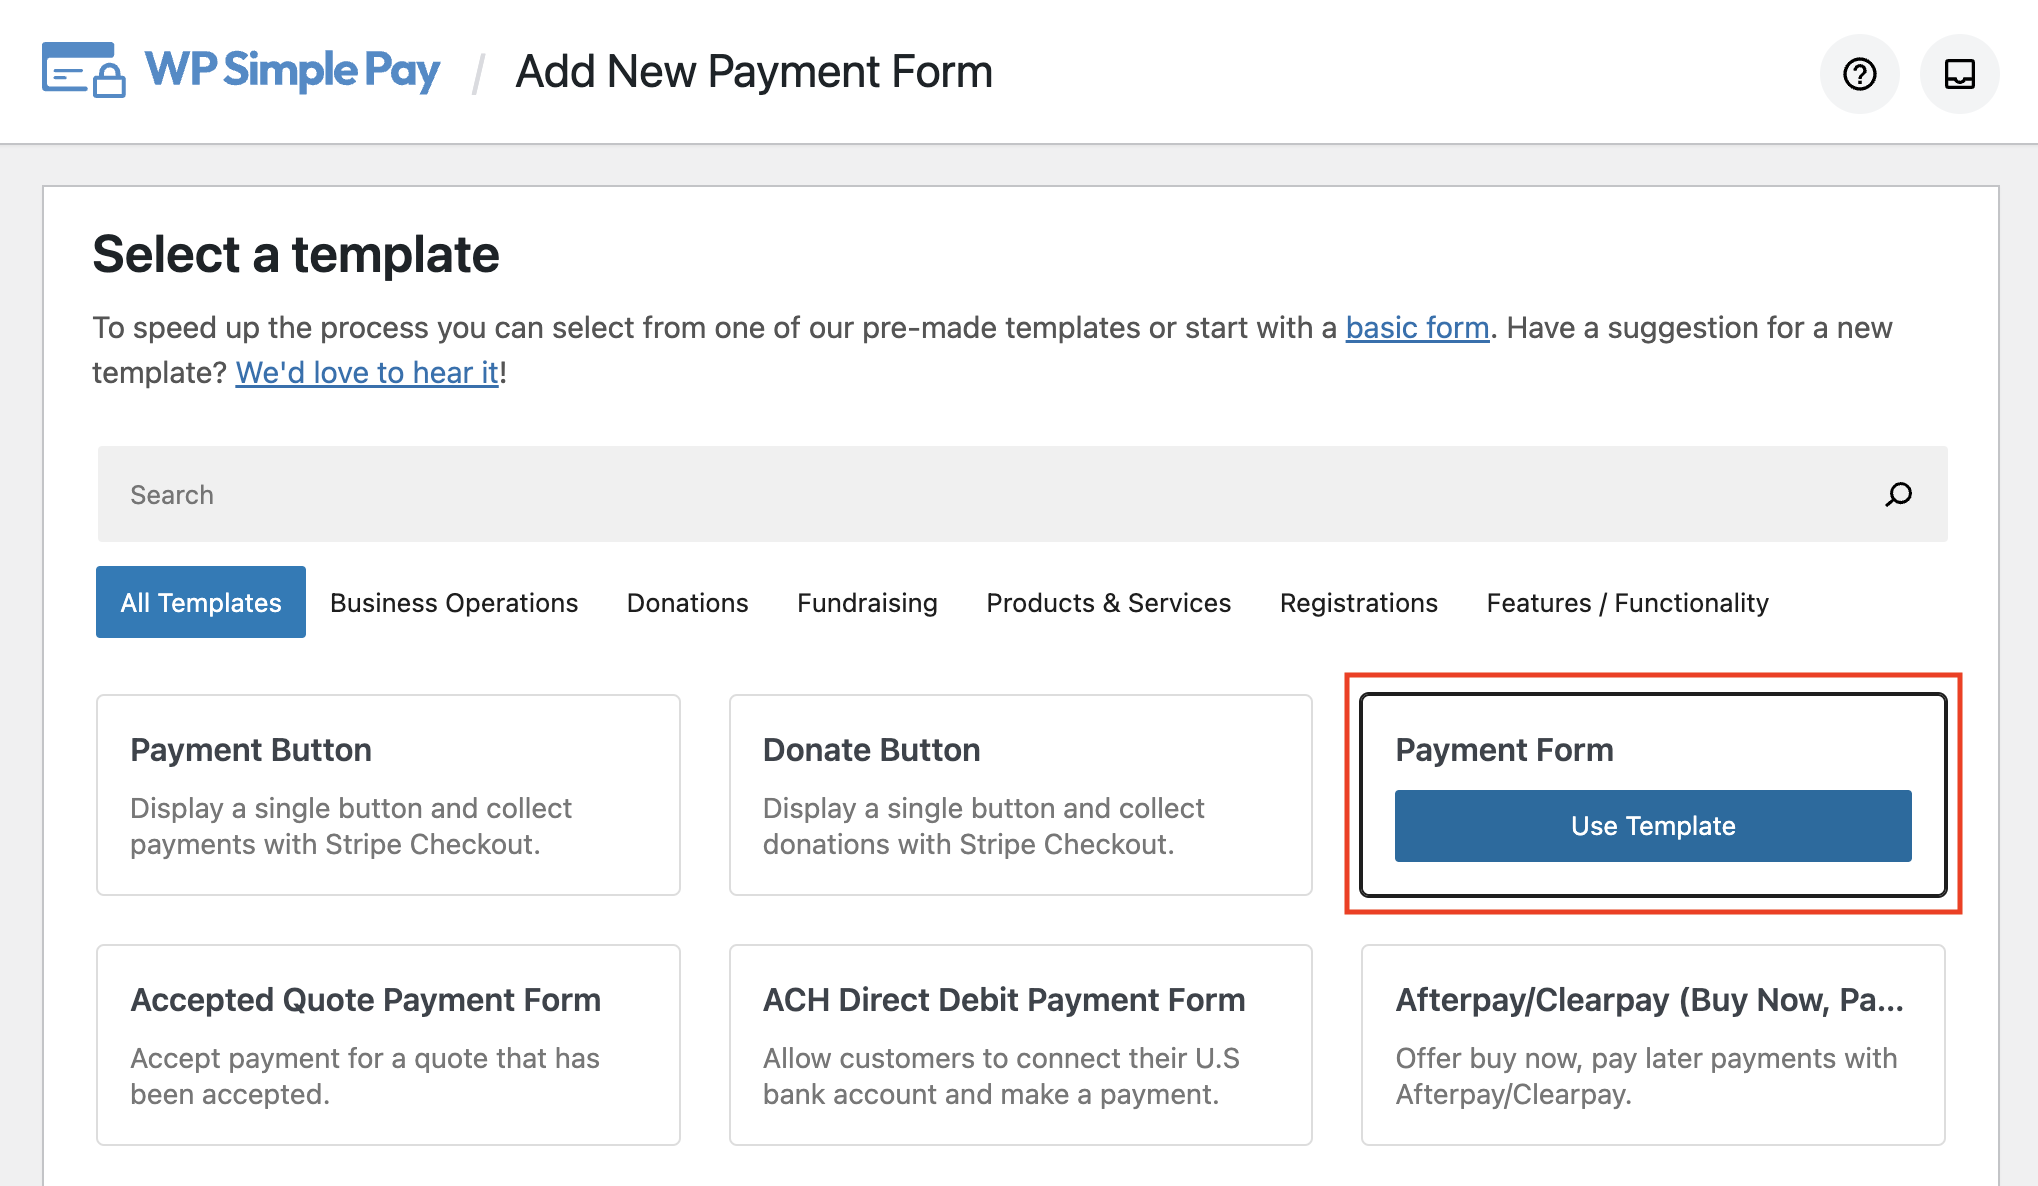
Step 3: Create a Payment Form
After clicking on Create a Payment Form, you should have landed on the payment form template library page.
Go ahead and select the Payment Form template.
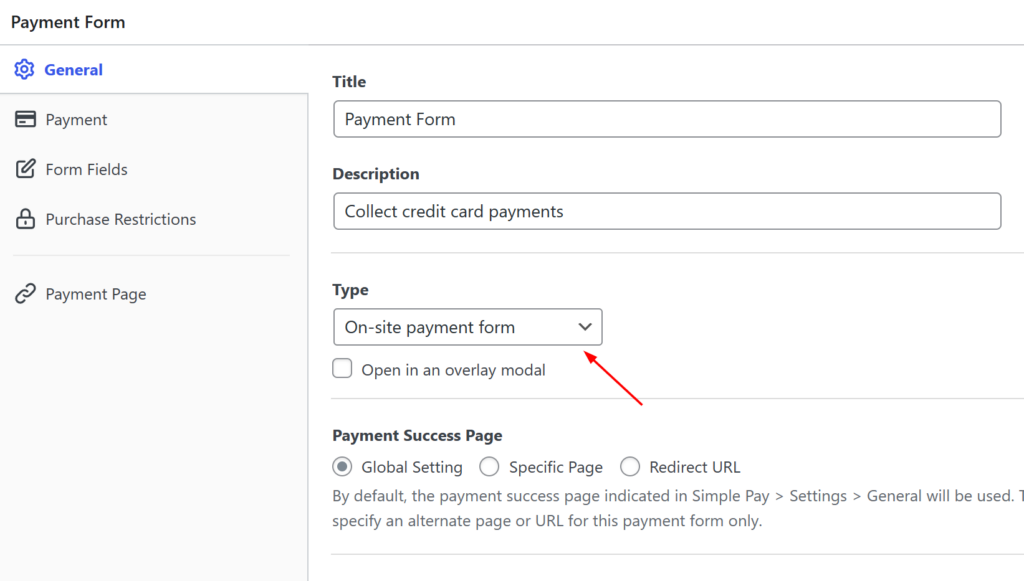
Next, you’ll be directed to the General tab of the payment form. This is where you can edit the title and description.
In addition, you’ll need to select On-Site payment form for your form Type. This means your payment form can be added to any page or post, where your customers can complete their transaction without ever leaving your site.
Now that you’ve finished configuring your General tab settings, click on the Payment tab in the left-hand side of the page. This is where you can add your price options and choose between a one-time or recurring payment option.
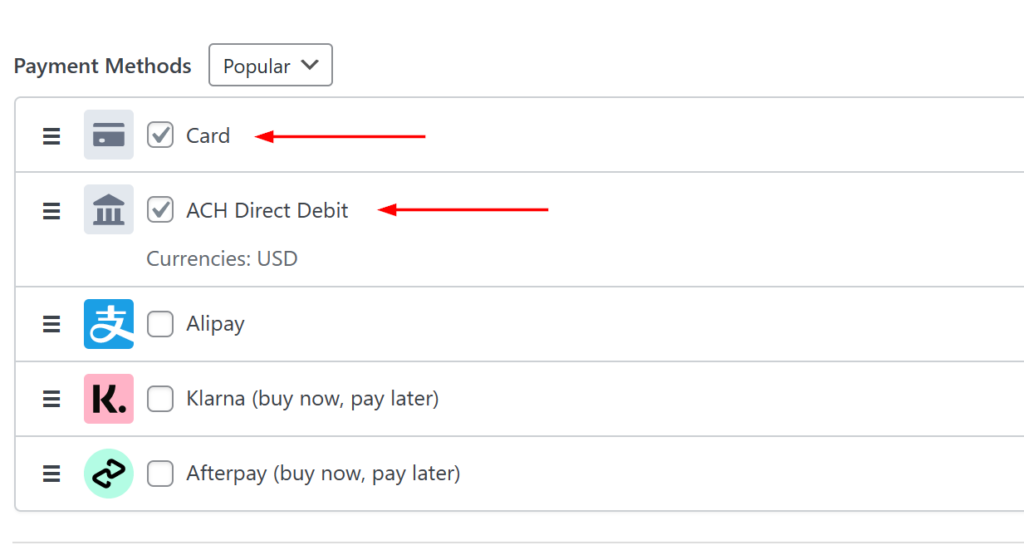
You’ll notice a list of available payment methods. For the sake of this tutorial, ensure that Card and ACH Direct Debit are both selected.
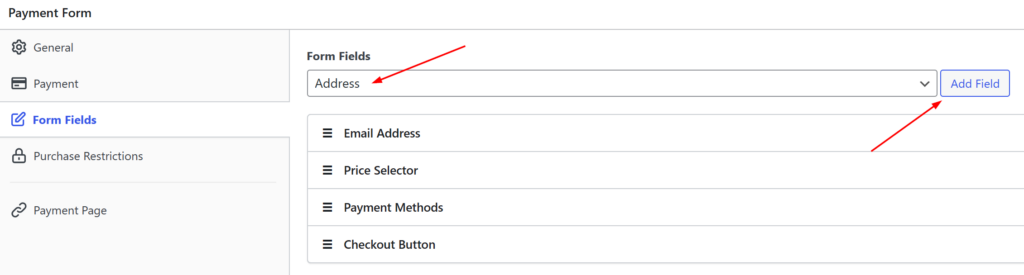
Next, go to the Form Fields tab. From the dropdown menu, select Address and click on the Add Field button.
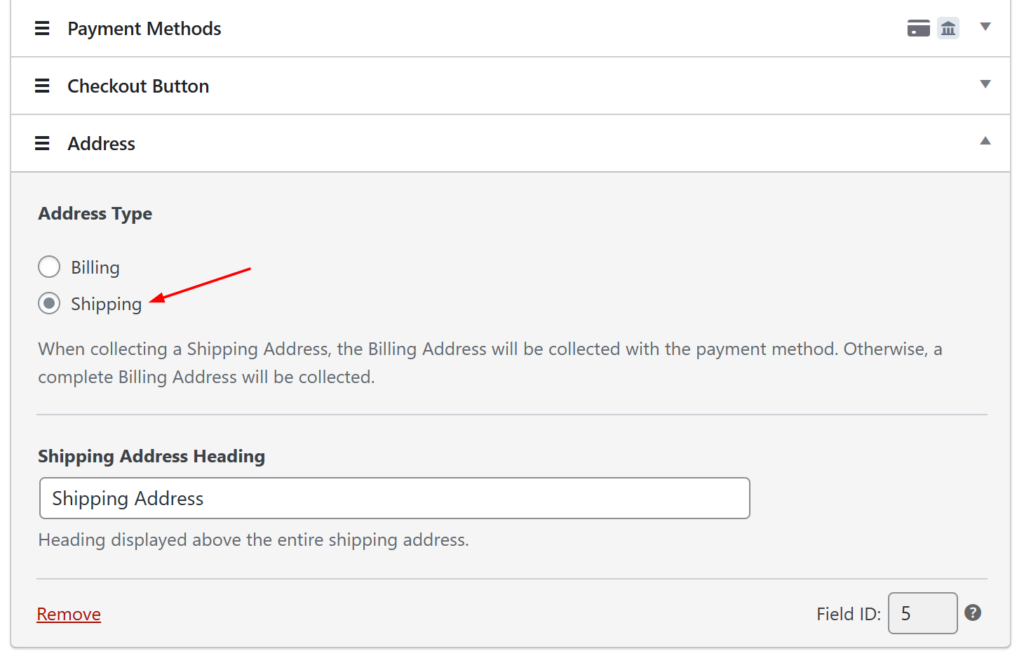
Step 4: Configure the Shipping & Billing Address Field
To ensure that your payment form is configured to autocomplete the shipping and billing address for your customers during checkout, you’ll need to select Shipping for the Address Type.
To do this, simply click on the Address form field and select Shipping.
Step 5: Publish Your Form on Your Site
There you have it! You’ve created a payment form that will autocomplete the shipping and billing address for your customers during the checkout process.
All that’s left to do is publish your form by clicking the Publish button on the right-hand side.
Make sure you test the form first before it goes live. You can toggle your entire site or individual payment forms between Test and Live modes.
To embed the form, go to the post or page where you want to publish it. Then click on the + icon to add the WP Simple Pay block. Then choose a form you just created. And then, click Publish or Update.

We hope this article has helped you learn how to autocomplete shipping and billing addresses in WordPress.
If you liked this article, you might also want to check out how to let customers manage recurring renewals in WordPress.
What are you waiting for? Get started with WP Simple Pay today!
To read more articles like this, follow us on X.
Disclosure: Our content is reader-supported. This means if you click on some of our links, then we may earn a commission. We only recommend products that we believe will add value to our readers.


Leave a Reply