
How to Test Stripe Payments in WordPress (Step by Step)
Last updated on

Do you want to test Stripe payments on your WordPress site? Making Stripe test payments is recommended before switching your payment forms to Live Mode.
In this article, we’ll show you how to test payments in WordPress before accepting real payments.
Test Stripe Payments in WordPress
To confirm whether your payment forms work the way you anticipated, it’s recommended to test Stripe payments first. By making test payments, you can simulate transactions without moving any money.
Just like real payments, Stripe collects the test payment data, which you can validate by logging into your Stripe dashboard.
To test Stripe payments in WordPress, here are a few things you’ll need to do.
- Install a WordPress Stripe plugin and integrate it with Stripe
- Create a payment form and enable test mode
- Make test payments
- Switch to live mode and start accepting real payments
Step 1: Install WP Simple Pay and Integrate It With Stripe
First off, install WP Simple Pay on your site and integrate your Stripe account with it.
WP Simple Pay is hands down the best WordPress Stripe plugin that lets you easily create any type of payment form on your site.
WP Simple Pay also supports 13 different payment methods, provides support for Stripe Tax and Buy Now, Pay Later service, and more.
For more details, check out how to install WP Simple Pay.
Remove the additional 3% fee!
Most Stripe plugins charge an additional 3% fee for EVERY transaction
…not WP Simple Pay Pro!
Step 2: Create a Payment Form & Make Test Payments
WP Simple Pay makes it super easy to create a payment form and start accepting payments on your website. With its advanced drag-and-drop builder, you can collect as much information as you need on your form and save the entire data in Stripe’s PCI-compliant servers.
Here are a few resources that help you set up your first payment form.
- How to create a Stripe payment form
- How to create a credit card payment form
- How to create a recurring payment form
- How to create a donation form
- How to create a form that accepts Apple Pay / Google Pay
- How to enable multiple payment methods in a single payment form
Once your payment form is created and published, you’ll need to make a test payment to ensure the form is functioning the way you want it to function.
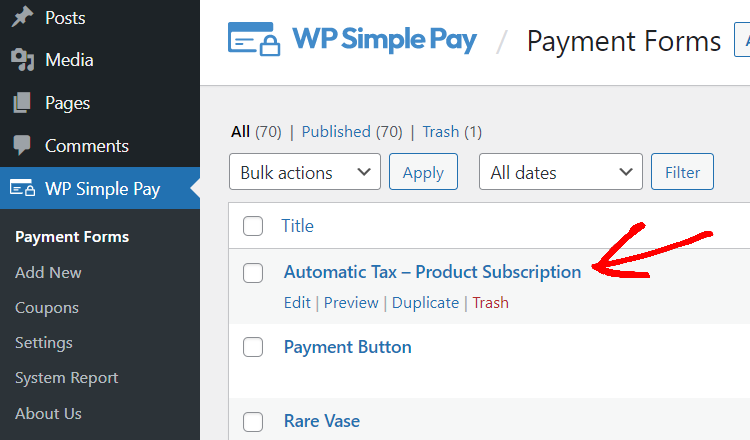
Before making a payment on your own, let’s check whether the form is in test mode. To do that, go to WP Simple Pay » Payment Forms, where you can find a list of payment forms you’ve created. Click on a payment form by which you want to make a test payment.
Then click the Payment tab and verify if your form is still in the test mode. If not, enable test mode and click Update to update the form.

Now click on the Preview button to preview the form. Go ahead and make a test payment.
In test mode, no live payments will be processed. You can test using card number 4242 4242 4242 4242 with any future expiration date, CVC, and a US-formatted post code (such as 42424). More test numbers here.
To verify whether Stripe has been collecting the payment data, log into your Stripe dashboard and go to the Payments screen by clicking this link. Here you can find all the payment details processed through test mode.

Step 3: Switch to Live Mode
When you’re ready to accept live payments, you can enable Live mode in WP Simple Pay either by switching to live mode sitewide or switching to live mode for individual forms.
Let’s take a look at how to switch to live mode globally (sitewide).
Go to WP Simple Pay » Settings in your WordPress dashboard. Click on the Stripe tab and then under Test Mode, choose Disabled. Then click Save Changes.

You may be required to reconnect to Stripe when your settings are saved.
To switch to Live Mode for individual forms, select a form by going to WP Simple Pay » Payment Forms. Then click on the Payment option on the left. Make sure to choose Live Mode here.
That’s it! We hope this article helped you learn how to make Stripe test payments on your WordPress site and then switch to Live Mode.
You might also want to check out how to protect your WordPress site from card testing.
What are you waiting for? Get started with WP Simple Pay today to accept legitimate payments. To read more articles like this, follow us on Facebook and Twitter.
Disclosure: Our content is reader-supported. This means if you click on some of our links, then we may earn a commission. We only recommend products that we believe will add value to our readers.


Leave a Reply