
Cum să adăugați noi clienți Stripe în ActiveCampaign în WordPress
Ultima actualizare la

Căutați o modalitate ușoară de a adăuga clienți Stripe noi la lista dvs. de corespondență ActiveCampaign?
Asigurarea că fiecare dintre noii dvs. clienți Stripe este adăugat automat la lista dvs. de e-mail după finalizarea unei achiziții este o modalitate excelentă de a organiza datele clienților, de a îmbunătăți comunicarea cu aceștia și de a economisi timp.
În acest articol, vă vom arăta cum să vă integrați cu ușurință site-ul WordPress cu Uncanny Automator, un instrument puternic de automatizare care vă permite să adăugați clienți Stripe noi la ActiveCampaign fără a fi nevoie să folosiți cod.
Ce este Uncanny Automator?
Uncanny Automator este un plugin de automatizare pentru WordPress care vă permite să conectați pluginurile, site-urile și aplicațiile dvs. pentru a vă eficientiza fluxurile de lucru și sarcinile.
În prezent, pluginul oferă peste 100 de integrări cu aplicații și servicii populare, inclusiv Google Sheets, Drip, ActiveCampaign, Twitter și pagini de Facebook.
Folosind Uncanny Automator, puteți crea cu ușurință rețete (secvențe automate) prin configurarea unor declanșatoare, acțiuni și condiții specifice direct din tabloul de bord WordPress.
Adăugarea clienților Stripe noi la ActiveCampaign
Deși Uncanny Automator se integrează cu mai multe servicii de marketing prin e-mail, vom folosi ActiveCampaign în scopul acestui tutorial.
Cea mai ușoară modalitate de a adăuga clienți Stripe noi la lista dvs. de corespondență ActiveCampaign este să creați o rețetă care leagă un plugin de plăți Stripe acceptat de ActiveCampaign.
WP Simple Pay este cel mai bun plugin de plăți Stripe pentru WordPress, care vă permite să acceptați cu ușurință mai multe metode de plată direct pe site-ul dvs., fără a fi nevoie să configurați un coș de cumpărături. Pluginul suportă, de asemenea, o integrare perfectă cu ActiveCampaign.
Caracteristicile suplimentare ale WP Simple Pay includ:
- Formulare de plată pe site: Permiteți utilizatorilor dvs. să finalizeze achiziția direct pe site-ul dvs.
- Constructor de formulare drag & drop: Creați cu ușurință formulare de plată în câteva minute, fără cod.
- Șabloane de formulare de plată: Alegeți dintre o mulțime de șabloane diferite de formulare de plată pentru a crea formulare pentru diferite produse, servicii și evenimente în câteva minute.
- Câmpuri personalizate în formular: Colectați date suplimentare împreună cu plățile.
- Acceptați peste 10 metode de plată inclusiv carduri de debit/credit, debit direct ACH, Google Pay/Apple Pay, Affirm, Cash App Pay și multe altele.
Eliminați taxa suplimentară de 3%!
Majoritatea pluginurilor Stripe percep o taxă suplimentară de 3% pentru FIECARE tranzacție
…nu și WP Simple Pay Pro!
Pasul 1: Descarcă și activează WP Simple Pay
Primul lucru pe care va trebui să îl faceți pentru a începe să adăugați clienți Stripe noi la lista dvs. de corespondență ActiveCampaign este să descărcați și să activați WP Simple Pay.
Mai întâi, va trebui să achiziționați o licență WP Simple Pay. Puteți face acest lucru pur și simplu accesând pagina de prețuri și alegând cel mai bun plan pentru nevoile dvs. specifice.
După achiziționarea WP Simple Pay Pro, va trebui să descărcați pluginul din e-mailul de confirmare a achiziției sau din contul dvs. WP Simple Pay.

Dacă nu ați văzut expertul de configurare, pur și simplu accesați fila WP Simple Pay » Setări » Avansat și faceți clic pe butonul Lansare Expert de configurare.
2: Conectați WordPress la Stripe
Pentru a conecta site-ul dvs. WordPress la Stripe, faceți clic pe Conectare cu Stripe.

În continuare, introduceți adresa de e-mail pe care o utilizați pentru contul dvs. Stripe și conectați-o la site-ul dvs. Dacă nu aveți un cont Stripe, îl puteți crea cu ușurință introducând adresa de e-mail și completând înregistrarea.
După finalizarea acestui proces, vi se va afișa o pagină de succes pe care scrie „Configurare finalizată”. Apoi, faceți clic pe Creare formular de plată.

Pasul 3: Descărcați și activați Uncanny Automator
Până acum, ați instalat și activat WP Simple Pay pe site-ul dvs. WordPress și ați conectat contul Stripe.
Acum este momentul să descărcați și să activați Uncanny Automator în WordPress. Puteți face acest lucru vizitând pur și simplu pagina de prețuri și achiziționând un plan.
Apoi, descărcați pluginul din contul dvs. Uncanny Automator. Navigați apoi la Pluginuri » Adăugare Nou în tabloul de bord WordPress. Faceți clic pe butonul Încărcare plugin, alegeți fișierul zip și selectați Instalare acum, apoi Activare.
Pasul 4: Crearea unei rețete
Pentru a începe să adăugați noi clienți Stripe în lista dvs. de corespondență, va trebui să creați o nouă rețetă.
Mai întâi, faceți clic pe Automator » Adăugare Nou în tabloul de bord WordPress.
Vi se va solicita să alegeți tipul rețetei. Continuați și alegeți Toată lumea și faceți clic pe Confirmare.

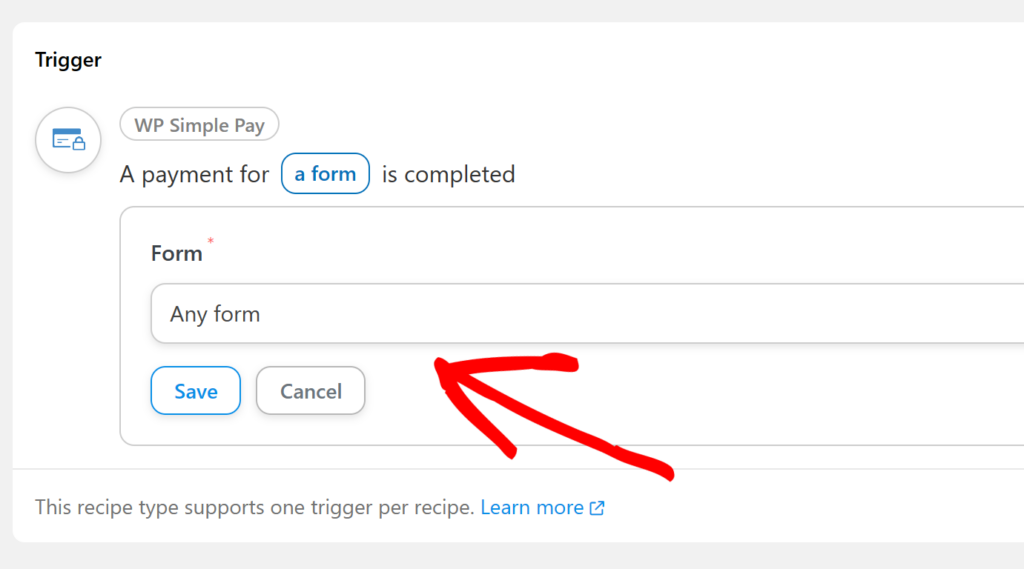
Acum că ați selectat tipul rețetei, este timpul să creați declanșatorul. Din lista de integrări posibile, selectați WP Simple Pay.

Va apărea un meniu derulant cu diferite opțiuni. Pentru acest declanșator, asigurați-vă că alegeți O plată pentru un formular este finalizată. Din meniul derulant, alegeți Orice formular și faceți clic pe Salvare.
Dacă doriți ca noii clienți Stripe care au finalizat achiziția folosind un formular de plată specific de pe site-ul dvs. să fie adăugați în lista dvs. de corespondență, puteți alege formularul din meniul derulant.
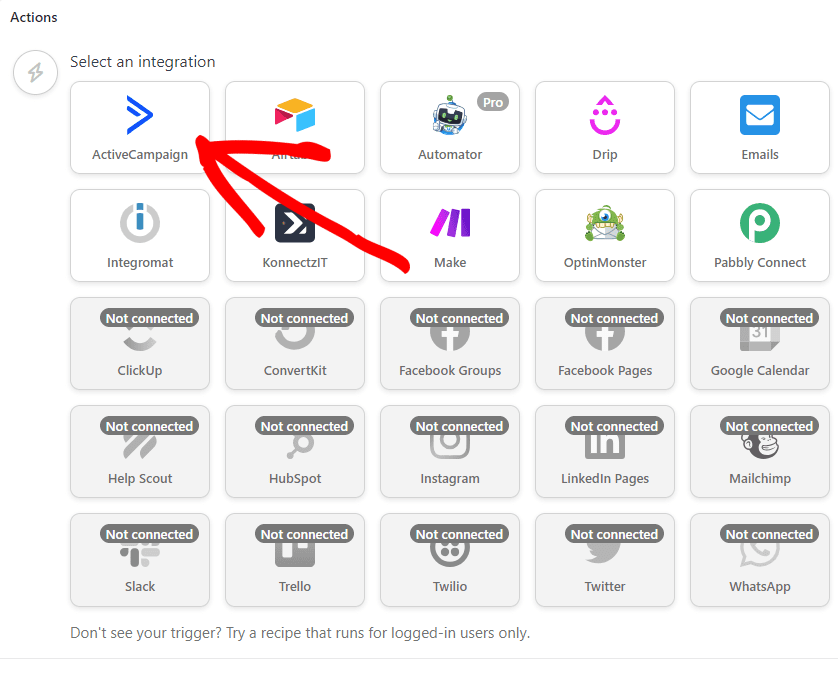
Acum că ați configurat declanșatorul, este timpul să configurați acțiunea. Mai întâi, continuați și faceți clic pe Adăugare acțiune.
Din lista de opțiuni de integrare, faceți clic pe ActiveCampaign.
Vi se va solicita să vă conectați contul. Faceți clic pe Conectare cont.

Pagina de setări ActiveCampaign se va deschide într-o fereastră nouă. Va trebui să găsiți URL-ul API și Cheia API accesând Setări » Dezvoltator în tabloul de bord ActiveCampaign. Apoi introduceți-le în câmpurile asociate și salvați setările.

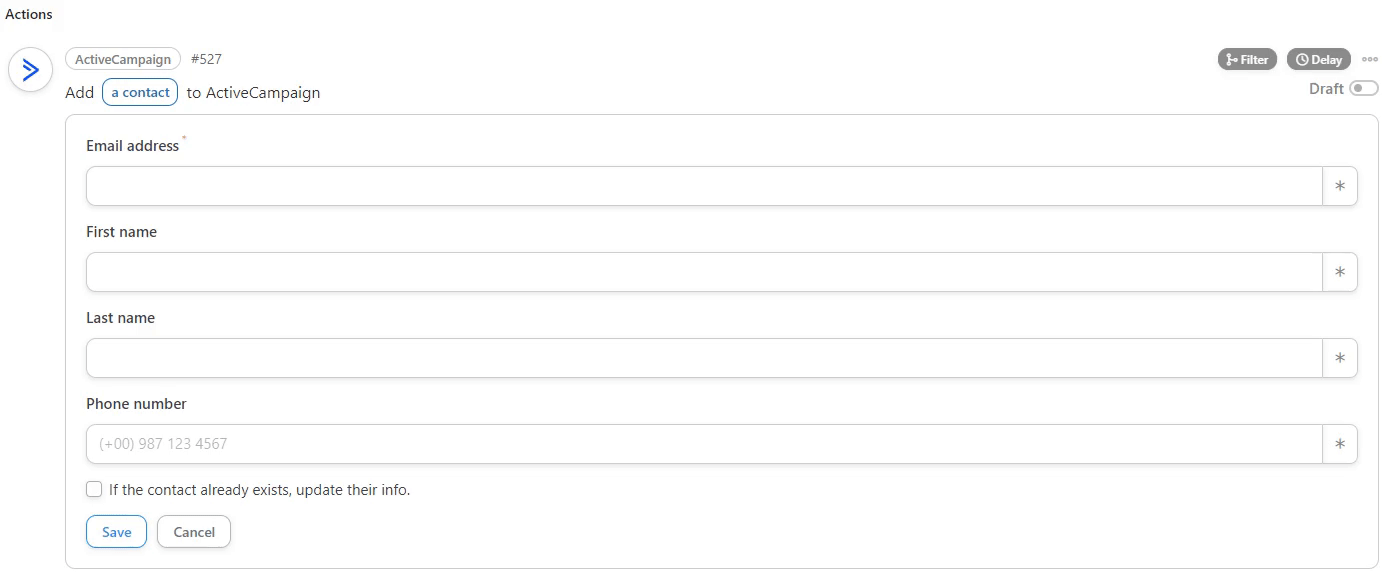
Apoi, creați a doua Acțiune: Adăugare contact la o listă.
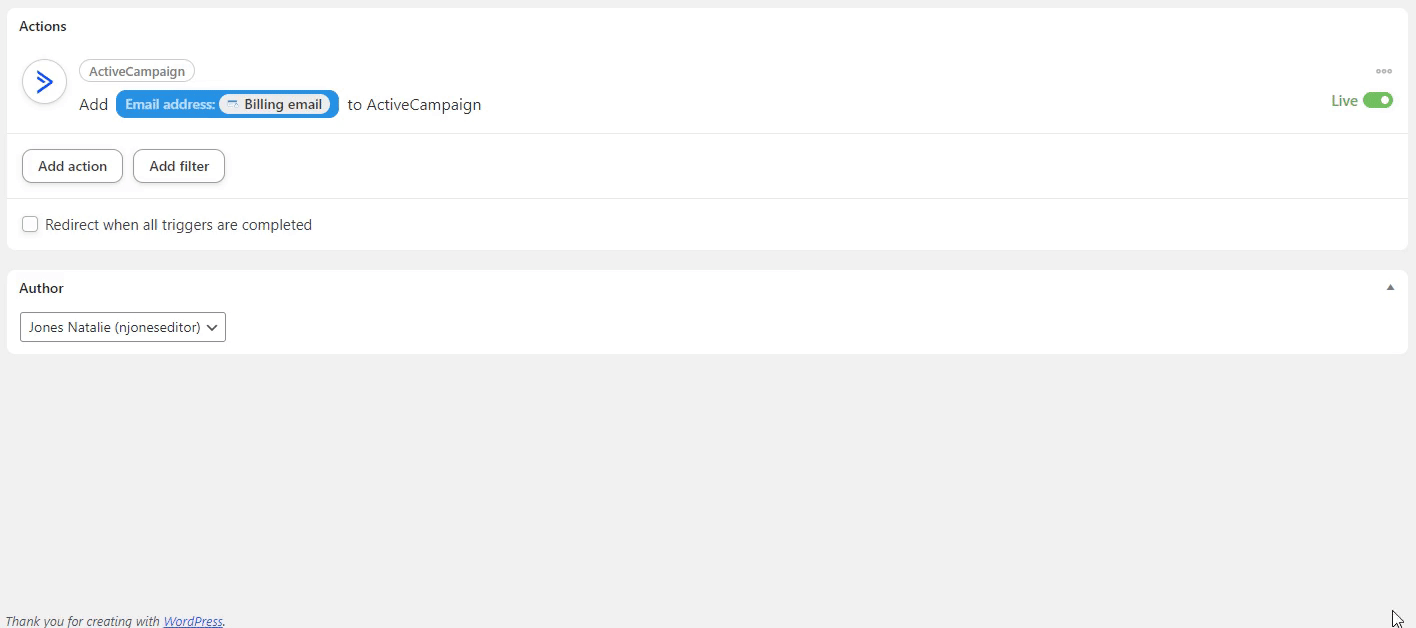
Veți observa că listele din contul dvs. ActiveCampaign sunt disponibile în meniul derulant. Alegeți lista la care doriți să fie adăugați noii dvs. clienți Stripe.
În cele din urmă, faceți clic pe Salvare și comutați comutatorul din Schiță la Activ.
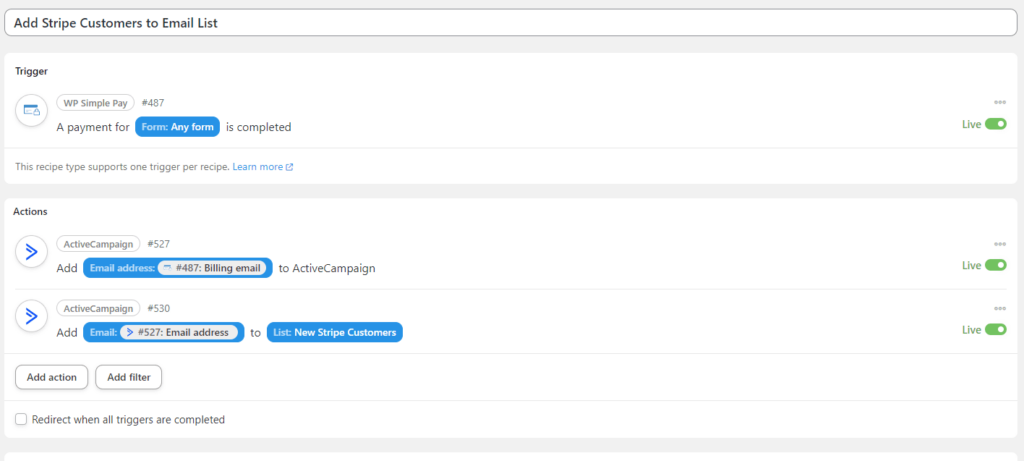
Odată ce ambele acțiuni sunt configurate, rețeta dvs. completă ar trebui să arate cam așa cum este prezentată mai jos.
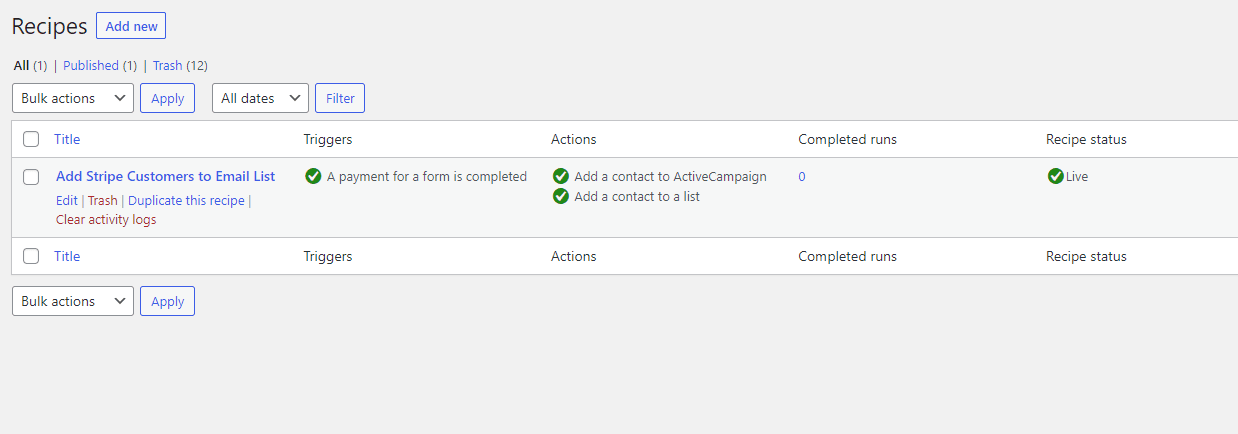
Asigurați-vă că navigați la Toate rețetele din tabloul de bord WordPress pentru a vă asigura că noua dvs. rețetă funcționează.
Pașii Următori
Acum că ați creat o rețetă în Uncanny Automator care vă permite să adăugați noii dvs. clienți Stripe în lista dvs. de corespondență ActiveCampaign, este foarte recomandat să testați integrarea.
Puteți face acest lucru efectuând o tranzacție de test folosind formularul WP Simple Pay pe care l-ați ales în timpul configurării rețetei dvs.
Pentru mai multe detalii și informații suplimentare, consultați următoarele tutoriale și ghiduri:
- Cum să activați modul de testare Stripe în WordPress
- Cele mai bune pluginuri de crowdfunding pentru WordPress
- Cum să testați plățile Stripe în WordPress
- Cum să acceptați plăți Stripe în WordPress
Ce mai așteptați? Începeți astăzi cu WP Simple Pay!
Pentru a citi mai multe articole ca acesta, urmăriți-ne pe X.
Dezvăluire: Conținutul nostru este susținut de cititori. Acest lucru înseamnă că dacă faceți clic pe unele dintre linkurile noastre, este posibil să câștigăm un comision. Recomandăm doar produse despre care credem că vor adăuga valoare cititorilor noștri.


Lasă un răspuns