
How to Accept WeChat Pay on WordPress (Easy Way)
Last updated on

 Cristian Rossi
Digital wallets have quickly become one of the most convenient ways to pay online. Whether it’s for eCommerce purchases, event registrations, or donations, people expect fast, mobile-friendly checkout options that don’t require pulling out a credit card.
WeChat Pay is one of the most widely used digital payment methods in the world, trusted by millions of consumers and supported by Stripe. By adding WeChat Pay to your WordPress site, you can give customers a familiar, secure way to complete their purchase all from within their mobile device.
Many site owners assume that enabling new payment methods requires complex setup or custom coding. Fortunately, that’s not the case here. With the right payments plugin for WordPress, you can connect your site directly to Stripe and easily enable WeChat Pay on your payment forms.
Let’s start by looking at why offering WeChat Pay can make a real difference for your business and your customers.
In this full guide, you’ll learn:
- Why Offer WeChat Pay on Your WordPress Site
- How WeChat Pay Works with Stripe
- Setting Up WeChat Pay in WordPress
- Step 4: Publish and Test Your WeChat Pay Form
- FAQs About Accepting WeChat Pay on WordPress
- Do I need a special plugin to accept WeChat Pay in WordPress?
- How do I enable WeChat Pay in my Stripe account?
- Can I display WeChat Pay alongside other payment options?
- Will WeChat Pay appear on all payment forms automatically?
- Can I test WeChat Pay before going live?
- My WeChat Pay option isn’t showing in the form builder. What should I do?
- Start Accepting WeChat Pay on WordPress Today
Why Offer WeChat Pay on Your WordPress Site
Every checkout should make it easy for customers to complete a purchase without hesitation. Adding modern, familiar payment options removes friction and builds confidence; and that’s exactly what WeChat Pay helps you do.
WeChat is often described as a “super app.” It’s a messaging platform that connects people, businesses, and services through social features, shopping, and payments. Inside the app, WeChat Pay functions as a digital wallet that’s used by more than 800 million people worldwide.

It’s one of the most popular ways to pay for online purchases, from travel and gaming to education, food delivery, and eCommerce. By supporting WeChat Pay, you give your customers the ability to complete transactions using the same payment method they already use daily on their phones.
Here’s why this matters for your WordPress site:
🔹 More options at checkout: Not every customer wants to use a credit card or a PayPal account. WeChat Pay gives people a fast, secure mobile option that feels familiar and trustworthy.
🔹 A smoother mobile experience: Customers can scan a QR code or authorize payment directly in the WeChat app; no typing, redirects, or browser issues.
🔹 Stripe-powered security: Because WP Simple Pay connects through Stripe, every WeChat Pay transaction benefits from Stripe’s built-in fraud prevention, encryption, and global compliance standards.
Adding WeChat Pay isn’t about following a trend; it’s about offering a payment method that already fits into your customers’ daily routines. It helps you deliver a modern checkout experience that feels simple, safe, and reliable.
Let’s look at how WeChat Pay works with Stripe and how the right WordPress payments plugin makes setup quick and code-free.
How WeChat Pay Works with Stripe
Before setting up your payment form, it helps to understand how WeChat Pay connects to your WordPress site through Stripe.
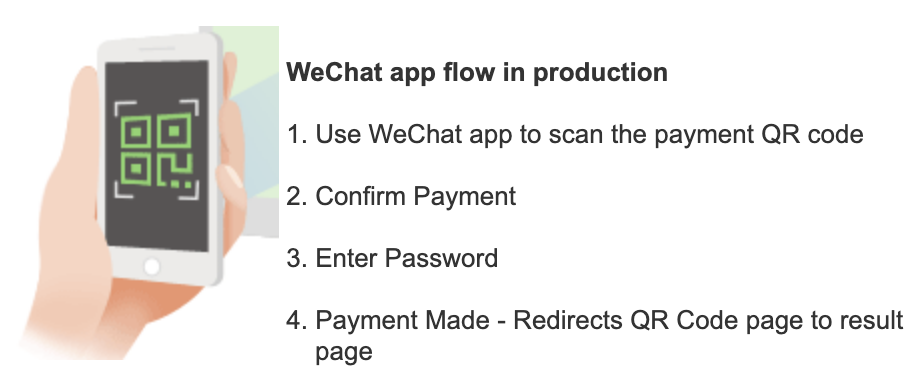
When a customer selects WeChat Pay at checkout, Stripe automatically generates a secure QR code or payment authorization link. The customer simply scans the code or confirms payment in the WeChat app, and Stripe handles the rest; securely processing the transaction and sending confirmation details back to your WordPress site.
Because a WordPress payments plugin connects directly to Stripe, all of this happens seamlessly in the background. You don’t need to manage separate payment gateways or touch any code. Once WeChat Pay is activated in your Stripe Dashboard, it becomes instantly available for you to enable in your payment forms.
Here’s what happens behind the scenes:
- The customer selects WeChat Pay on a payment form.
- Stripe displays a QR code or opens the WeChat app for quick payment.
- The customer confirms the payment.
- Stripe processes the transaction securely and notifies your WordPress site of success.
This integration means you can offer a modern, mobile-first payment experience without any extra plugins or third-party tools.
Now that you know how it works, let’s walk through the exact steps to enable WeChat Pay in Stripe and connect it to your WordPress payment form.
Setting Up WeChat Pay in WordPress
Adding WeChat Pay to your WordPress site only takes a few minutes. You can connect directly to Stripe, so once you enable the payment method in your Stripe Dashboard, it becomes instantly available inside your payment form using the best Stripe payments plugin for WordPress, WP Simple Pay.
Here’s how to set up WeChat Pay step by step.
Step 1: Enable WeChat Pay in Stripe
To get started, you’ll need enable WeChat Pay is enabled in your Stripe dashboard. Simply Log in to your Stripe Dashboard, go to Settings → Payment Methods, and toggle WeChat Pay On.
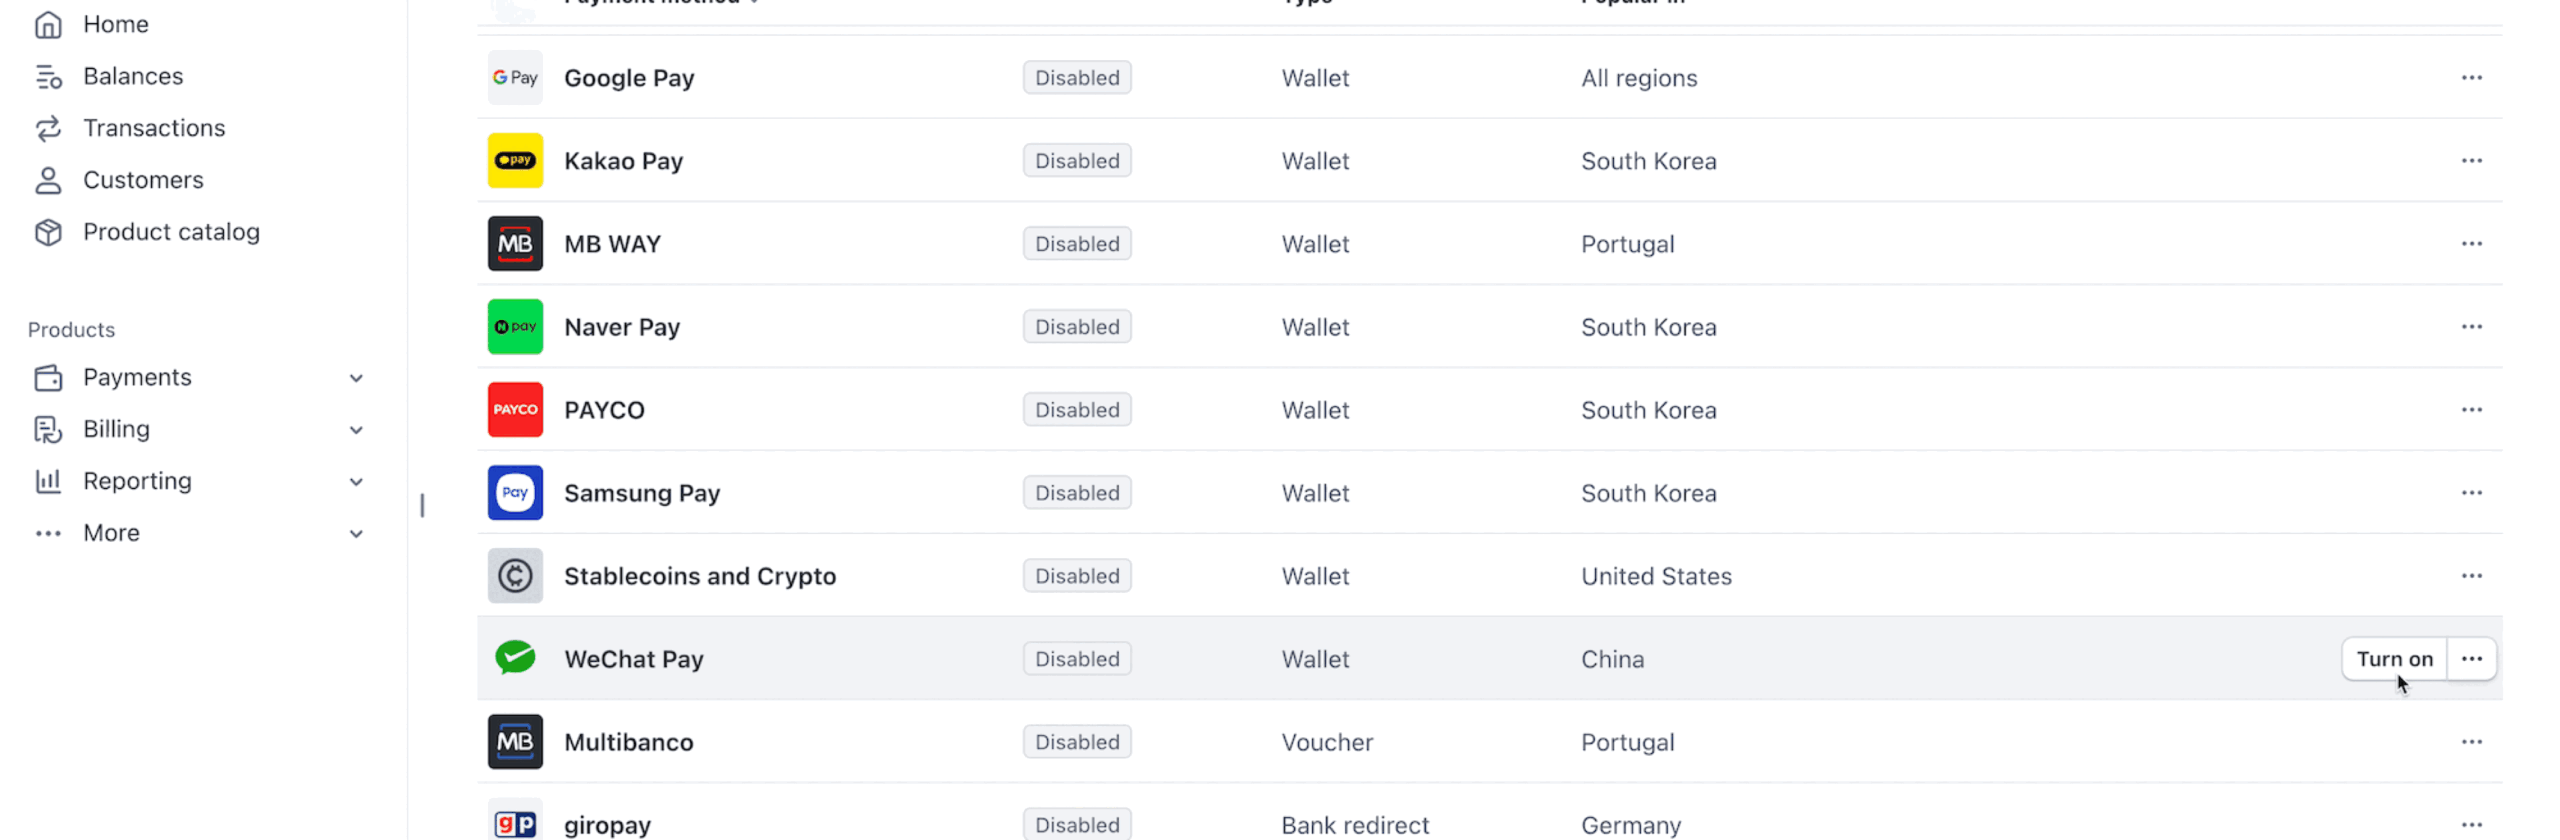
Once enabled, Stripe will automatically allow payments through WeChat Pay for supported currencies and regions. Most businesses are approved instantly and can begin accepting payments right away.
Step 2: Install and Activate WP Simple Pay
With WeChat Pay enabled in your Stripe account, the next step is to install and connect WP Simple Pay, the plugin that lets you build custom payment forms directly in WordPress and easily accept payments from 10+ payment methods, including WeChat Pay.
With WP Simple Pay Pro, you can also:
- Remove the additional 3% Stripe processing fee to receive the full net amount.
- Create a payment form in minutes using several different pre-built payment form templates.
- Accept multiple payment methods, including ACH Direct Debit, traditional debit/credit cards, Cash App Pay, Apple Pay, Buy Now, Pay Later services, Alipay, and more.
- Easily set up subscriptions and installment plans to ensure long-term funding and increase average order values.
Installing WP Simple Pay
To get started, visit the WP Simple Pay pricing page and choose the plan that best fits your needs. After completing your purchase, download the plugin’s .zip file to your computer.
Then, in your WordPress dashboard, head to Plugins → Add New → Upload Plugin, upload the file, and click Install Now. Once installation is complete, activate the plugin and launch the Setup Wizard to connect your Stripe account.
The setup wizard will guide you through a quick authorization process where you’ll log in to Stripe and grant WP Simple Pay permission to manage payments on your site. Once connected, your active Stripe payment methods, including WeChat Pay, will automatically sync with your account.
You don’t need to write any code or manually configure APIs. WP Simple Pay takes care of the technical setup so you can move straight to creating your first payment form.

Step 3: Create a WeChat Pay Payment Form
Once WP Simple Pay is installed and connected to your Stripe account, you’re ready to create a payment form that accepts WeChat Pay on your WordPress site.
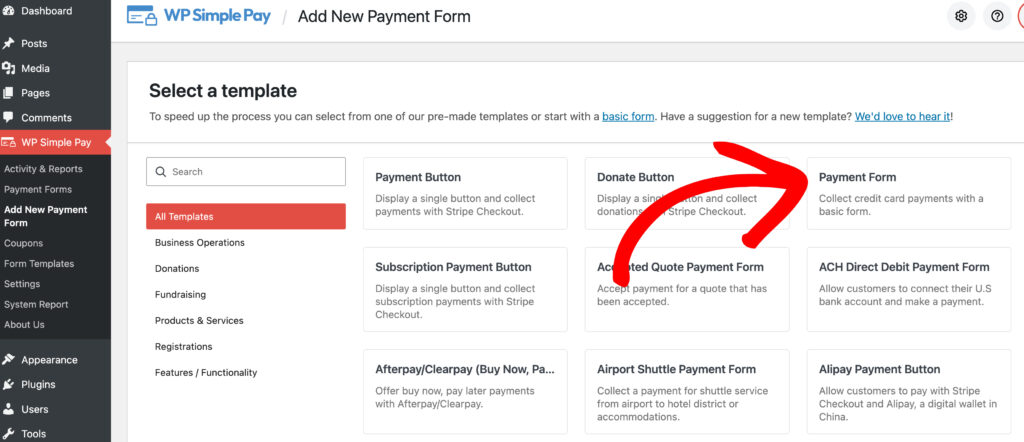
From your WordPress dashboard, go to WP Simple Pay → Add New Payment Form. You’ll see several pre-built templates designed for different use cases, such as donation forms, subscription forms, or custom amount forms. Choose the one that best fits your needs to start customizing.
For the purpose of this tutorial, we’ll go with the Payment Form template.
Next, open the Payment tab in the form builder. Scroll down to the Payment Methods section, where you’ll see all the payment options currently active in your Stripe account. Simply check the box for WeChat Pay to enable it on your form.
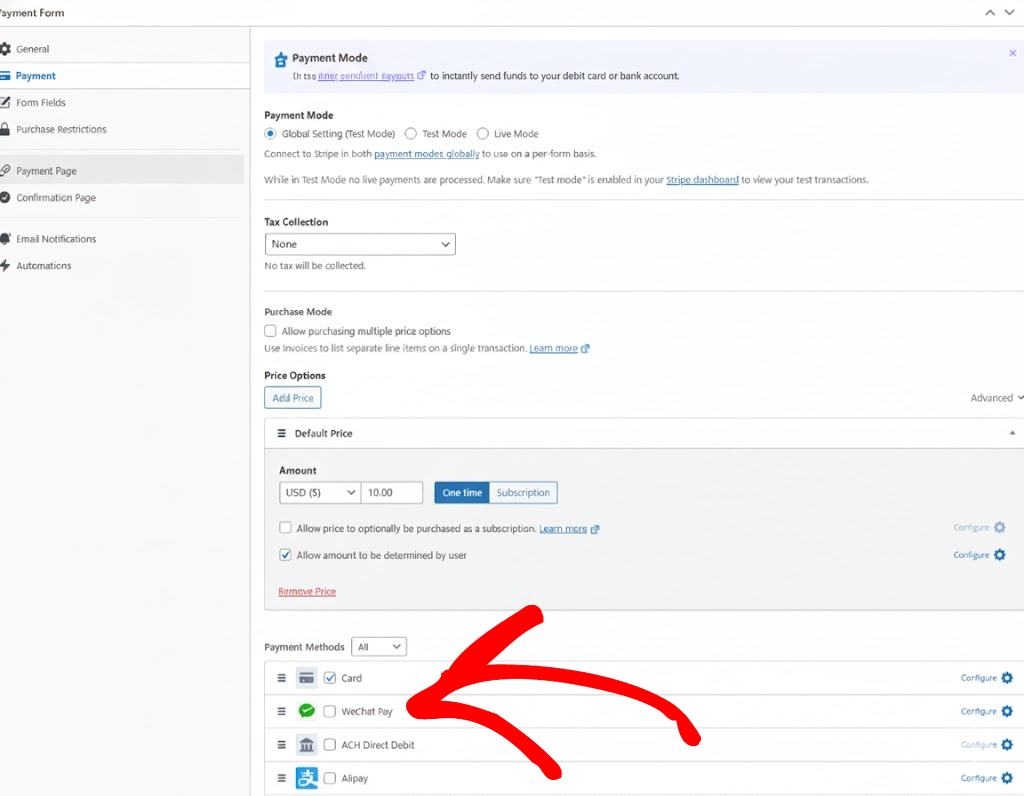
If you don’t see WeChat Pay listed, return to your Stripe Dashboard under Settings → Payment Methods to make sure it’s toggled on. Then, refresh the WP Simple Pay page to sync the update.
Now that you’ve enabled WeChat Pay, you can use the form builder to easily customize your payment form further. Updating the title, description, and pricing options of your form is effortless using the General tab. WP Simple Pay lets you offer one-time or subscription payment options, and even allow multiple selections on a single form if you want to provide several pricing tiers or donation levels.
Under the Form Fields tab, you can add details like name, email, or company information to collect exactly what you need at checkout.

When you’re finished, click Save to store your changes. Your new form is now ready to accept WeChat Pay alongside any other payment methods you’ve activated in Stripe, such as credit cards, Apple Pay, or Google Pay.
Next, let’s publish your payment form on your WordPress site and test it to make sure everything’s working smoothly.
Step 4: Publish and Test Your WeChat Pay Form
With your WeChat Pay payment form ready, the final step is to add it to your WordPress site and confirm that everything works correctly.
From the Publish panel in the form builder, copy the provided block or Shortcode. You can then paste it into any page or post using the WordPress Block Editor, for example, a “Donate,” “Checkout,” or “Book Now” page.
Once you update or publish the page, your WeChat Pay form will appear exactly where you placed it.

Before accepting live payments, it’s a good idea to test your setup. Switch WP Simple Pay to Test Mode from the plugin’s settings or top toolbar, then open your payment page in a new browser tab.
You can walk through the full checkout experience using Stripe’s test credentials to confirm that WeChat Pay appears as an available option and that each step of the transaction behaves as expected.
When you’re satisfied with the results, return to your WP Simple Pay settings and switch from Test Mode to Live Mode. Your form is now active and ready to accept real payments through WeChat Pay with no extra configuration required.
FAQs About Accepting WeChat Pay on WordPress
Do I need a special plugin to accept WeChat Pay in WordPress?
No. You can accept WeChat Pay using WP Simple Pay and Stripe; no additional plugins or eCommerce platforms required. WP Simple Pay connects directly to Stripe, so once WeChat Pay is enabled in your Stripe account, it becomes available in your payment forms automatically.
How do I enable WeChat Pay in my Stripe account?
Log in to your Stripe Dashboard, go to Settings → Payment Methods, and locate WeChat Pay in the list. Toggle it On to enable it. WP Simple Pay will automatically sync the update, and the option will appear inside your form builder.
Can I display WeChat Pay alongside other payment options?
Yes. You can offer WeChat Pay, credit and debit cards, Apple Pay, and Google Pay all within the same payment form. WP Simple Pay shows these as simple radio-button choices, so customers can easily pick their preferred payment method during checkout.
Will WeChat Pay appear on all payment forms automatically?
Only if it’s selected in the form builder. Each payment form in WP Simple Pay lets you choose which payment methods to include, so you can turn WeChat Pay on or off per form based on your needs.
Can I test WeChat Pay before going live?
Yes. Switch WP Simple Pay to Test Mode and walk through a test payment using Stripe’s test credentials. This lets you preview the entire checkout process and confirm that the WeChat Pay option appears correctly before you start accepting real payments.
My WeChat Pay option isn’t showing in the form builder. What should I do?
If WeChat Pay doesn’t appear, double-check your Stripe settings to make sure the method is toggled on. You can also refresh your WordPress dashboard or reconnect your Stripe account in WP Simple Pay to force a sync.
Quick Summary: How to Accept WeChat Pay on WordPress
- WeChat Pay is the wallet inside the WeChat app, used by 800M+ people for online purchases.
- WP Simple Pay connects WordPress to Stripe so you can accept WeChat Pay without extra plugins.
- Enable it in Stripe Dashboard → Settings → Payment Methods and toggle WeChat Pay On.
- In WP Simple Pay, select WeChat Pay in the form’s Payment Methods and publish with a block or shortcode.
- Processed by Stripe with PCI and fraud tools; verify in Test Mode before going live.
Start Accepting WeChat Pay on WordPress Today
Adding WeChat Pay to your WordPress site is a small change that can make a big difference in your checkout experience. With WP Simple Pay, you can start accepting secure mobile payments in just a few clicks; no extra plugins, no custom code, and no complicated setup.
Whether you’re selling services, collecting donations, or offering online bookings, supporting modern payment methods like WeChat Pay helps every customer feel confident completing their transaction.
If you haven’t already, update to the latest version of WP Simple Pay and connect your Stripe account to unlock WeChat Pay and other localized payment options.
👉🏻 Get WP Simple Pay today and start offering your visitors a faster, more flexible way to pay right from your WordPress site.
Ready to accept WeChat Pay on WordPress and reach customers worldwide?
What are you waiting for? Get started with WP Simple Pay today!
To read more articles like this, follow us on X.
Disclosure: Our content is reader-supported. This means if you click on some of our links, then we may earn a commission. We only recommend products that we believe will add value to our readers.


Leave a Reply