
How to Configure a Payment Form’s Fields and Collect Custom Data
In This Document
Reading time: 10 minutes | Difficulty: Beginner
Overview
On the Form Fields tab is where you’ll add and configure custom fields for additional data collection, labels, and other fields displayed in your on-site payment forms.
Prerequisites
- WP Simple Pay Pro (custom fields beyond the basics require Pro)
- A payment form opened in the form builder
Adding a Field
To begin, visit the Form Fields tab in the form builder, then simply select the type of field you’d like added to your payment form and click Add Field.
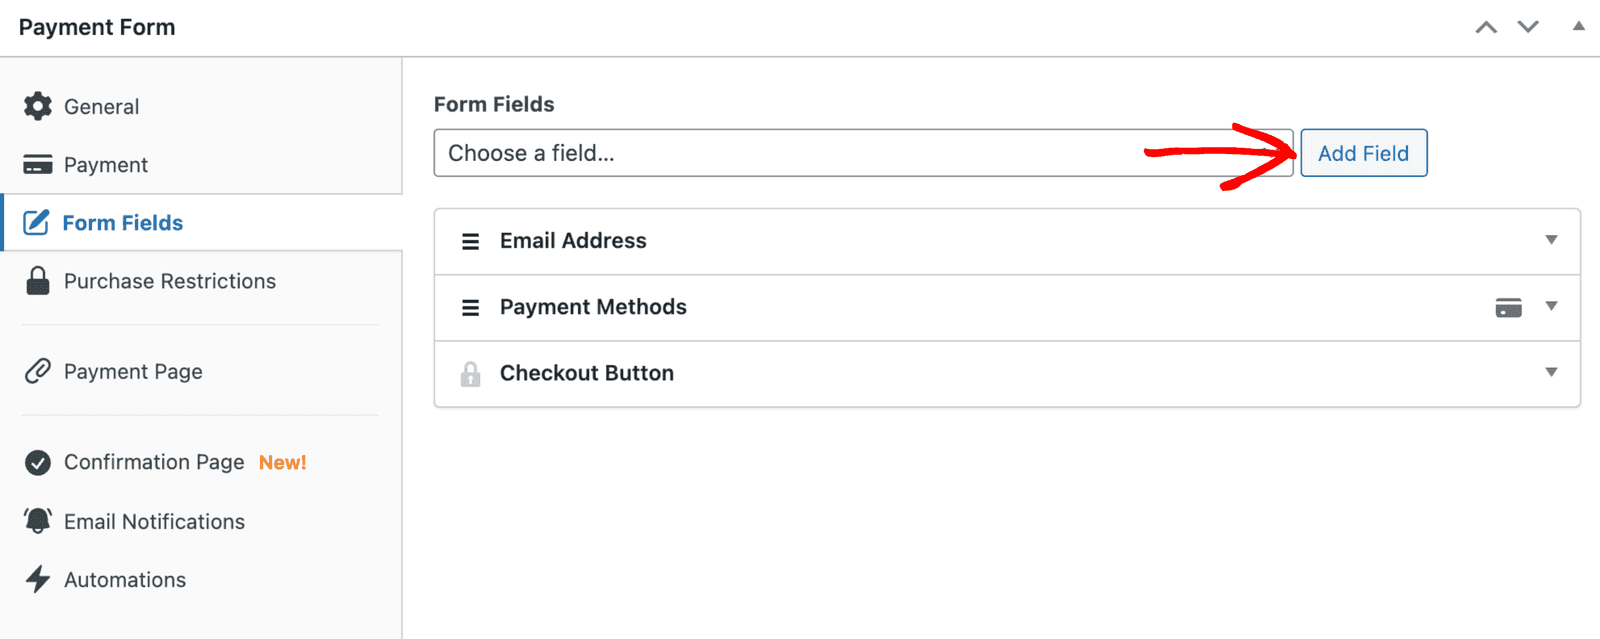
Field Types
Data inputs generally share the following settings:
Shared Field Settings
Label
A text label displayed above the field.
Placeholder
A short hint shown when the field is empty.
Default Value
A text label displayed above the field.
Dynamic Value
An optional dynamic value that can be passed into the field value. See documentation.
Required
Whether or not the field must be completed before the payment is submitted.
Stripe Metadata Label
Used to identify this field within Stripe payment records. Not displayed on the payment form.
Customer Fields
Name
Collect the payer’s name.
Email Address
Collect the payer’s email address. This field is always required.
Field Settings
Offer Saved Payment Methods
Boost conversions by offering previously saved payment methods Stripe Link.
When enabled, Link autofills your customers’ payment information to create an easy and secure checkout experience. The Link authentication field will automatically display a localized email field.
On on-site payment forms with card payments enabled, Link is also offered inside the payment fields, next to the card form, so returning Link customers can pay in one click. Link may also offer to pay by bank account. To turn that off, change your Link settings in the Stripe Dashboard.
Phone
Collect the payer’s phone number.
Field Settings
Offer Smart Phone Validation
Reduce the likelihood of errors and typos by activation Smart Phone Validation.
When enabled, this activates an intelligent field validation system that ensures the phone number is entered in the correct format for the selected locale, reducing the likelihood of typos or errors. An alternative default country can be set.
Address
Collect the payer’s billing and/or shipping address. This field is not compatible with Stripe Checkout.
Field Settings
Address Type
Determines the type of address fields to show.
If “Billing” is selected, a complete billing address is collected. The form sends this address to Stripe, so payment methods such as Klarna don’t ask for a second address.
If “Shipping” is selected, a complete shipping address is collected, and the payment method collects any billing details it needs. Klarna and Afterpay/Clearpay use the shipping address as the billing address.
Afterpay/Clearpay requires a shipping address. While Afterpay/Clearpay is enabled on an on-site form, the Address Type is set to “Shipping” and locked, with the message “Afterpay/Clearpay requires a shipping address, so this cannot be changed while that payment method is enabled.” You can still rename the heading. Turn off Afterpay/Clearpay to unlock the setting. The first time the field is switched to Shipping for this reason, a notice confirms the change when you save the form.
Billing Address Heading
Heading displayed above the entire billing address type.
Shipping Address Heading
Heading displayed above the entire shipping address type.
Tax ID
Collect the payer’s tax ID.
Stripe Billing provides automatic validation to help determine if formatting is correct. Stripe also provides automatic validation with government databases for the tax ID types below.
You’re responsible for making sure that customer information is accurate (including their tax identification number). Stripe displays a customer tax ID on an invoice, regardless of whether or not it’s valid.
Read Stripe’s official documentation →
Payment Fields
Price Selector
Displays the available price options. A single price option will be hidden.
Field Settings
Display Style
Determines how the available price options are presented.
Coupon
Allows payer’s to enter a coupon code to reduce the payment amount.
Field Settings
Button Style
Determines how the Apply button is presented.
Custom Amount
Allows the payer to enter an amount to pay. Requires a price option that allows a custom amount.
Field Settings
Prefill input with default price amount
Determines if the selected price option amount should be set in the input
Recurring Amount Toggle
Allows the payer to transform a one-time payment in to a recurring subscription. Requires a price option that allows recurring payments.
Field Settings
**Recurring by Default
**Purchases are automatically opted-in to a recurring subscription. It can be deselected.
Amount Breakdown
Displays a breakdown of the payment subtotal, discounts, taxes, total, and recurring amount.
Field Settings
**”Subtotal Amount” Label
**The label displayed in the subtotal row.
**”Total Amount” Label
**The label displayed in the total row.
**”Recurring Amount” Label
**The label displayed in the recurring amount row.
1-Click Payment Button (Apple Pay / Google Pay)
Displays the available 1-click payment buttons. Learn more about 1-click payments →
Payment Methods
Displays the list of available payment methods. Learn [more about payment methods →](/?s=payment method&docs=1)
Checkout Button
Outputs the checkout button to complete the payment.
Field Settings
Complete Payment Text
Text to display to complete the payment. Use {{amount}} to display the payment amount.
**Start Trial Text
**Text to display to a activate a subscription with a trial.
Buy Now, Pay Later Text
Text to display when using a “buy now, pay later” payment method that redirects to complete the payment.
Processing Text
Text to display when the payment form is processing.
Payment Button Style
Determines the appearance of the button.
Payment Button
Outputs the payment button to continue to Stripe Checkout or launch the overlay modal.
Field Settings
Continue to Payment Text
Text to display to continue to payment.
Continue to Trial Text
Text to display to a activate a subscription with a trial.
Processing Text
Text to display when the payment form is processing.
Button Style
Determines the appearance of the button.
Custom Data Input Fields
The following custom fields are intended for collecting additional data that is not specific to payments, billing, subscriptions, and coupons.
Where is my form data stored?
See the What Happens After A Payment page for details on where to find payment, customer, and custom field data.
Heading
A text heading.
Field Settings
Heading
The heading text.
Heading LevelH1, H2, H3, H4, H5, or H6 level.
Text
Allow users to enter any characters into a standard input area. Limit 500 characters.
Field Settings
Multi-line
Set to a paragraph text field. Limited to 500 characters by Stripe.
Dropdown
Allow users to choose one item from a dropdown list of choices.
Field Settings
Options
The list of available options to choose from, separated by a comma. i.e Red, Blue, Green
Quantity Multiplier
Uses the selected numerical option to multiple the payment amount.
Radio Select
Allow users to choose one item from a list of choices.
Field Settings
Options
The list of available options to choose from, separated by a comma. i.e Red, Blue, Green
Quantity Multiplier
Uses the selected numerical option to multiple the payment amount.
Date
Allow users to choose a date from a dropdown datepicker.
Number
Allow users to enter numeric values.
Field Settings
Minimum
The minimum number allowed.
Maximum
The maximum number allowed.
Quantity Field
Uses the set value to multiple the payment amount.
Checkbox
Allow users to opt-in by checking a box.
Field Settings
Checked by default
Determines if the checkbox input is initially checked
Looking to add a checkbox with a label such as “Agree to terms” that opens a new page? Read more here.
File Upload
Allow users to attach a file to their payment, by drag-and-drop or through the file browser. Requires WP Simple Pay Pro.
Field Settings
Allowed File Types
A comma-separated list of allowed file extensions, such as .pdf,.jpg,.png. Only file types WordPress itself permits for upload are accepted, whatever you list here.
Max File Size (MB)
The largest file a customer may upload, in megabytes.
Stripe Metadata Label
Used to identify the uploaded file within Stripe payment records. A Copy Smart Tag button next to it gives you the matching smart tag for confirmation pages and emails.
For the full walkthrough, see How to Add a File Upload Field.
Hidden
Not visible to users. You can use it to send additional data to Stripe.
Viewing Collected Form Information
Everything a customer submitted is visible inside WordPress. Go to Payment Forms > Transactions, open a payment, and the detail view lists the custom field values that came in with it, along with any uploaded files, the amount breakdown and the payment method. See How to Use the Transactions Page. Recurring payments have their own list at Payment Forms > Subscriptions — see How to Use the Subscriptions Page.
The same values are also stored on the Stripe payment record as metadata, which is useful when you want to edit a value or work from the Stripe Dashboard:
- How to View Customer Details in Stripe
- How to View Payment Details in Stripe
- How to View Subscription Details in Stripe
- How to View Custom Field Values in Stripe
What’s Next?
- Custom Field Types Reference – Every field type and the options it offers
- How to Use Conditional Logic for Form Fields – Show or hide fields based on earlier answers
- How to Add and Configure Coupons – Set up coupons for the Coupon field
Still have questions? We're here to help!
Last Modified: