How to Get Stripe Dashboard (Payment Reports) in WordPress
Last updated on
Do you want to get Stripe payment stats right within your WordPress dashboard? With our Activity & Reporting dashboard, you can get Stripe payment reports in WordPress without even having to log into your Stripe account.
In this article, we’ll walk you through how to enable Stripe Dashboard in WordPress.
Stripe Dashboard in WordPress
Using the WP Simple Pay plugin is the easiest way to get Stripe payment reports in WordPress.
WP Simple Pay is one of the best WordPress Stripe plugins that let you easily accept payments with WordPress. Unlike a typical Stripe plugin, WP Simple Pay enables you to make the most of the Stripe payment gateway.
- Multiple payment methods: Supports 10 + payment methods, including ACH Direct Debit, Apple Pay / Google Pay, and more.
- Drag and drop form builder: Easily build a payment form with our intuitive payment form builder
- Tons of built-in templates: Never start from scratch, thanks to our built-in form templates library
- Automatic taxes: Collect taxes based on customer location along with the payment
Aside from these features, WP Simple Pay comes bundled with Activity & Reports, giving you a bird’s eye view of your business performance.

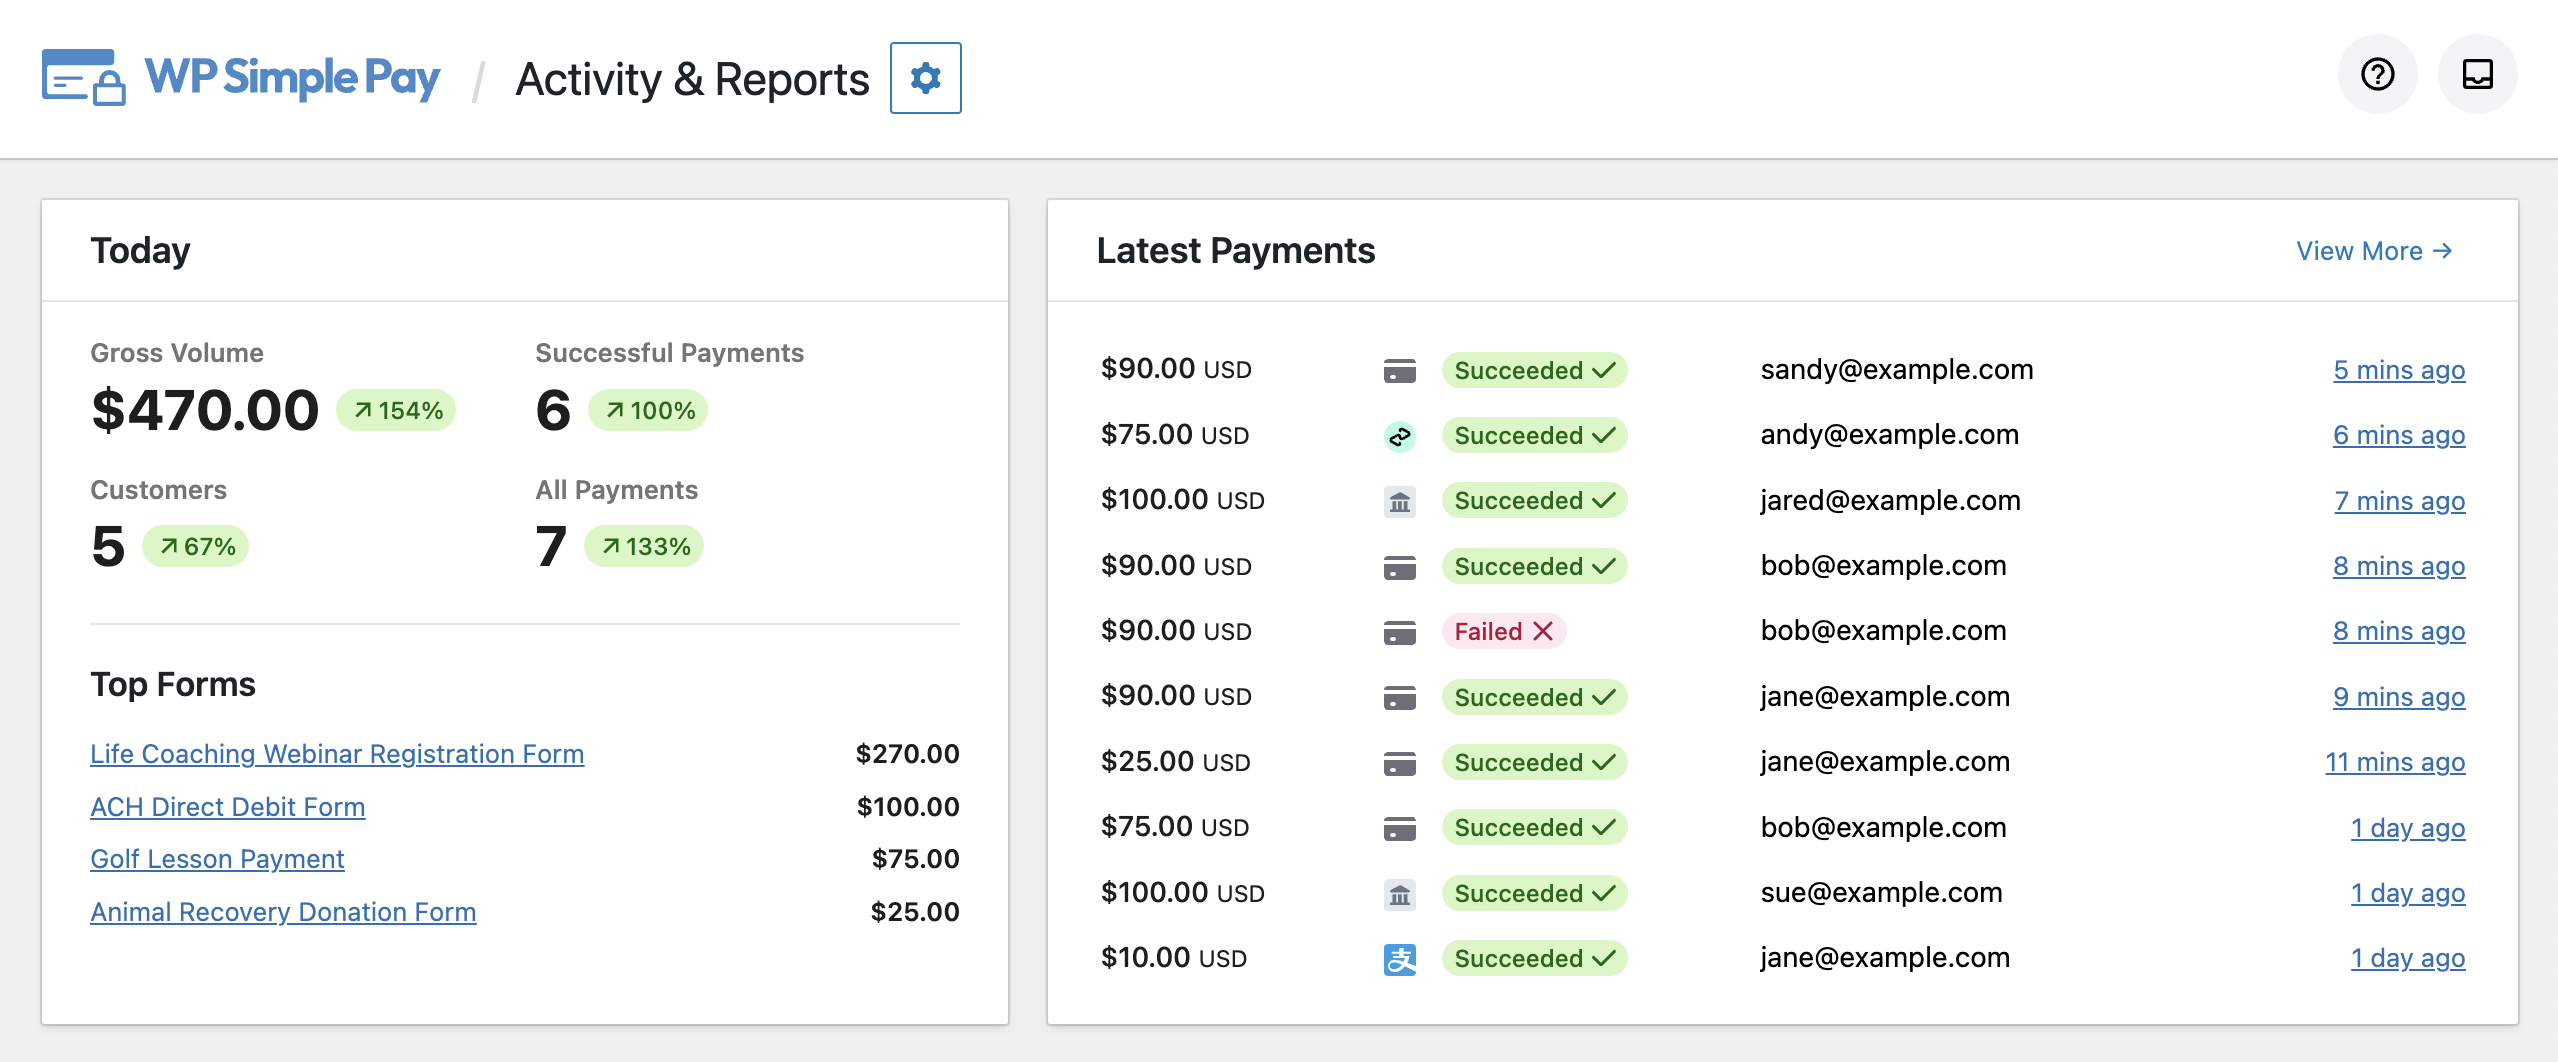
The Activity & Reports screen gives you a snapshot of the total payments you collected for the day. In addition, you can also get an overview of the latest 10 payments you receive through the Stripe forms you published on your website.
Simply put, this overview report shows you what is happening on your website at the moment in terms of payments.
In addition to the overview report, you can view your historical payment data too.

For example, you can see period-over-period charts for gross volume and successful payments. Plus, view all these reports for a preset date range or a custom-selected period.
Now let’s take a look at how to enable the Stripe dashboard in WordPress
Step 1: Install WP Simple Pay on Your Site
First off, install WP Simple Pay on your WordPress site.
After purchasing the WP Simple Pay plugin, download it from your purchase email receipt or from your WP Simple Pay account.
Then log into your WordPress admin panel and install the plugin on your site.
If you want to install it via FTP, follow this guide.
Remove the additional 3% fee!
Most Stripe plugins charge an additional 3% fee for EVERY transaction
…not WP Simple Pay Pro!
Once the plugin is activated, you’ll automatically be directed to the setup wizard, where you can connect your Stripe account with your WordPress site.

In the setup wizard, you can either connect your Stripe account with your site or create a brand new Stripe account and then connect it with your site.
Step 2: Start Accepting Stripe Payments
After integrating your Stripe account with your site, you can create a payment form and accept payments on your site.
To create a payment form, head over to WP Simple Pay » Add New. Then choose from one of the payment form templates and launch your payment form.
You can preview the template before selecting it. Once you find the right template, select it and configure it per your needs.
Each template comes preselected with certain options, which you can customize later on. For example, you can customize details like pricing options, payment methods, and more.
When the form is ready, you can make some test payments and publish the form on your site.

For more details, you can check out how to create a Stripe payment form.
Step 3: View Stripe Payments at a Glance
So far, you’ve installed WP Simple Pay and created a payment form, and published it on your site.
You can view the payment stats within your WP Simple Pay dashboard as you receive payments from your users.
To view payment stats, go to WP Simple Pay » Activity & Reports, where you get detailed insights into current and historical payment data.
That’s it!
We hope this article helped you learn how to get Stripe payment stats inside your WordPress dashboard.
If you liked this article, you might also want to check out how to accept credit card payments with WordPress.
What are you waiting for? Get started with WP Simple Pay today!
To read more articles like this, follow us on X.
Disclosure: Our content is reader-supported. This means if you click on some of our links, then we may earn a commission. We only recommend products that we believe will add value to our readers.


Leave a Reply