
How to EASILY Sell a Single Product Online With WordPress
Last updated on

Looking to sell a product on your own WordPress site? You don’t have to be a programming or marketing geek in order to do so.
In this article, we’ll walk you through how to easily sell a single product online with WordPress, step by step.
Selling a Single Product With WordPress
Contrary to popular belief, you don’t need to set up a complex shopping cart if you only want to sell a single product on your site.
Here’s what exactly you need to sell a single product.
- Create an order form: Create an order form that your customers can fill out to make a purchase.
- Offer multiple payment methods: Let your customers choose their preferred payment method.
- Inventory management: Set a limit for the total number of sales you can process for your product. You can also hide the order form as soon as your product gets sold out.
- Automatic tax: Calculate and collect tax based on customer location.
- Customize invoice: Customize your payment invoice and provide details about how your customers would receive the product.
You can do all these and more with WP Simple Pay, #1 Stripe plugin for WordPress.
WP Simple Pay allows you to create an order form with Stripe.
Using WP Simple Pay is the EASIEST way to sell a single product on your own site.
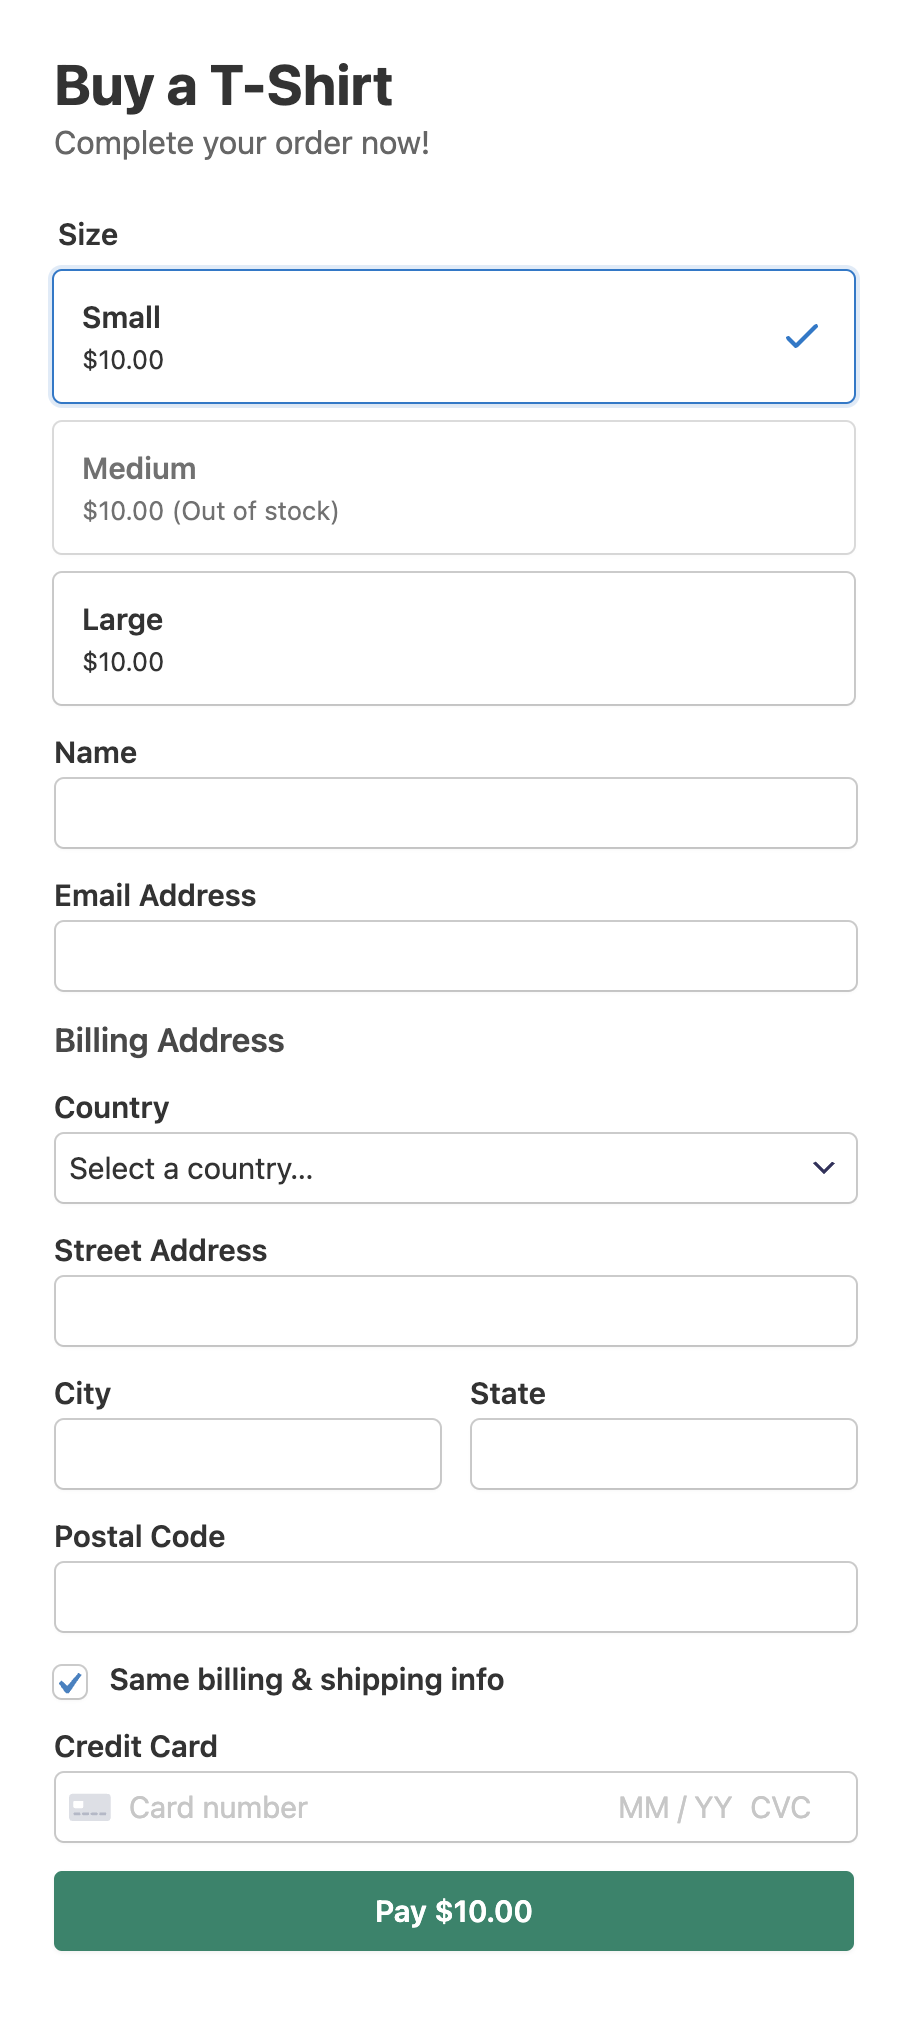
Here’s the form we’re going to create with this tutorial:
Step 1: Install and Activate WP Simple Pay
To sell a single product on your website, the first thing you’ll need to do is to install and activate WP Simple Pay on your WordPress site.
Go to the pricing page and choose a plan to purchase the plugin.
After purchasing the plugin, download it from your purchase email receipt or from your WP Simple Pay account.
Remove the additional 3% fee!
Most Stripe plugins charge an additional 3% fee for EVERY transaction
…not WP Simple Pay Pro!
To install it, go to your WordPress backend, navigate to Add New under Plugins, and then Upload Plugin. Click Choose File and find the WP Simple Pay .zip file on your computer. Click Install Now. When the upload is complete, press the Activate Plugin button.
If you want to install WP Simple Pay via FTP, follow this guide.
As soon as you activate the plugin, you’ll see a setup wizard. In the setup wizard, you’ll be asked to set up a Stripe account and connect it to your website. Click Let’s Get Started.

If you didn’t see the setup wizard, simply head over to WP Simple Pay » Settings and then click on the Stripe tab, where you can find the Connect with Stripe button. Just click on it to connect your Stripe account to your site.
Step 2: Connect WordPress to Stripe
Now in the setup wizard, let’s go ahead and connect Stripe with your WordPress site. Click Connect with Stripe.

Now let’s create a Stripe account if you don’t have one already. Alternatively, you can type in the email address associated with your Stripe account and integrate it with your website.
Keep in mind that if you choose to go with the Skip this form option, instead of connecting your site with your Stripe account, a temporary Stripe account will be set up that cannot be recovered or moved to Live Mode. So let’s not use Skip this form unless you’re setting up the plugin on a test site.

After the integration is complete, you’ll see a success page that says Setup Complete. The next thing you’ll need to do is to start creating a payment form. Click on the button Create a Payment Form.

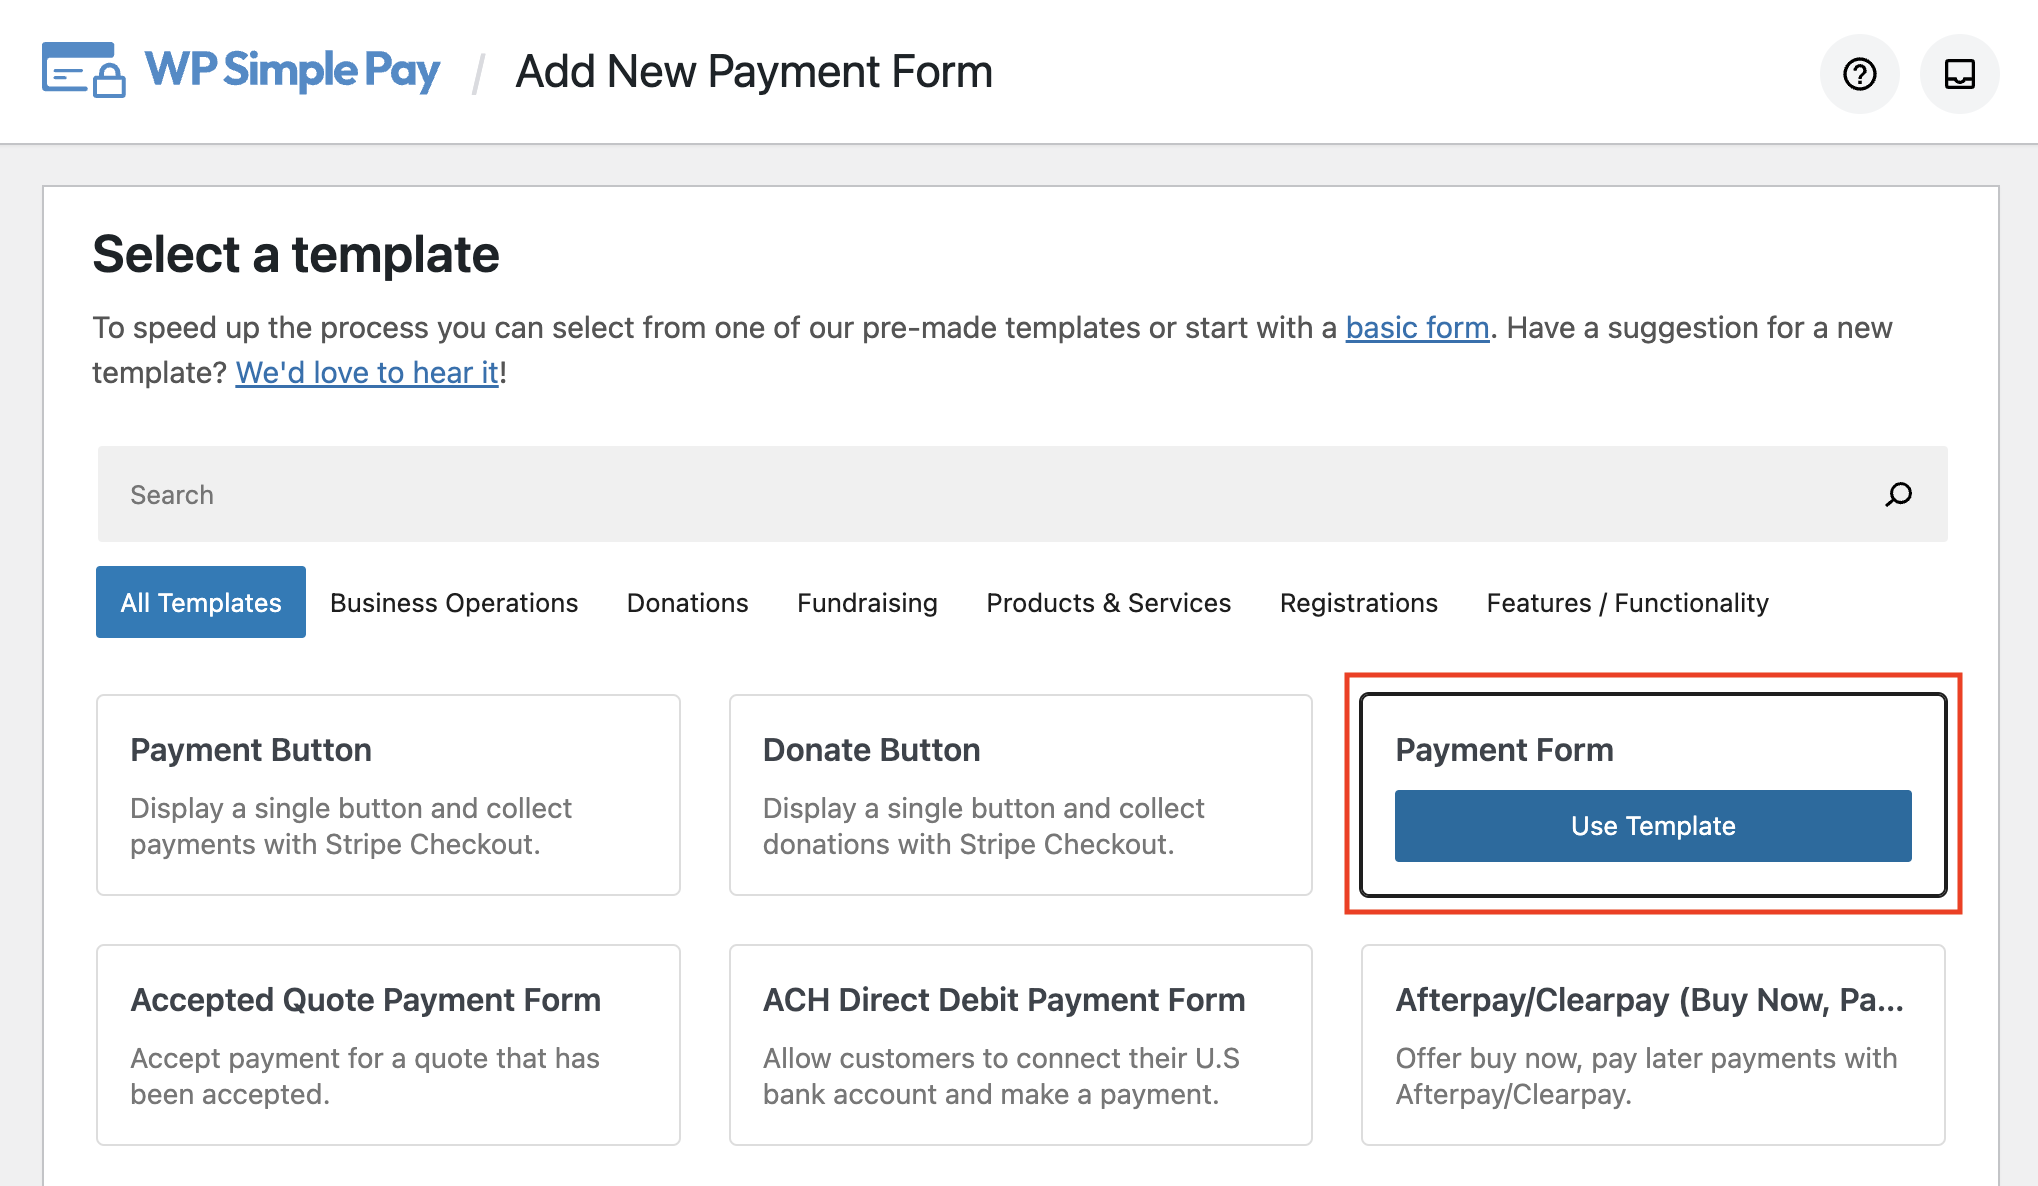
Step 3: Create a Payment Form
Now that you’ve connected your site to Stripe, let’s start creating a payment form. To create a payment form per your needs, you’ll need to select a built-in payment form template from our extensive form template library.
For the sake of this post, let’s choose a simple payment form template called Payment Form.
Step 4: Configure the Form to Accept Payments
After selecting your preferred template, it’s your turn to offer a unique payment experience to your customers by configuring the payment settings.
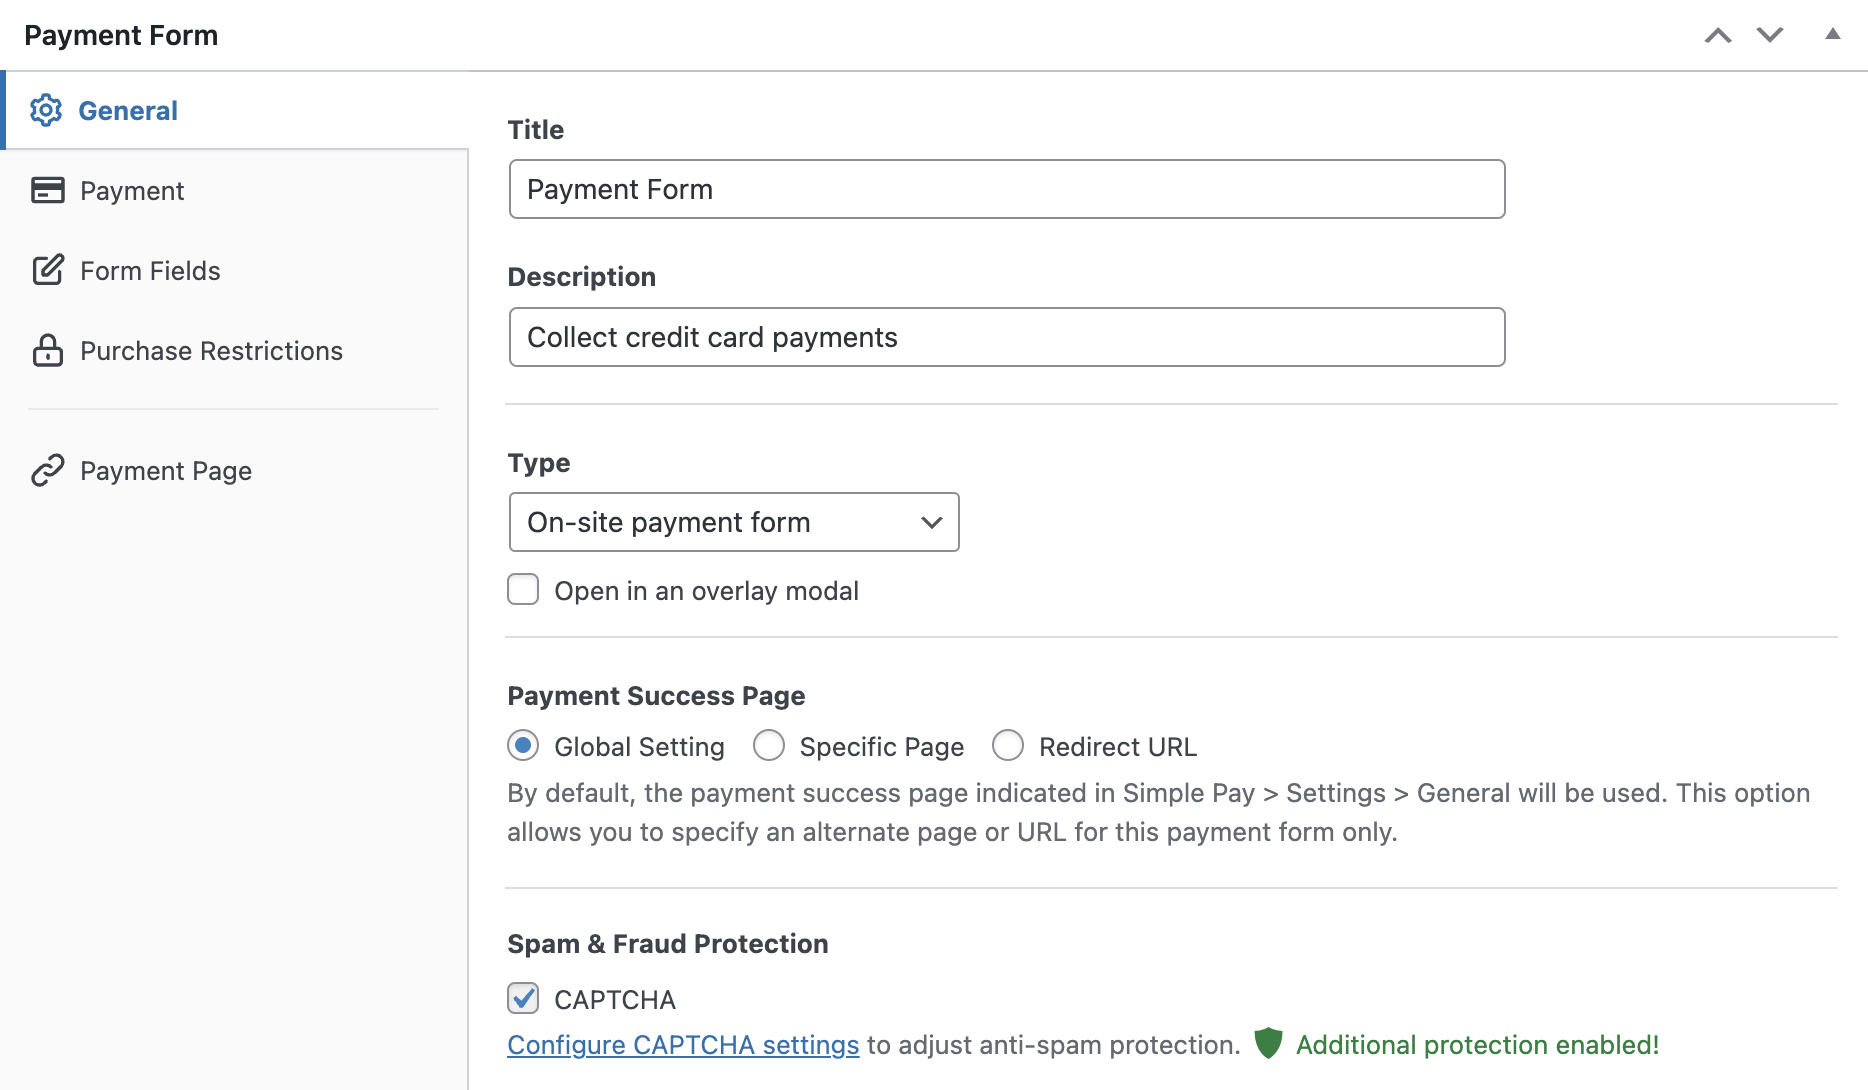
In the General tab, you can change the title, description, and form type based on your needs. To know more, check out this post on selecting the right payment form types.
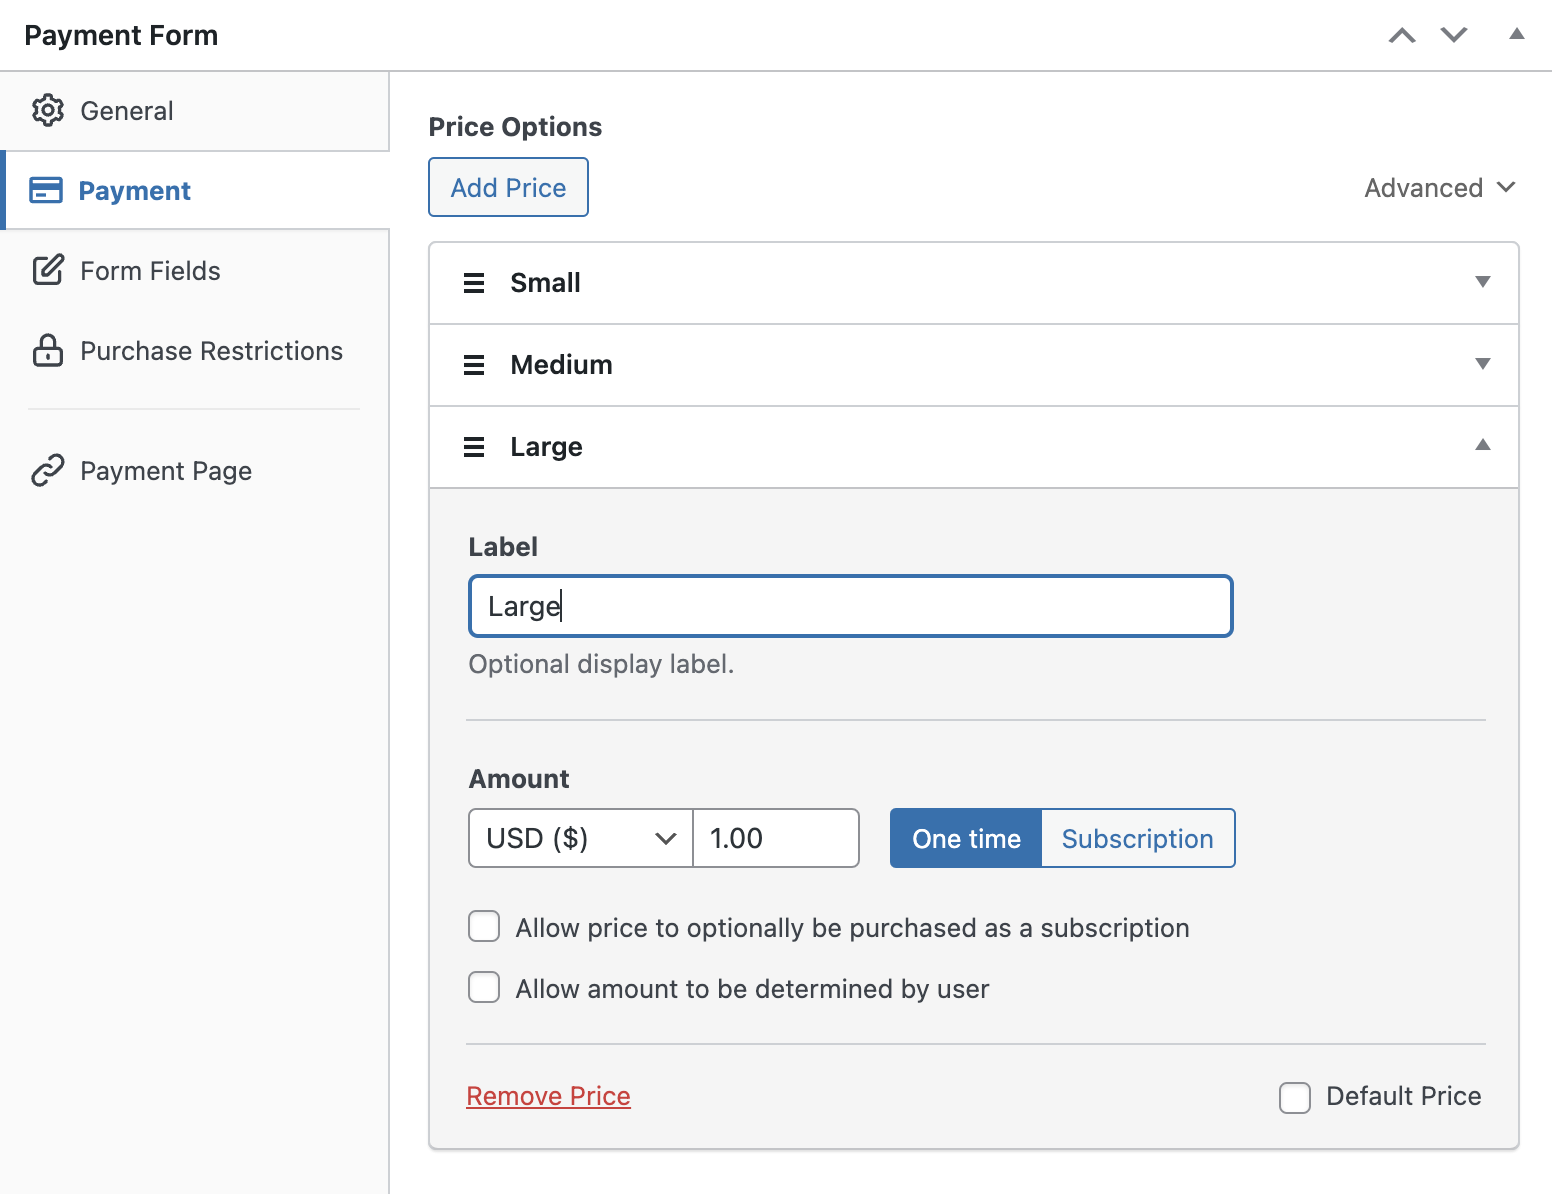
Next, click on the Payment tab on the left, and customize the currency, amount, and more. In this post, we’ll be adding 3 different price options for different t-shirt sizes.
One of the benefits of adding different price options is that when t-shirts of a certain size get sold out, the plugin automatically disables transactions through that price option (t-shirt size). Or in other words, you can automatically stop selling t-shirts of a size that’s unavailable and avoid taking out-of-stock orders.
Now go to the Form Fields tab on the left. Here, you can even add or customize any existing form fields the way you want.
Since we’re going to sell t-shirts with this form, we need to collect some additional info from our users, such as shipping address and more.
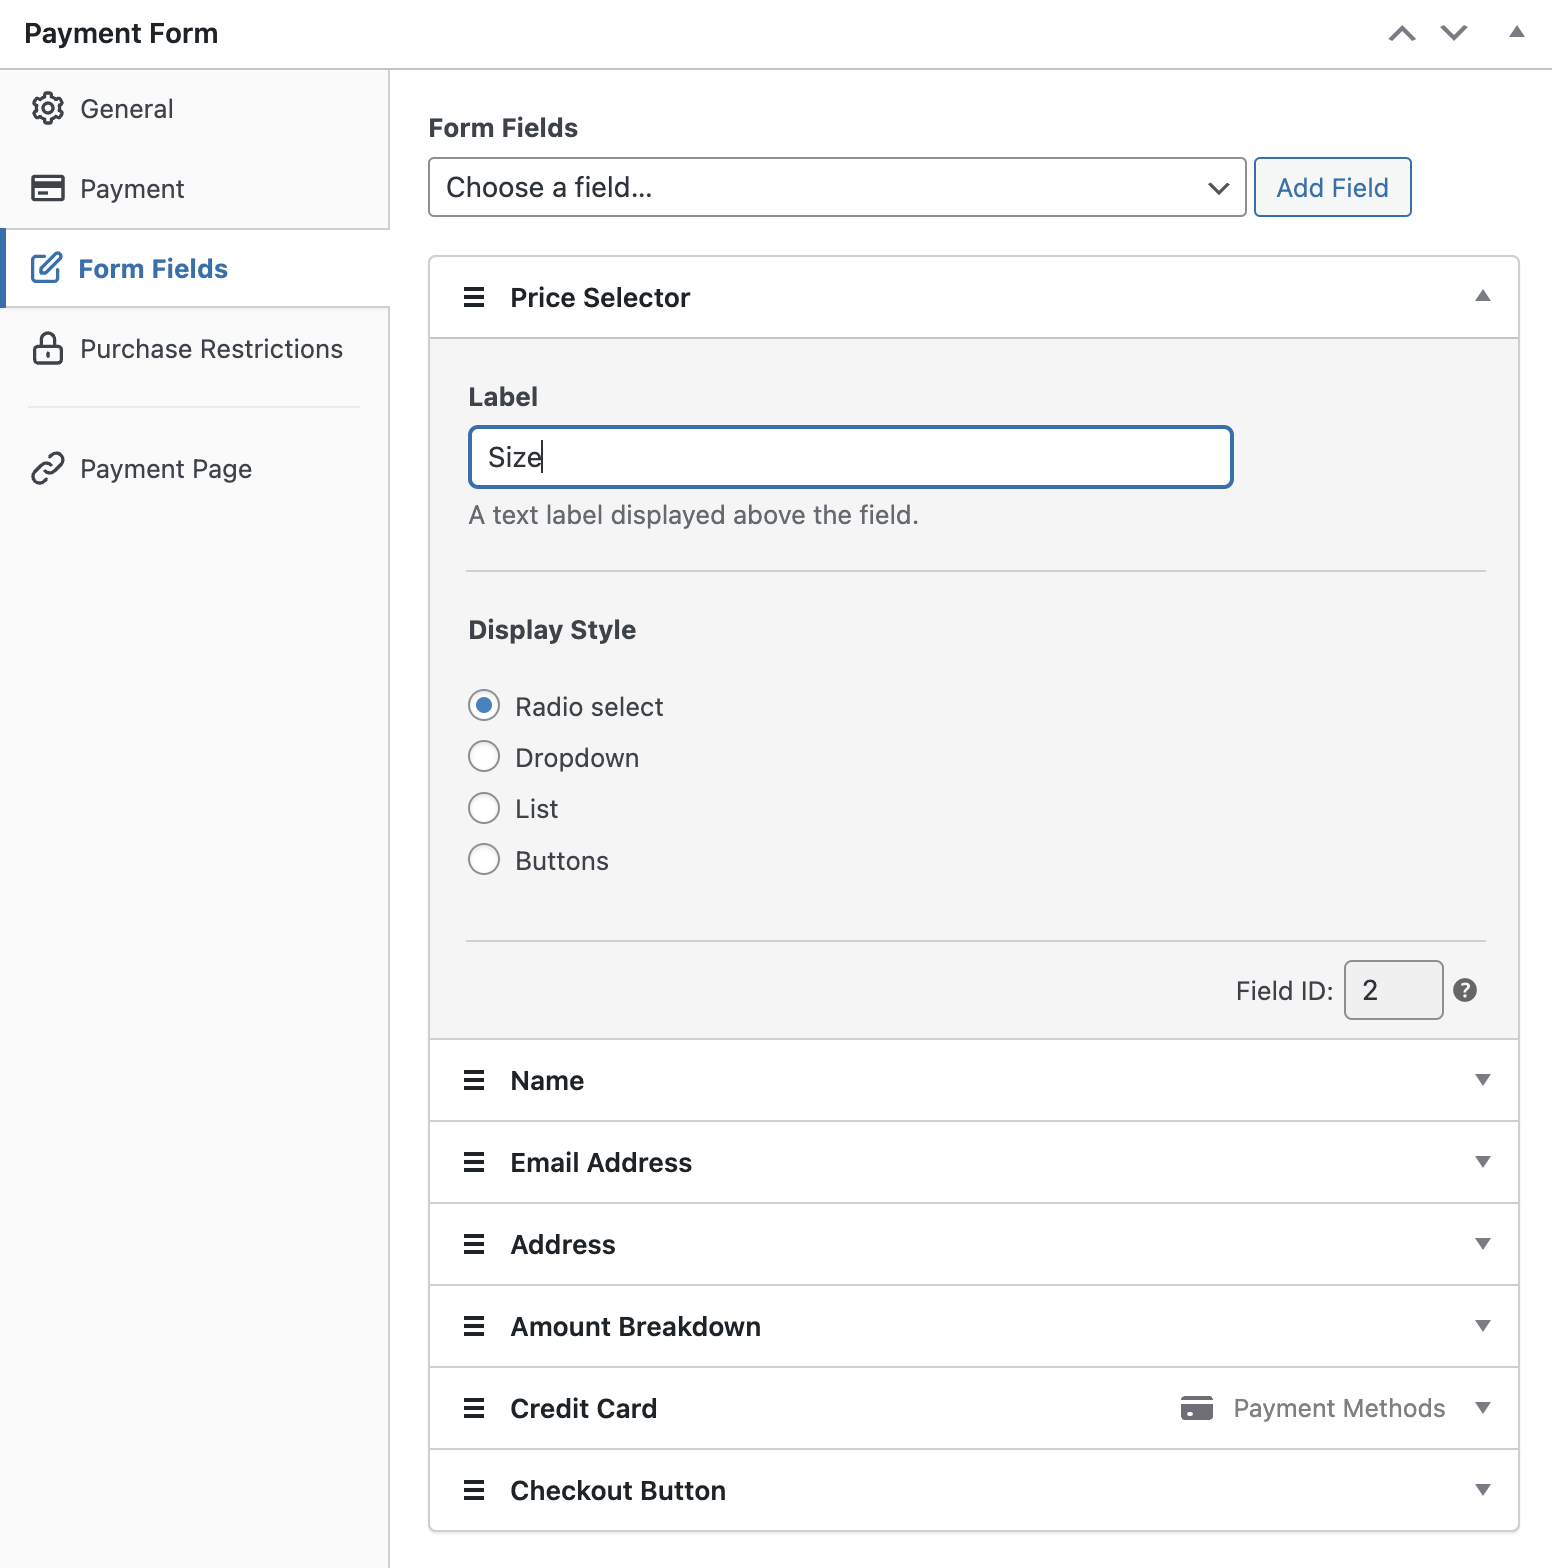
Here are the form fields we’ll be adding to our form.
- Name
- Email Address
- Price selector: Label it as Size
- Amount breakdown: Amount breakdown helps your customers understand the details of the payments, like total due, tax, processing fee, and more
- Address: Needed if you want to ship a physical product
Step 5: Inventory Management
This step is only required if you’re selling limited quantities of an item, like a physical product, an event ticket, and so on. With WP Simple Pay’s purchase restrictions, you can hide an entire payment form or disable a price option within a payment form when the product gets sold out.
To limit the number of payments in your order form, click Purchase Restrictions on the left. Then select Hide the payment form after a set number of payments and then select Each price option has its own limit.
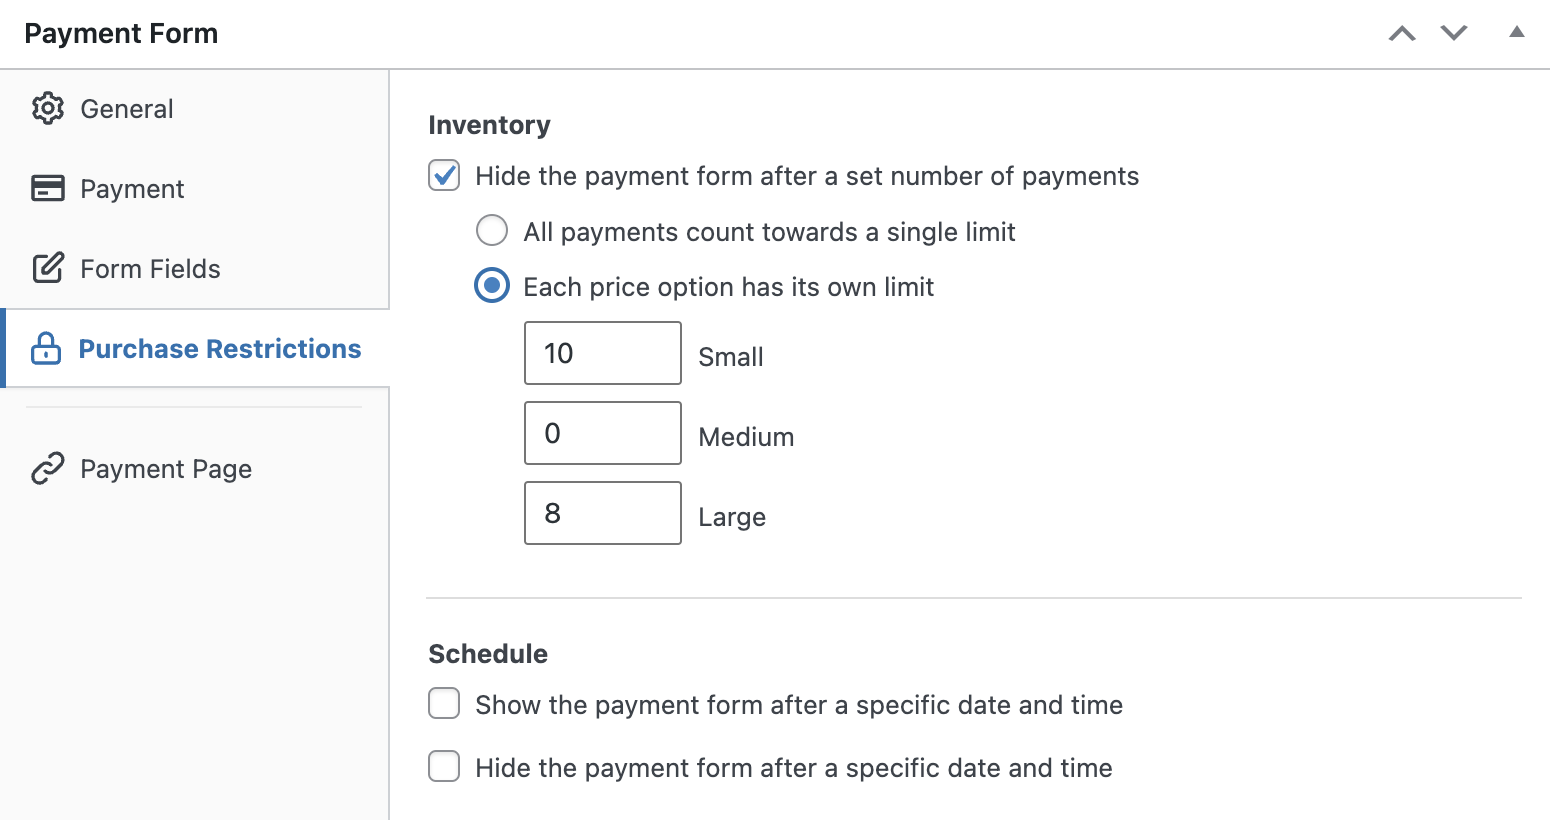
Now you’ll see different price options you’ve added to your form. Specify a limit for each option based on your available inventory. Once done, you can save your form.
Step 6: Calculate and Collect Tax
If you want to collect tax (like sales tax, GST, etc.) in addition to the payment, you’ll need to configure tax details in WP Simple Pay.
WP Simple Pay offers 2 different tax options:
- Stripe Tax: It’s a premium Stripe feature that lets you calculate and collect tax dynamically based on your customers’ location.
- Global tax: This option lets you set up a tax rate manually on your payment forms.
Global tax is the best choice for you if your sales volume or transactions don’t exceed the tax threshold in a jurisdiction where your customers reside in.
To set up a global tax rate, go to WP Simple Pay » Settings » Taxes. Select the checkbox to enable the global tax rate. Click the Add Rate button.
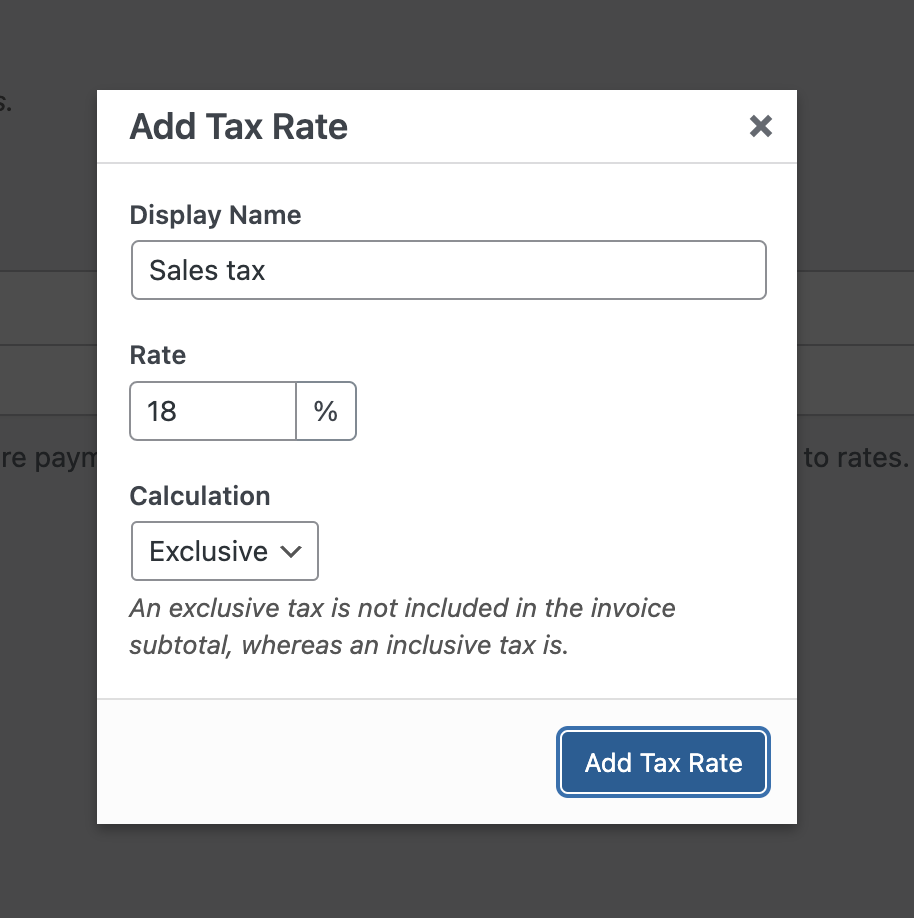
You’ll now be prompted to add the tax rate via a modal popup. Specify the display name and rate, and then specify how tax has to be calculated, inclusively or exclusively. Choose the right option per your needs and click Add Tax Rate.
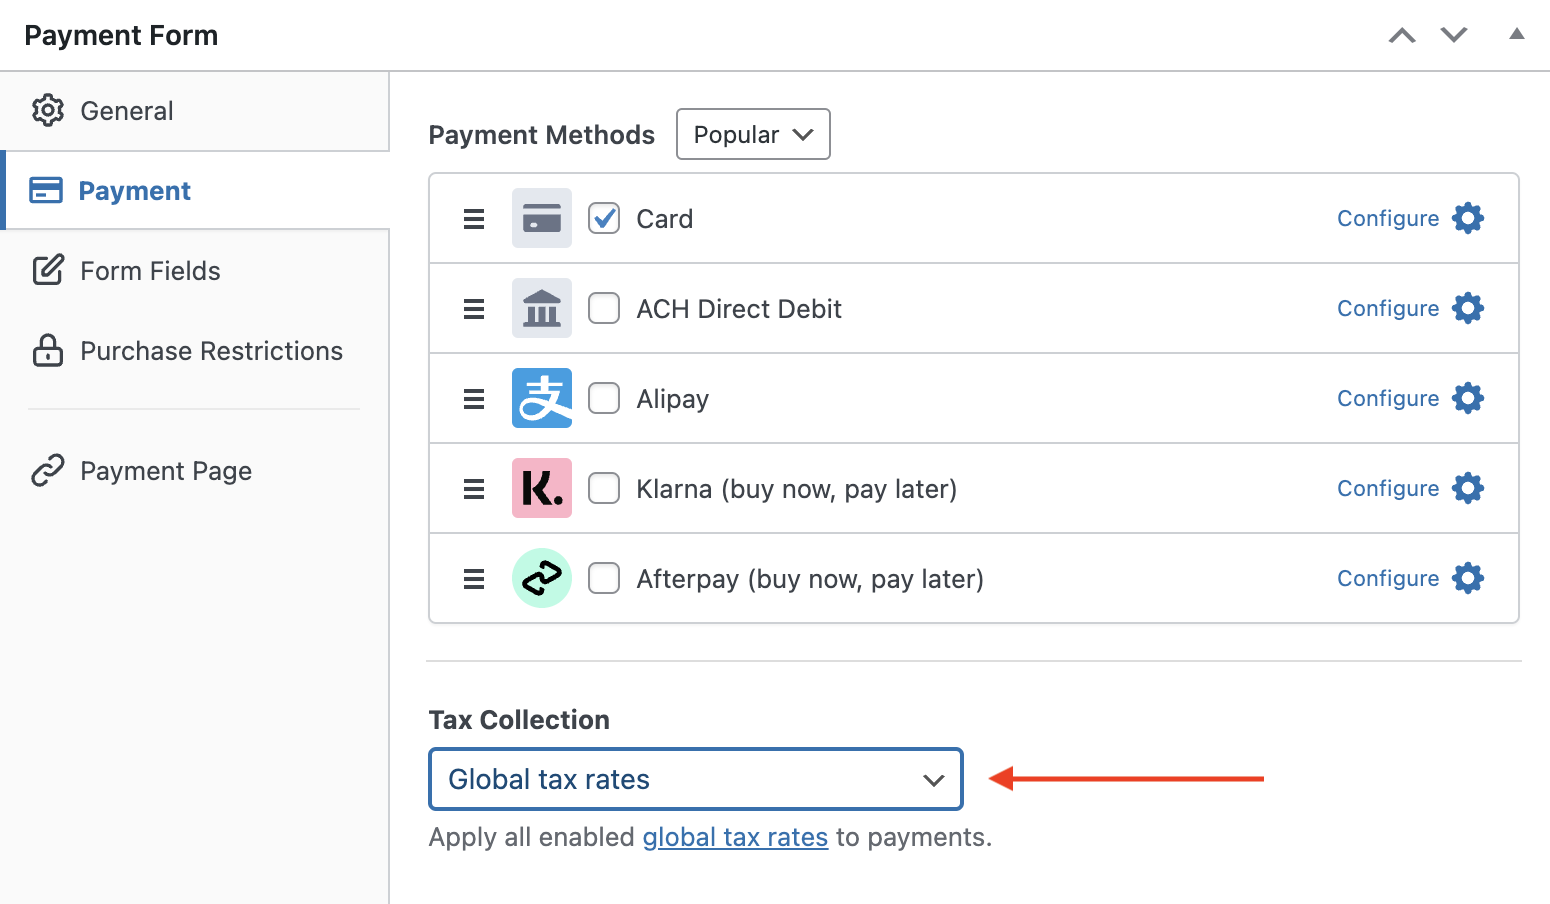
Now go back to the payment form you’ve just created. Click the Payment tab on the left. Scroll down the page until you find a drop down menu for Tax Collection. Select Global tax rates from the dropdown menu.
For more details, check out how to collect taxes with WordPress payments.
Now save your form and preview it. If it looks fine, publish the form and make some test payments to see if it works as intended. If it works as intended, let’s embed the form on your live site (read more about Test mode).
Step 7: Embed the Payment Form on Your Site
Now that your payment form is ready to accept payments, let’s embed your form on your website.
Make sure you test the form first before it goes live. You can toggle your entire site or individual payment forms between test and live modes .

To embed the form, go to the post or page where you want to publish it. Then click on the + icon to add the WP Simple Pay block. Then choose a form you just created. And then, click Publish or Update.
That’s it!
We hope this article helped you learn how to sell a single product online with WordPress.
If you liked this article, you might also want to check out how to start taking pre-orders with WordPress.
What are you waiting for? Get started with WP Simple Pay today!
To read more articles like this, follow us on X.
Disclosure: Our content is reader-supported. This means if you click on some of our links, then we may earn a commission. We only recommend products that we believe will add value to our readers.


Leave a Reply