
Stripe + Klarna: How to Generate Up to 14% More Revenue on WordPress
Last updated on
 Reviewed By:
 Spencer Finnell
Small eCommerce business owners are always on the lookout for innovative ways to set themselves apart. While there are many strategies to differentiate a brand, one of the most effective is offering customers flexible and convenient payment plans. This approach not only fosters customer loyalty but also helps increase average order value.
When I first started creating an eCommerce website on WordPress, I wasn’t sure where to begin when it came to choosing the right payment processor or payment method options.
Like most of us, I have experienced checking out on other websites using complicated shopping carts. I knew I wanted my website’s checkout process to be simpler than that.
So, I decided to do some research and discovered that Stripe offered all the benefits I needed to easily accept payments and offer flexible installment options like Buy Now, Pay Later.
Once I added multiple payment method options to my payment forms, conversion rates began to increase. One interesting thing I noticed is Klarna is particularly popular among my visitors.
In this article, I’ll go over Klarna, its partnership with Stripe, and the easiest way to accept it on your website to help you increase revenue and optimize the checkout experience.
Why Use Stripe & Klarna?
I’ve written several articles about what makes Stripe the most powerful and user-friendly payment processor for most eCommerce businesses.
Connecting it to your WordPress website using WP Simple Pay, the #1 Stripe payments plugin, is quick and easy. You can use the plugin to accept Stripe payments directly on your website without having to set up a shopping cart or install addons.
Stripe and WP Simple Pay let you offer customers over 10 payment method options, including Buy Now, Pay Later (BNPL) services like Klarna.

Thanks to the improved partnership between Stripe and Klarna, Stripe-powered businesses in 25 countries can instantly offer Klarna to their customers. It’s evolved into a global network connecting 85 million active consumers with retailers with hopes to make its payment services available everywhere, for everything. In Q4 2024, Klarna doubled the number of new merchants offering its services.
On top of all that, a recent study conducted by Stripe indicates that businesses offering BNPL generated up to 14% more revenue from increased conversions and higher average order values.
How to Generate Up to 14% More Revenue with Klarna
Accepting Klarna On WordPress
To help you encourage hesitant customers concerned about upfront costs to make a purchase on your WordPress website, I’ll show you step-by-step how I implemented Klarna on my checkout forms. Stripe is simply the easiest way to offer Klarna.
I noticed that simply offering flexible payment options not only seemed to alleviate concerns, but also built trust in my brand and products. With higher conversion rates and average order values, I realized that I was tapping into a market of buyers who were eager for financial flexibility and convenience. If you’re offering high-end products or services, embracing Klarna is especially a must.
Let’s take a look at how easy it really is to accept Klarna on WordPress.
Step 1: Installing and Activating WP Simple Pay
WP Simple Pay lets you connect your Stripe account to your WordPress website in less than five minutes. Once you’re connected, you can begin creating Klarna payment forms effortlessly.
Just go to the pricing page and choose the best plan for you. Once you’ve completed your purchase, you can download the .zip file from your confirmation email or your WP Simple Pay account.
Then, upload the file to your WordPress website from the admin dashboard. Once you’ve activated it, the plugin’s setup wizard will automatically appear.
Click on Let’s Get Started.

If you didn’t see the setup wizard, simply head over to WP Simple Pay » Settings » Advanced tab and click the Launch Setup Wizard button.
2: Connect WordPress to Stripe
To connect your WordPress site to Stripe, click on Connect with Stripe.

Next up, enter the email address you use for your Stripe account and connect it to your site. If you don’t have a Stripe account, you can easily create one by entering your email address and completing the registration.
Upon completing this process, you’ll be shown a success page that says, “Setup Complete.” Next, click on Create a Payment Form.

Step 3: Create a Klarna Payment Form
You’ll notice there are pre-built payment form templates available for you to choose from.
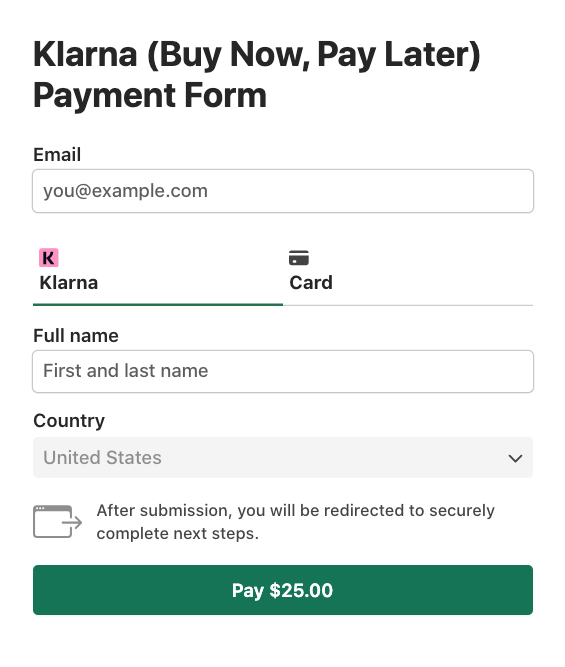
For the purpose of this tutorial, go ahead and choose the Klarna (Buy Now, Pay Later) template.

Next, in the General tab, enter the title and description for your form and choose On-site payment form for the Type.
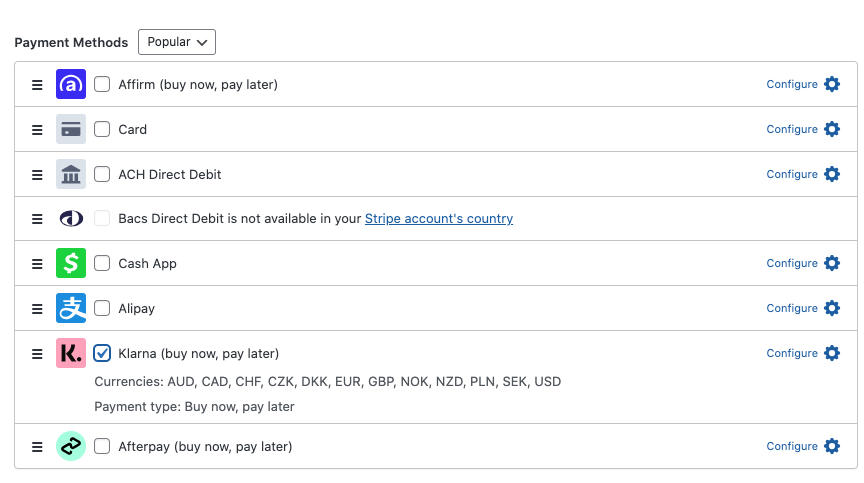
Then, go to the Payment tab to enter your pricing options and amounts. You’ll also need to ensure Klarna is selected as the payment method option.
You can use WP Simple Pay to add, remove, and edit custom fields.
Then, simply publish your form. You can preview it to make sure that Klarna is set up correctly.
Step 4: Publishing Your Klarna Payment Form
All that’s left to do is publish the Klarna payment form on a page or post on your website.
simply go to the post or page where you want to publish it. Then, click on the + icon to add the WP Simple Pay block.

Then, select the payment form you just created and click Publish or Update.
There you have it! You now have a Klarna payment form on your WordPress website.
Increasing Revenue With Klarna
Providing customers flexible payment options on your WordPress website doesn’t have to be difficult.
Stripe and WP Simple Pay make integrating Klarna on your website effortless. Once your Klarna payment forms are up and running, visitors who previously couldn’t make a purchase will now have the opportunity to buy from you.
With the latest improvements and the expanded partnership between Stripe and Klarna, many eCommerce businesses are now offering flexible payment options to their customers. Don’t risk losing potential buyers who might turn to competitors offering similar products or services with more appealing payment solutions.
If you liked this article, you might also want to check out our guide on how to monetize your WordPress blog.
What are you waiting for? Get started with WP Simple Pay today!
To read more articles like this, follow us on X.
Disclosure: Our content is reader-supported. This means if you click on some of our links, then we may earn a commission. We only recommend products that we believe will add value to our readers.


Leave a Reply