
How to Use the Transactions Page
In This Document
Reading time: 6 minutes | Difficulty: Beginner
Overview
The Transactions page lists every one-time payment your site has recorded, so you can answer “did this payment go through, and what did the customer send with it?” without opening the Stripe Dashboard.
Each row opens a detail view with the full amount breakdown, the Stripe IDs, the payment method, a link to the Stripe receipt, the customer’s details, and the custom field values and files they submitted with the form.
The Transactions page is available on every WP Simple Pay tier, including the free Lite plugin.
Prerequisites
- WP Simple Pay 4.17.4 or later.
- A connected Stripe account.
- An administrator account (the page requires the ability to manage options).
Where to Find It
Go to Payment Forms > Transactions.
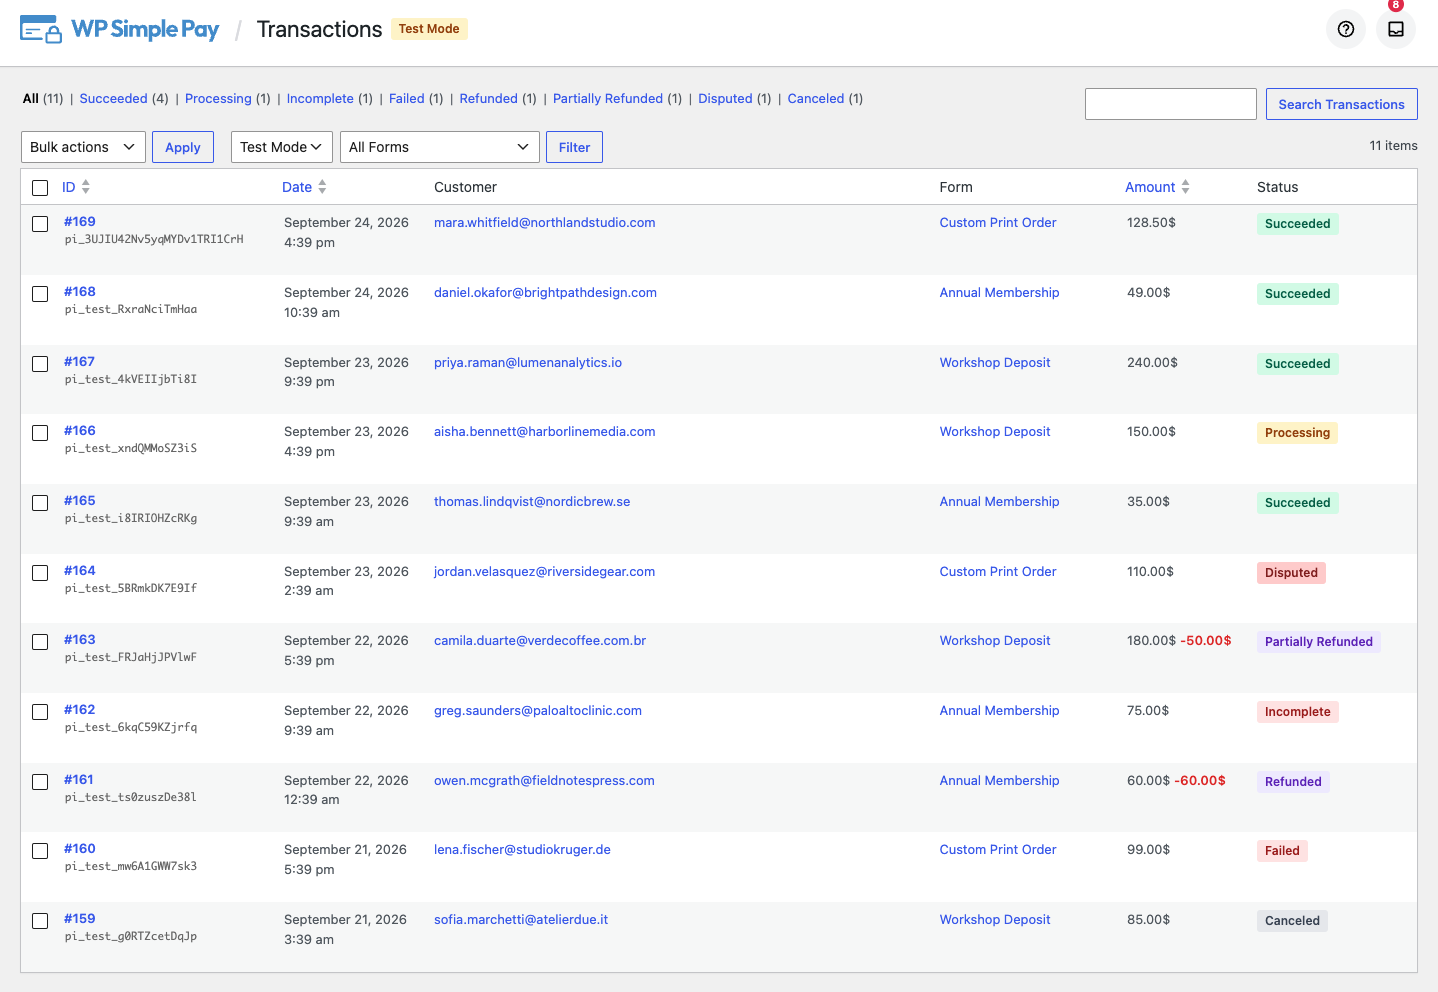
The table has six columns:
- ID — the payment’s local record number, with its Stripe object ID beneath it.
- Date — when the payment was created.
- Customer — the email address on the payment.
- Form — the payment form the payment came from.
- Amount — the total charged, in the payment’s currency.
- Status — the payment’s current state.
ID, Date and Amount are sortable. Click a column heading to sort by it, and click again to reverse the order.
Status Views
Across the top of the table sits a row of status views. Each one carries its own count, and the counts respect whatever filters and search you already have applied.
| View | What it shows |
|---|---|
| All | Every recorded one-time payment. |
| Succeeded | Payments that completed and were collected. |
| Processing | Payments still clearing, common with bank debits. |
| Incomplete | Payments that were started but never finished. |
| Failed | Payments the card issuer or bank declined. |
| Refunded | Payments refunded in full. |
| Partially Refunded | Payments where some, but not all, of the amount was returned. |
| Disputed | Payments with an open or lost chargeback. |
| Canceled | Payments abandoned or canceled before collection. |
Filters
Two selectors sit above the table.

Payment mode switches between Live Mode and Test Mode. This selector is independent of your global test mode setting, so you can look at test payments without changing anything about how your site takes payments. When you are viewing test payments, a Test Mode badge appears next to the page heading.
This matters because an individual payment form can override the global mode. Both modes’ records coexist, and the filter is how you decide which set is on screen.
Payment form narrows the list to a single form. If a form runs in the opposite mode to the one you are viewing, the list would otherwise look like a form that has never been paid, so the page says which mode the form runs in and offers a link to switch.
Search
The search box matches on:
- The customer’s email address.
- The Stripe customer ID (
cus_...). - The Stripe object ID (
pi_...).
Partial values work, so you can paste part of an ID or search for a domain name to find every payment from one company.
Export to CSV
Tick the payments you want, choose Export to CSV from the Bulk actions menu, and click Apply. The selected rows download as a spreadsheet.

The export includes more columns than the table shows, including the full amount breakdown, both Stripe IDs, the payment method type, the IP address and the payment mode.
The Detail View
Click a payment’s ID, or its View link, to open the detail view.
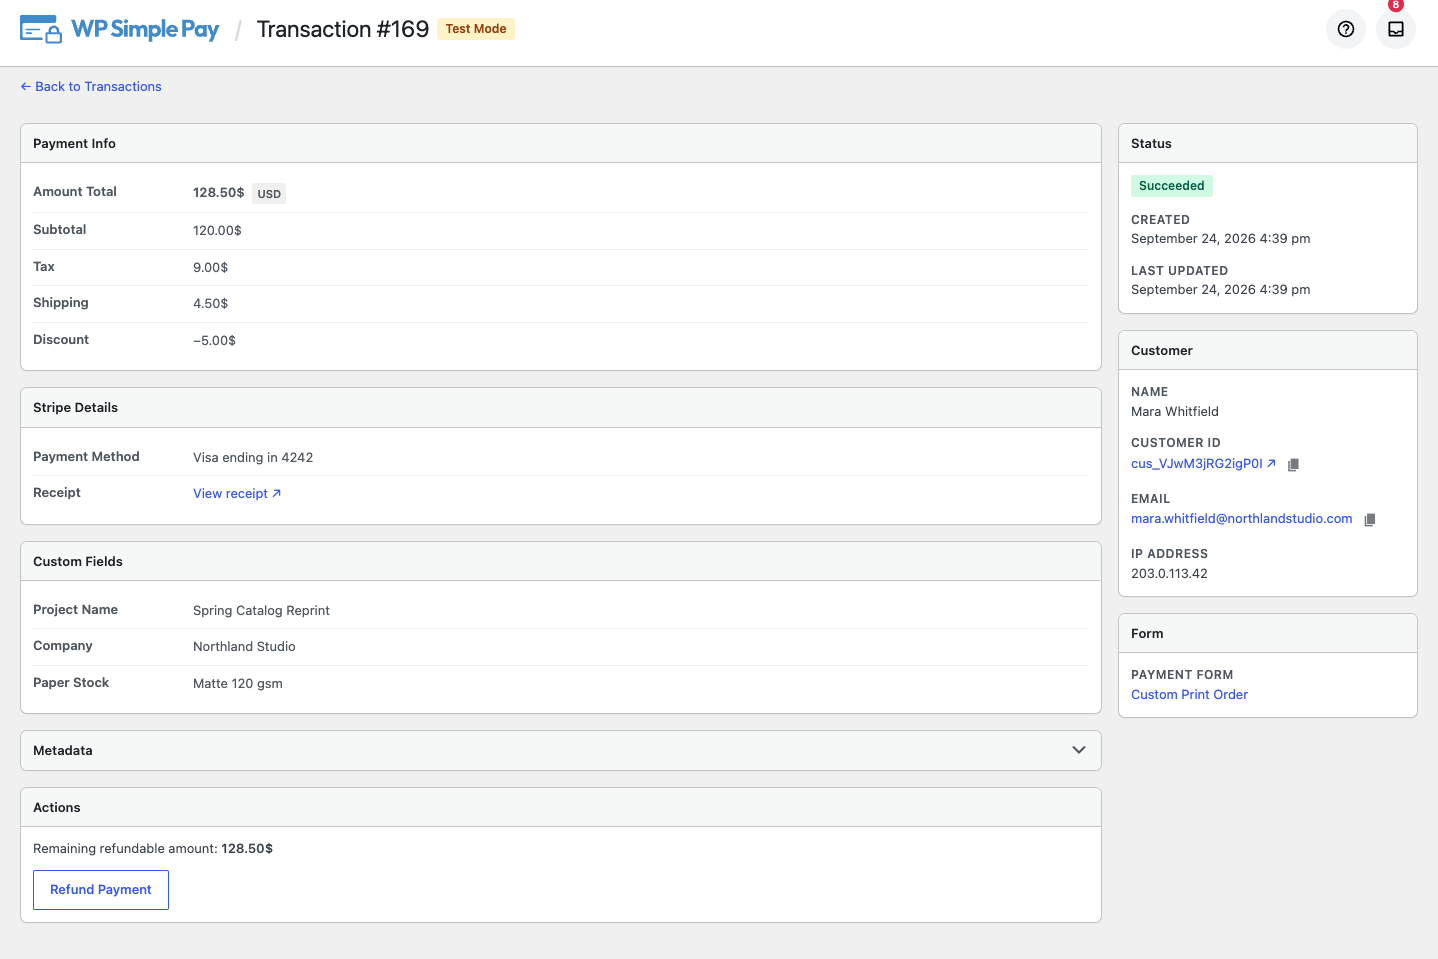
The detail view gathers:
- Amount breakdown — the total, plus the subtotal, tax, shipping, discount and refunded amounts whenever they apply.
- Stripe details — the Stripe IDs, each with a copy-to-clipboard button, the payment method used, and a link to the Stripe receipt.
- Customer — the name, the Stripe customer ID, the email address and the IP address the payment came from.
- Form — the payment form that took the payment, linked to its editor.
- Uploaded files — anything the customer attached through a File Upload field, linked by filename.
- Custom fields — the values the customer submitted, shown under the labels you gave those fields.
- Metadata — any remaining Stripe metadata, in a collapsed section.
On a Professional license or higher, the same page can also issue a full or partial refund. See How to Refund a Payment for that workflow.
Chargeback (Dispute) Tracking
Chargeback tracking requires WP Simple Pay Pro.
When a customer’s bank opens a chargeback, WP Simple Pay hears about it from Stripe and marks the matching payment as Disputed. Chargebacks stop being invisible: the Disputed view shows exactly which payments are being contested.
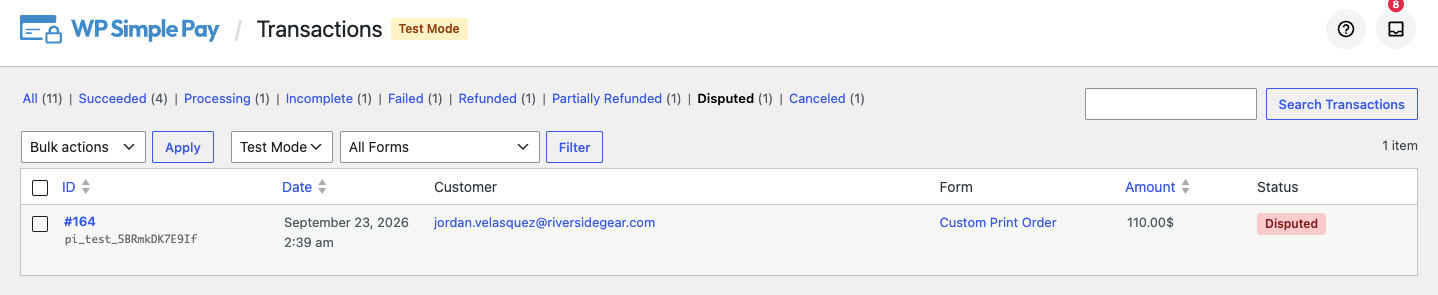
When the dispute closes, the payment’s status is restored if the outcome was in your favour:
- A dispute that is won, closed as an inquiry, or prevented by Stripe restores the payment to the status it had before.
- A payment that was already partially refunded before being disputed goes back to Partially Refunded, not plain Succeeded, because that refund still stands.
- A lost dispute stays Disputed, since the funds really were withdrawn.
On the free Lite plugin, the Disputed view exists but never fills up. The part that listens for chargebacks ships only with Pro, so on Lite the view will always be empty even if chargebacks are happening in your Stripe account.
Automatic Recovery of Missed Payments
Payments reach WP Simple Pay through Stripe webhooks, and a webhook can be delayed or lost. An hourly background job reconciles your records against Stripe to close that gap. It picks up:
- Checkout Sessions that completed while the buyer never returned to your site. These used to sit as pending placeholders forever; now they resolve on their own.
- Payments that later succeeded or were canceled after being left incomplete.
- Refunds and chargebacks applied directly in the Stripe Dashboard, which now appear on this page too.
You do not need to do anything to turn this on, and there is nothing to configure. Records converge on what Stripe says.
A Few Things Worth Knowing
Records are scoped to your connected Stripe account. If you switch to a different Stripe account, the page shows that account’s payments, not the previous account’s.
This page lists one-time payments only. Recurring payments have their own list: see How to Use the Subscriptions Page.
Frequently Asked Questions
A customer says they paid, but I do not see the payment. What now?
Most often the webhook that reports the payment has not arrived yet. Wait a few minutes and reload. If it still is not there, the hourly reconciliation job will ask Stripe directly and add it, so the record will appear on its own within the hour. Also check the payment mode selector: if the form that took the payment runs in test mode, the payment is in the Test Mode list.
How is this different from the Stripe Dashboard?
The Stripe Dashboard is the authoritative record of the money. The Transactions page is the record tied to your site: it tells you which payment form took each payment, which custom field values the customer submitted, which files they uploaded, and which IP address they paid from. Stripe does not know about your forms, and the Transactions page does not replace Stripe for accounting, payouts or fees. Both are linked, so you can jump from a payment here to its Stripe record.
Why is my Disputed view empty even though I have had a chargeback?
On the free Lite plugin, chargeback tracking is not included, so nothing ever lands in the Disputed view. Upgrading to Pro enables it. On Pro, check that your Stripe webhooks are configured correctly, and remember that the hourly reconciliation will pick up a dispute whose webhook was missed.
Will payments from before 4.17.4 appear?
Yes, for payments WP Simple Pay had already recorded. They are assigned to your currently connected Stripe account when you upgrade. Payments taken with a different Stripe account, or taken outside WP Simple Pay entirely, are not shown.
Can I delete a transaction record?
No. The page is a record of what happened, so rows are not editable or removable from WordPress. Refunding a payment is the way to reverse it.
Do I need to keep the page open or run anything for the hourly recovery?
No. It runs in the background on your site’s schedule.
What’s Next?
- How to Refund a Payment — issue a full or partial refund from the detail view.
- How to Use the Subscriptions Page — the same view for recurring payments.
- How to View Payment Details in Stripe — find the same payment in the Stripe Dashboard.
Still have questions? We're here to help!
Last Modified: