
How to Add a File Upload Field
In This Document
Reading time: 5 minutes | Difficulty: Beginner
Overview
The File Upload field lets a customer attach a file when they pay. It covers every form that needs a document alongside the money: a design brief for a custom job, a photo for a print order, a signed form, or proof of eligibility for a discounted rate.
Customers can drag a file onto the field or click to pick one from their computer. They see an upload progress bar, then the filename with a button to remove it and choose a different file. Once the payment is made, the file is recorded against that payment and linked from its detail view in WordPress.
Prerequisites
- WP Simple Pay Pro (any tier)
- A payment form to add the field to
Step 1: Add the File Upload Field
- Navigate to WP Simple Pay > Payment Forms and edit the form you want to add the field to.
- Click the Form Fields tab.
- Open the field dropdown and choose File Upload.
- Click Add Field.

The new field is added to the top of your field list. Click its title to expand its settings.
Step 2: Configure the Field
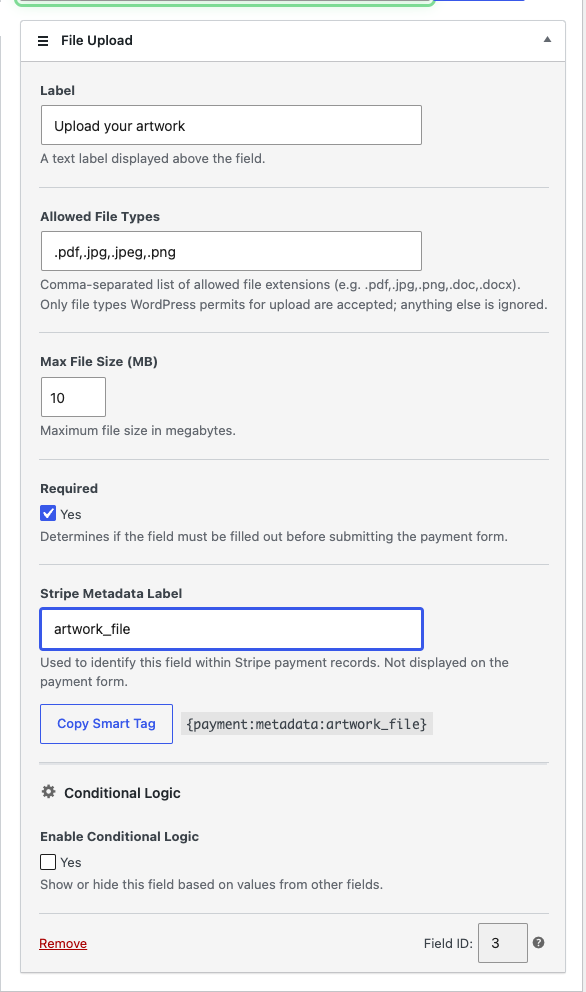
Each File Upload field has its own settings, so a form with two uploads can accept completely different files in each.
Label
The text shown above the field on your form. Make it say what you want, for example “Upload your artwork” rather than just “File”.
Allowed File Types
A comma-separated list of file extensions, written with or without the leading dot. The default list is:
.pdf,.doc,.docx,.jpg,.jpeg,.png,.gifNarrow it to exactly what you need. A print shop taking artwork might use .pdf,.png,.tif, while a form collecting a signed agreement might allow only .pdf.
Your list is not the final word. WP Simple Pay accepts a file only if the extension is on your list and WordPress itself permits that file type for upload. Anything outside that overlap is rejected, and HTML and JavaScript files are always rejected regardless of what you type here.
Max File Size (MB)
The largest file the field will accept, in megabytes. The default is 10 MB, and you can set anything from 1 MB to 100 MB.
Your web server has its own upload limit, and whichever number is smaller wins. If your host caps uploads at 8 MB, setting this field to 50 MB does not raise that ceiling. Ask your host to raise the server limit if you need larger files.
Required
Tick this if the customer must attach a file before they can pay. A required field with no file blocks the payment and shows an error on the field.
Stripe Metadata Label
A short name (up to 40 characters) used to identify this upload in your Stripe payment records and in the transaction detail view in WordPress. It is not shown to the customer.
Type a label here and a Copy Smart Tag button appears underneath it, along with the matching smart tag:
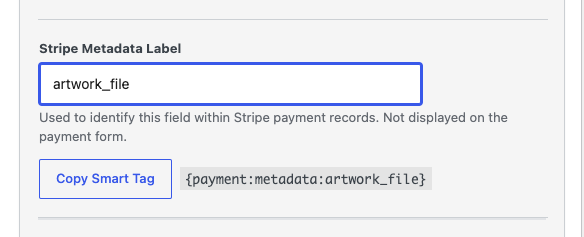
Click Copy Smart Tag to copy a tag like {payment:metadata:artwork_file} to your clipboard, ready to paste into a confirmation page or an email. See Using Smart Tags For Confirmation Pages and Emails for where those tags can be used.
Save the form when you are done.
Step 3: What Your Customers See
On the published form, the field starts as a drop zone reading “Drag & drop a file or click to browse”.
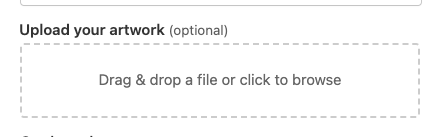
The customer drags a file in, or clicks to open their file browser. The file is checked against the allowed types and the size limit straight away, so a wrong file type is refused before anything is uploaded. A progress bar runs while the file transfers, and then the field shows the filename with a remove button so the customer can swap the file out.

Two things protect the submission:
- While an upload is still in progress, the form cannot be submitted. The customer never pays before their file has finished transferring.
- If a required File Upload field is empty, submitting shows an error on the field and the payment is not attempted.
Where the Uploaded File Goes
When the payment is created, the uploaded file’s URL is saved to that payment’s Stripe metadata, under the name you set in Stripe Metadata Label. You can see it on the payment in your Stripe Dashboard.
Inside WordPress, the file appears in an Uploaded Files card on the payment’s detail view, listed by the field’s metadata label, with the original filename as a link that opens the file. See How to Use the Transactions Page for how to find a payment and open its detail view.
Security and Storage
Uploads happen on a public payment form, so every check is applied on the server as well as in the browser:
- Deny by default. The accepted types are the overlap between your allowed list and the file types WordPress itself permits. HTML and JavaScript are always excluded, for every visitor.
- The file’s real content is checked against its extension. A script renamed to look like an image is rejected, not stored.
- Size is enforced twice, against your field limit and against your server’s own upload limit.
- The same per-IP rate limit that guards payment submissions applies to uploads. A single visitor cannot hammer the endpoint with files.
Files are kept in a dedicated, hardened folder inside your WordPress uploads directory, apart from your ordinary media, and each one is given a randomly generated filename so its address cannot be guessed.
These files are not meant to be managed by hand. Renaming, moving or deleting one breaks the link recorded against the payment, and the automatic cleanup below already clears out files nobody paid for.
Automatic Cleanup of Abandoned Uploads
A file is uploaded the moment the customer picks it, which is before they pay. A scheduled job runs regularly and clears out the uploads that were never paid for:
- Files that were never attached to a payment at all, because the visitor picked a file and then left the form. These are removed after about a day.
- Files attached to a payment the customer never completed, such as a declined card or a closed tab at the payment step. These are removed after about a week.
The practical consequence is that an abandoned checkout does not leave files on your server forever. Files belonging to payments that actually went through are never touched by the cleanup, including payments that were later refunded or disputed.
Frequently Asked Questions
Which file types are allowed by default?
PDF, DOC, DOCX, JPG, JPEG, PNG and GIF. You can replace that list with your own in the Allowed File Types setting.
I added an extension to the allowed list and the file is still rejected. Why?
Your list is intersected with the file types WordPress permits for upload, and anything WordPress does not allow is dropped from the field’s list. HTML and JavaScript files are excluded no matter what. The error shown on the form lists the extensions the field actually accepts, which is the quickest way to see what survived the intersection.
A file can also be rejected when its extension does not match its real content, for example a .zip renamed to .pdf.
What is the largest file size I can allow?
The field setting accepts 1 MB to 100 MB, with a default of 10 MB. Your server’s own PHP upload limit applies on top of that, and the smaller of the two is what is enforced. If your host allows 8 MB uploads, 8 MB is the real limit no matter what the field says. Raising the field value above your server’s limit does nothing, so ask your host to raise the server limit first.
Do uploaded files go into my Media Library?
No, they are not stored alongside your regular media. They go into a dedicated WP Simple Pay folder inside your uploads directory, under randomized filenames, and are cleaned up automatically when the payment they belong to was never completed. Treat them as payment records rather than as media to manage.
How do I include the upload in a confirmation page or an email?
Set a Stripe Metadata Label on the field, click Copy Smart Tag, and paste the resulting {payment:metadata:...} tag into your confirmation page content or email body. The tag outputs the file’s URL. See Using Smart Tags For Confirmation Pages and Emails and How to Create Custom Form Field Smart Tags.
What happens to the file if the customer abandons the payment?
It is deleted automatically. A file that was never attached to a payment is removed after about a day, and a file attached to a payment that was never completed is removed after about a week. Nothing is left behind indefinitely.
Can a customer attach more than one file?
Each File Upload field accepts one file. To collect several files, add a File Upload field for each one, since the field can be added to a form as many times as you need. Giving each field its own label, allowed types, size limit and metadata label also makes the payment record much easier to read than a single pile of files would be.
Does this work with forms that redirect to Stripe Checkout?
Yes. The field is shown and the file is uploaded on your site before the customer is sent to Stripe, and the file’s URL is saved to the resulting payment the same way.
What’s Next?
- How to Configure a Payment Form’s Fields and Collect Custom Data – Add, reorder and configure the fields on your payment forms.
- Custom Field Types Reference – Every field type and what each one collects.
- How to Use the Transactions Page – Find a payment and open the detail view where uploaded files are listed.
Still have questions? We're here to help!
Last Modified: