How to Configure the Confirmation Page Tab
In This Document
- 1 Overview
- 2 Prerequisites
- 3 Step 1: Open the Confirmation Page Tab
- 4 Step 2: Choose a Payment Success Page Type
- 5 Step 3: Customize the Payment Success Message
- 6 Step 4: Customize the Dedicated Confirmation Page (Optional)
- 7 Step 5: Save
- 8 Decision Tree
- 9 Frequently Asked Questions
- 9.1 What’s the difference between this tab and the global Payment Confirmations settings?
- 9.2 Can I redirect to a page with query string parameters?
- 9.3 Does the redirect happen immediately after payment?
- 9.4 Will my analytics tracking still work?
- 9.5 Why doesn’t the Payment Success Message show?
- 9.6 Can I A/B test confirmation pages?
- 10 What’s Next?
Reading time: 5 minutes | Difficulty: Beginner
Overview
The Confirmation Page tab in the form builder controls what happens after a customer completes a payment with this specific form. It overrides the global confirmation page settings for the form it’s edited on, so different forms can land their customers on different pages — a thank-you page for donations, a download page for digital products, an external scheduling tool for service bookings, etc.
For the global settings this tab inherits from, see How to Configure the Payment Confirmation Display and How to Set Payment Success and Failure Pages.
Prerequisites
- WP Simple Pay (any tier)
- A payment form open in the form editor
Step 1: Open the Confirmation Page Tab
- Navigate to WP Simple Pay > Payment Forms and edit the form.
- Click the Confirmation Page tab in the form editor.
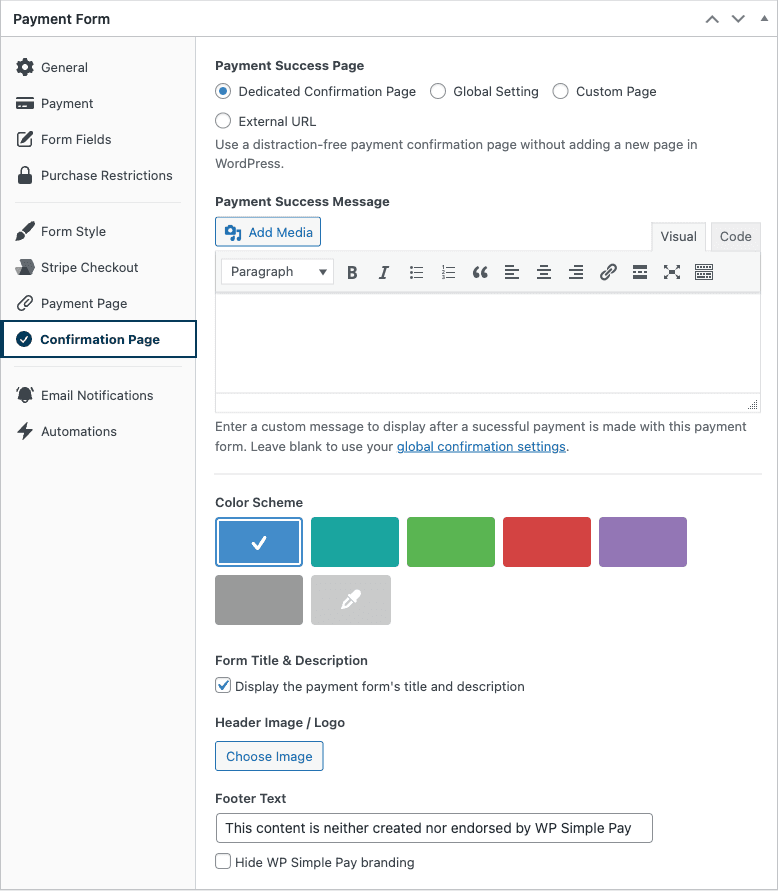
Step 2: Choose a Payment Success Page Type
The first setting, Payment Success Page, has four options. Pick whichever matches your conversion flow:
Dedicated Confirmation Page
Default for new forms. Sends the customer to a distraction-free, plugin-rendered confirmation page that doesn’t require you to create a new WordPress page. The URL is generated by WP Simple Pay; you don’t have to maintain it.
When this option is selected, additional appearance settings appear (described below).
Global Setting
Inherits whichever Success Page is configured under WP Simple Pay > Settings > Payment Confirmations > Pages. Pick this when you want a consistent post-payment experience across most forms and only need to customize a few outliers.
Custom Page
Redirects to any published WordPress page on your site. A page-picker dropdown appears so you can select the destination.
- Useful for: Custom thank-you pages with upsells, video, or course access links.
- Tip: Use smart tags inside the destination page to reference the customer’s name, amount paid, or form metadata.
External URL
Redirects to a URL on a different domain. Enter the full URL (including https://).
- Useful for: Sending customers to scheduling tools (Calendly), course platforms hosted elsewhere, fulfillment partners, or third-party download links.
- Caution: External redirects bypass the on-site Payment Confirmation entirely. The customer never sees your site’s confirmation message, and JavaScript-based analytics on your confirmation pages won’t fire.
Step 3: Customize the Payment Success Message
When the Payment Success Page is set to Dedicated Confirmation Page or Global Setting, the Payment Success Message field appears below. This is the body copy shown on the confirmation page after a successful payment.
The field is a standard WordPress visual editor — you can use formatting, images, links, and smart tags. Common smart tags for this field:
{customer-name}— Greet the customer by name.{total-amount}— Show what they paid.{form-title}— Reference the product/donation/event they paid for.{payment-link}— Link back to the payment receipt.
Leave the field blank to inherit the message from the global confirmation settings.
Step 4: Customize the Dedicated Confirmation Page (Optional)
When Dedicated Confirmation Page is selected, an additional Appearance section appears. By default the dedicated confirmation page inherits the visual style of your Payment Page (if you’ve configured one). To override:
- Uncheck Inherit the Payment Page’s style.
- Pick a Color Scheme from the six preset colors (Blue, Teal, Green, Red, Purple, Gray) or use the custom color picker for any hex value.
- Add an optional logo, brand image, and footer text — same configuration shape as the Payment Page customization.
The result is a standalone, branded confirmation page without the overhead of designing a WordPress page from scratch.
Step 5: Save
Click Publish or Update to save the form. Test the flow by submitting a test payment to confirm customers land where you expect.
Decision Tree
| Goal | Use this option |
|---|---|
| Quick, branded confirmation without designing a page | Dedicated Confirmation Page |
| Same confirmation across most forms | Global Setting |
| Page with upsells, related content, or full WordPress layout | Custom Page |
| Hand-off to scheduling, course platform, or external tool | External URL |
Frequently Asked Questions
What’s the difference between this tab and the global Payment Confirmations settings?
The global settings apply to every form by default. This tab is a per-form override — only the form you’re editing is affected. Forms that use the Global Setting option here continue to follow the global settings.
Can I redirect to a page with query string parameters?
Yes. With Custom Page or External URL, you can include query parameters. WP Simple Pay also automatically appends payment metadata (customer ID, payment intent ID) to the redirect URL so the destination can read them server-side or via JavaScript.
Does the redirect happen immediately after payment?
Yes — the redirect fires as soon as Stripe confirms the payment. For asynchronous payment methods (ACH, SEPA, Bacs), the customer is redirected to a “processing” view first, with the final confirmation arriving when the payment clears.
Will my analytics tracking still work?
If you redirect to a page on your own site (Dedicated, Global, or Custom Page), client-side analytics fire as normal. With External URL, you lose access to on-page tracking — instead, configure conversion tracking via Stripe webhooks or the simpay_payment_complete hook before the redirect.
Why doesn’t the Payment Success Message show?
The message field only renders when you’ve selected Dedicated Confirmation Page or Global Setting. With Custom Page or External URL, the destination page or URL controls what the customer sees — the field is hidden because it wouldn’t be displayed.
Can I A/B test confirmation pages?
WP Simple Pay doesn’t ship with built-in A/B testing for confirmation pages. To test variants, create two forms with identical configuration but different Confirmation Page settings, then route traffic between them with your preferred A/B testing tool.
What’s Next?
- How to Configure the Payment Confirmation Display – Global confirmation settings
- How to Set Payment Success and Failure Pages – Configure the global Pages subsection
- Using Smart Tags – Personalize the success message
Still have questions? We're here to help!
Last Modified: