フォームテンプレートの使い方
このドキュメントについて
読む時間: 4分 | 難易度: 初級
概要
フォームテンプレートは、新しい支払いフォームの事前構築された開始点です。空白のスレートからフォームを構築する代わりに、WP Simple Payに付属する80以上のテンプレートのいずれかを複製して、そこからカスタマイズできます。テンプレートは最も一般的なユースケース(定期的な寄付、サブスクリプションサービス、イベント登録、製品購入、資金調達ドライブ)をカバーしており、そのシナリオに適したフィールドタイプ、支払い方法、およびスタイルで事前設定されています。
フォームが一般的なパターンに似ている場合、テンプレートから始めることで、フォームごとに5〜15分節約でき、重要なフィールドを忘れる可能性(例:税金を徴収するフォームで金額の内訳フィールドを省略する)を減らすことができます。
前提条件
- WP Simple Pay(どのティアでも — 多くのテンプレートはProが必要です)
- Stripeに接続済み(Stripeの設定を参照)
ステップ 1: フォームテンプレートページを開く
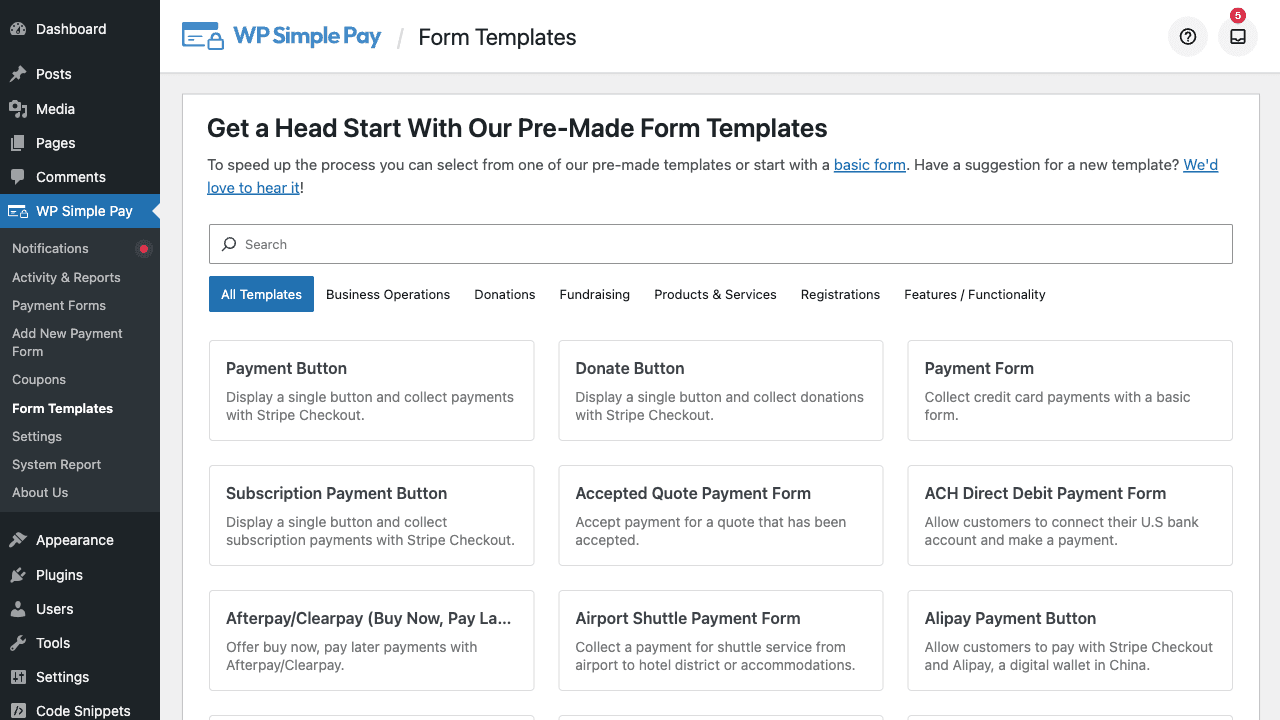
WordPress管理メニューのWP Simple Pay > フォームテンプレートに移動します。ページには、利用可能なすべてのテンプレートのグリッドが表示され、それぞれにサムネイル、タイトル、短い説明があります。
ステップ 2: テンプレートを閲覧およびフィルタリングする
テンプレートはカテゴリ別に整理されているため、リストをすばやく絞り込むことができます。一般的なカテゴリには以下が含まれます:
- 寄付フォーム — 1回限り、定期、カスタム金額、および資金調達テンプレート
- サブスクリプションフォーム — サービスサブスクリプション、定期メンバーシップ、オプトイントライアル
- イベント登録 — レースサインアップ、トーナメントエントリー、クラス登録
- サービスベース — コーチング、クリーニング、造園、専門サービス
- 支払いボタン — 単一メソッドボタン(Apple Pay、Google Pay、iDEALなど)
- 地域固有 — SEPA、ACH、Bacs、Bancontact、Przelewy24、Klarna、Afterpay/Clearpay
ページ上部の検索ボックスを使用して、キーワードでフィルタリングします(例:donation、subscription、tuition、またはKlarnaのような支払い方法名を入力します)。
現在のライセンスティアよりも高いライセンスティアを必要とするテンプレートは引き続き表示されますが、アップグレードプロンプトが表示されます。新着!とマークされたテンプレートは、最近のリリースで追加されたものです。
ステップ 3: テンプレートをプレビューする
テンプレートカードにカーソルを合わせ、プレビューをクリックすると、結果のフォームがどのように表示されるかを確認できます。プレビューには、タイトル、説明、フィールド、支払い方法、送信ボタンなど、レンダリングされたフォーム全体が表示されるため、コミットする前に構造がニーズに合っているかどうかを判断できます。
ステップ 4: テンプレートを使用する
適切なテンプレートを見つけたら:
- テンプレートカードでテンプレートを使用をクリックします。
- WP Simple Pay は、テンプレートの設定が事前に入力された新しいドラフト支払いフォームを作成します。
- フォームエディターがすぐに開き、カスタマイズできます。
新しく作成されたフォームは完全に独立したコピーです。編集しても元のテンプレートには影響しません。また、同じテンプレートを複数回使用してバリエーションを作成できます。
ステップ 5: 新しいフォームをカスタマイズする
クローンされたフォームを他のフォームと同様に扱います:
- 一般タブ — フォームのタイトルと説明を更新します。
- 支払いタブ — 価格を実際の金額に調整します。
- フォームフィールドタブ — フィールドを追加または削除します(カスタムフィールドタイプの参照を参照)。
- フォームスタイルタブ — ブランドカラーを適用します(フォームスタイルで支払いフォームをスタイルする方法を参照)。
- 確認ページタブ — 支払い後に顧客がどこに誘導されるかを選択します(確認ページタブの設定方法を参照)。
準備ができたら公開をクリックし、支払いフォームブロックまたはショートコードを使用してページにフォームを埋め込みます。
テンプレートを使用する場合と最初から作成する場合の使い分け
| シナリオ | 推奨 |
|---|---|
| 初めて支払いフォームを作成する場合 | テンプレートを使用する — 完璧に合わなくても |
| 標準的な寄付、サブスクリプション、または製品フォーム | テンプレートを使用する |
| 珍しいフィールドの組み合わせを持つ高度にカスタムされたフロー | 最初から作成する(またはテンプレート + 大幅なカスタマイズ) |
| 地域固有の支払い方法をプライマリトリガーとする | 一致するメソッド固有のテンプレートを使用する |
| 既存のフォームの構造を再現する | 既存のフォームの複製フォームアクションを使用する |
よくある質問
テンプレートを使用すると、既存のフォームが上書きされますか?
いいえ。各テンプレートはまったく新しいフォームを作成します。既存のフォームは変更されません。
独自のテンプレートを作成できますか?
カスタムテンプレートは、現在のリリースでは管理UIからユーザーが作成することはできません。複数のフォーム間で構造を再利用するには、既存のフォームを複製してください。WP Simple Pay > 支払いフォームに移動し、フォームにカーソルを合わせて複製をクリックします。
希望するテンプレートがアップグレードを必要とするのはなぜですか?
一部のテンプレートは、Pro限定の機能(サブスクリプション、カスタムフィールド、税金、手数料回収、高度な支払い方法)を使用しています。プラグインは、フォームを作成する前に必要なライセンスティアを通知します。
テンプレートを削除できますか?
組み込みテンプレートは削除できません。これらはプラグインのデータファイルの一部であり、すべてのユーザーのデフォルトとして機能します。データベースのスペースを消費せず、使用時にのみJSONファイルからロードされます。
テンプレートはStripeの製品と価格を設定しますか?
テンプレートには推奨価格が含まれていますが、公開する前に実際の提供内容に合わせて必ず確認および更新してください。テンプレート内の金額はプレースホルダーです。
新しいテンプレートは時間とともに追加されますか?
はい。新しいテンプレートは、ほとんどの主要なWP Simple Payのリリースに含まれています。最近追加されたテンプレートは、メニューとテンプレートグリッドで新規!バッジが付いています。
次にやること
- 最初の支払いフォームの作成方法 – セットアップウィザードを使用したウォークスルー
- フォームスタイルを使用した支払いフォームのスタイル設定方法 – クローン後の外観をカスタマイズ
- カスタムフィールドタイプの参照 – 各フィールドタイプの機能を確認する
まだ質問がありますか?私たちが喜んでお手伝いします!
最終更新日: